

DIY nib grinding can ruin a fountain pen nib in seconds. If I were new to it, I’d treat it as a high-risk job: start with a cheap steel nib, use a 10x loupe, make only 2–3 light passes at a time, test after each round, and stop the moment the line gets broader, the nib still catches, or the tipping looks thin.
Here’s the short version:
- Grinding is not the same as smoothing. Smoothing removes tiny rough spots. Grinding changes the nib shape for good.
- The biggest risk is tipping loss. Once that hard metal is gone, the nib may wear fast and write poorly.
- Cheap practice nibs matter. Some replacement steel nibs cost under $1, which makes early mistakes less painful.
- Simple shapes are safer. Round nibs come first. A basic stub is the next step. Italics and architects are much less forgiving.
- Short test cycles cut risk. I’d grind a little, clean the slit, ink-test, inspect, and only then decide on another pass.
- Some signs mean stop at once. If the line gets broader, side strokes keep catching, or tipping is hard to see under magnification, I’d stop.
A fast side-by-side view:
| Task | What it does | Risk |
|---|---|---|
| Smoothing | Polishes rough spots | Low |
| Grinding | Changes shape and line | High |
If I had to sum up the whole article in one line, it would be this: practice on low-cost nibs, remove as little material as possible, and quit early rather than push for a “perfect” result.
Start Safely: Practice Order, Tools, and Low-Cost Pens
The Right Order for a First Nib Project
Before you grind anything, inspect the nib under a 10x loupe. Check tine alignment, slit straightness, and tipping symmetry. That first inspection can save you from a bad start. If something is already off, grinding won't fix it.
Start with light smoothing before you try any reshaping. Get the nib writing cleanly first. Then, if basic smoothing goes well, move to a very small shape change, like a slight stub. That's a safer first step because you're making a small adjustment instead of jumping into a more demanding grind.
Skip angle-sensitive grinds at the start. They're less forgiving, and early mistakes tend to show up fast on the page.
Basic Tools That Cut Down on Avoidable Mistakes
You don't need a big setup. A few simple tools do most of the work:
| Tool | Purpose |
|---|---|
| 10x loupe | Inspect tine alignment, tipping shape, and slit symmetry before and after each pass |
| 12,000-grit micro-mesh | Light smoothing |
| 0.001-inch brass shim | Clear debris from the slit |
| Clean water | Rinse the nib and dampen the micro-mesh surface as needed |
| Your usual paper and ink | Test progress on what you actually use |
| Flat, stable work surface | Keeps the pen from rolling and reduces slip damage |
Avoid coarse abrasives and sandpaper at first. They remove tipping material fast and can leave flat spots or uneven edges. That's the kind of damage that's easy to cause and hard to undo. A 10x loupe helps you catch small problems early, before they turn into big ones.
With the tools sorted out, the next step is picking a pen you can afford to mess up.
Low-Cost Pens and Nibs to Practice On First
Do not practice on a pen you care about. Vintage pens, gold nibs, sentimental pieces, and limited-edition models are bad first-project choices.
For beginners, inexpensive steel-nib pens are usually the best place to start. In many cases, spare nibs cost under $1 each. That changes the whole math. A mistake still stings, but it doesn't ruin your week.
Pens with swappable nib units are also a smart pick. If you damage a nib, you can replace it without sacrificing the whole pen.
Fountain Pen Revolution offers beginner-friendly pens and replacement nibs. It's smart to keep a few spare nibs on hand before you begin. Spare nibs make mistakes a lot less expensive.
With your tools ready and your practice pens lined up, the next move is choosing the simplest nib shape.
sbb-itb-1dd4fe9
HOW TO: Fountain Pen Nib Tune & DIY Nib Grind
Pick a Beginner-Friendly Nib Shape Before Removing Any Material
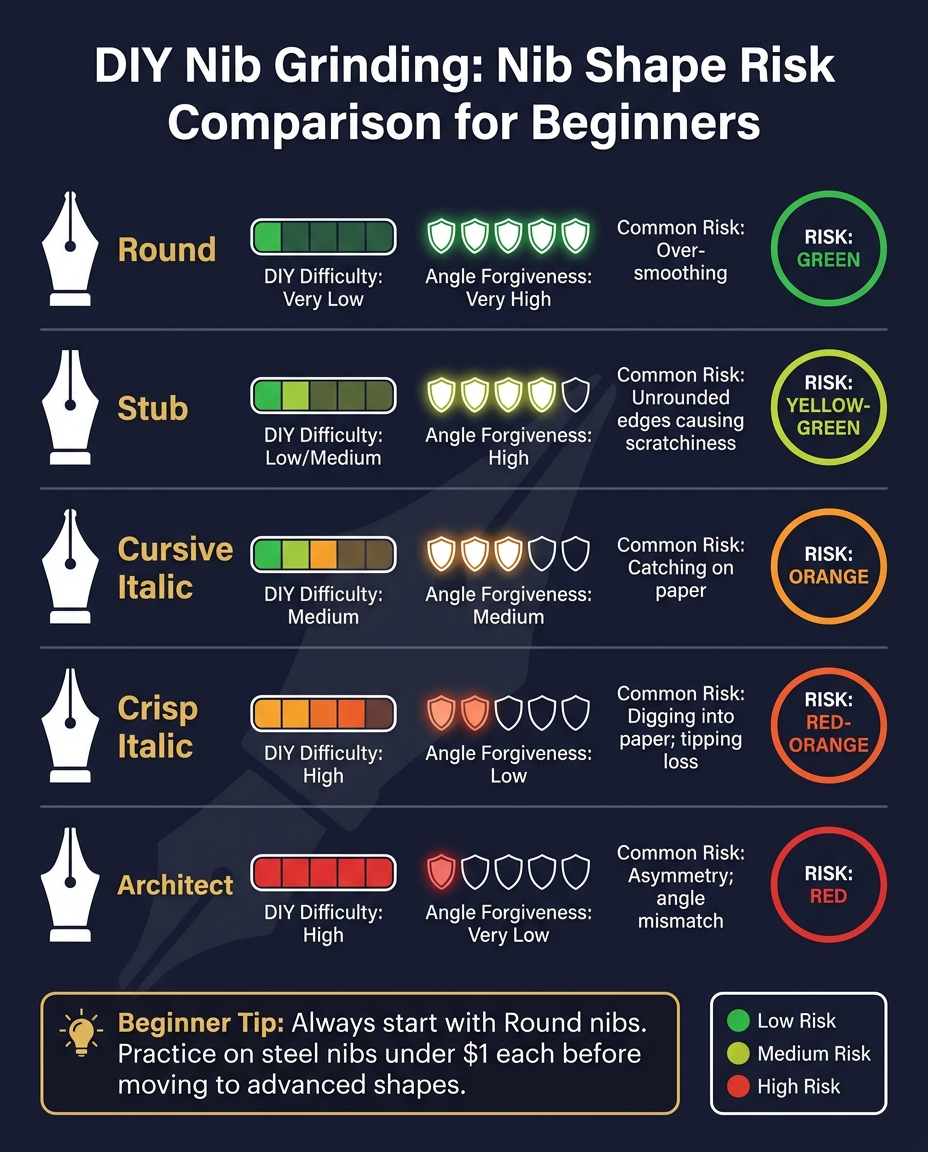
DIY Nib Grinding: Nib Shape Risk Comparison for Beginners
Why Round Nibs and Simple Stubs Are the Safest Starting Points
Start with the simplest nib shape you can. Simpler geometry gives you less room to mess things up, which makes shape choice your first line of risk control.
A round nib is the safest place to begin compared to more complex custom shapes. It has a large sweet spot, so small shifts in writing angle usually don't change how it feels on the page.
If you want to try a basic custom grind after that, a stub is the usual next move. Once you've removed tipping from the sides, round those edges and a bit under the tip. If you skip that part, the nib will feel rough. That rounding is what turns a stub from scratchy to usable.
When to Avoid Italics, Architects, and Other Advanced Grinds
Crisp italics and architects need exact edge control and tight discipline with writing angle, so they're not a good starting point for beginners.
These shapes ask you to already know how to smooth and test a nib without adding scratchiness or causing flow issues. Until that feels routine, advanced grinds bring more risk than payoff.
Nib Shape Comparison: Difficulty, Angle Sensitivity, and Risk
Shape choice is your first risk control. The table below shows how each shape compares for difficulty, angle tolerance, and the mistakes people run into most often.
| Nib Shape | DIY Difficulty | Forgiving of Writing Angle | Common Failure Risks |
|---|---|---|---|
| Round | Very Low | Very High | Over-smoothing |
| Stub | Low/Medium | High | Unrounded edges causing scratchiness |
| Cursive Italic | Medium | Medium | Catching on paper |
| Crisp Italic | High | Low | Digging into paper; tipping loss |
| Architect | High | Very Low | Asymmetry; angle mismatch |
Choose the simplest shape first. Then keep each grinding pass short so you can stop before you remove too much tipping.
Limit Material Loss with Short Test Cycles and Ink Checks
Use a Grind-Test-Repeat Cycle Instead of Long Sessions
Once you’ve picked a simple nib shape, keep each pass short. That lowers the odds of taking off too much material.
A good rhythm is 2–3 light strokes, then test. As you get close to the line width you want, check after every 1–2 passes. Let the pen’s own weight do the work. No pressure. Then look at the nib with a loupe so you can see how much tipping is still there.
For test strokes, use side strokes and vertical strokes to spot catches or uneven contact. If the nib catches in only one direction, that usually means the edge needs a bit of rounding before you remove more material.
With fine and extra-fine nib sizes, the margin for error is tiny. A few extra passes can strip away all usable tipping.
Check Ink Flow and Flush the Slit After Each Adjustment
Grinding leaves behind metal dust and tiny shavings. Those can settle into the nib slit and lead to skipping or a dry, uneven line. After each short grinding round, wipe the tip clean and floss the slit with a brass shim. Then dip the nib and feed into a test vial and write a few test lines.
Don’t decide on another pass until the nib is clean and the ink flow is back to normal. That clean test matters. It shows whether the issue comes from the grind itself or from debris stuck in the slit.
Symptom Tracking Table: Causes and What to Do Next
Use the table below to match the symptom to the next move.
| Symptom | Likely Cause | What to Do Next |
|---|---|---|
| New scratchiness or catching | Sharp edges from removing tipping material on the sides | Round the sides and the writing surface underneath with 2–3 light strokes |
| Skipping or dry flow | Metal debris trapped in the nib slit | Flush the slit, flush the nib, and retest with clean ink before grinding more |
| Line width getting broader | Over-rounding the writing surface underneath | Stop immediately - further grinding will only widen the line |
| Scratchiness after smoothing | Misaligned tines or unrounded corners | Check alignment and round the edges before grinding more |
| No tipping material left | Excessive grinding without frequent loupe checks | Stop immediately - the nib needs professional retipping |
If the line gets wider or the tipping is gone, stop right there. Those are hard-stop signs.
Stop Points That Prevent Permanent Nib Damage
Hard-Stop Warning Signs for Beginners
Use the symptom check above as your stop list. For beginners, stopping at the right time matters more than trying to perfect your technique. Some signs mean “pause and check.” Others mean the nib is done.
Stop right away if any of these show up:
- Line width is getting broader.
- Tipping is barely visible under 10x magnification.
- Side-stroke catching remains after smoothing.
The margin for error can be tiny. On extra-fine nibs, just a couple of passes on the stone can take you from a usable point to no tipping at all.
When to Leave a Pen Alone or Hand It to a Professional
If the warning sign is still there after one adjustment, stop instead of taking off more tipping. If tipping already looks minimal, stop there too. Over-rounding can leave too little tipping for the pen to write well, and if the line gets broader while you’re rounding, you’ve already gone past the sweet spot.
There’s also the cost side of this. DIY grinding voids manufacturer warranties, so antique, high-value, or sentimental pens are better left alone and sent to a professional nibmeister.
If the pen already has flow issues before you begin, deal with flow and basic smoothing first rather than removing more material.
Conclusion: The Safest Way for Beginners to Approach Nib Grinding
The safest path is simple: start with inexpensive practice nibs, check your work often, test ink flow after each adjustment, and stop as soon as the nib writes well enough.
If the nib widens, loses tipping, or still catches after one adjustment, stop and leave it alone. Past that point, the damage is permanent.
FAQs
How do I know if a nib needs smoothing instead of grinding?
Use a 10x to 20x loupe under bright light. If the tines look level and come together evenly at the tip, the problem is probably surface roughness, not misalignment.
If the nib feels scratchy only in certain directions, that usually means the tines are misaligned. If it feels scratchy in all directions and the tines are aligned, the next step is smoothing with 12,000-grit micro-mesh.
What should I practice on before touching a better pen?
Always practice on low-cost pens first. Nib grinding is a permanent change, and one slip can ruin a pen or void its warranty.
A smart place to start is with affordable pens and replacement nibs from Fountain Pen Revolution. Models like the FPR Jaipur V1 or Jinhao C100 give you room to build confidence and control before you touch a more expensive pen.
When should I stop and send the nib to a professional?
If you feel hesitant, stop. That’s often a sign the work may be beyond your skill level. And for rare, high-value, or collectible pens, it’s best to leave the job to a professional. One small mistake can cause damage you can’t undo.
Get expert help if the nib has cracked or bent tines, missing tipping material, or flow problems that won’t go away. And once you’ve achieved your goal, stop right away. Overworking the nib is one of the most common ways people damage it.