
Diluting fountain pen ink is a simple way to create lighter shades, improve ink flow, and reduce clogging. It involves mixing ink with distilled water or a specialized dilution solution. Here's what you need to know:
- Why Dilute Ink? Lighten colors, enhance shading, speed up drying, and extend ink life.
- What to Use: Always use distilled water or a commercial dilution solution to avoid contamination or mold.
- How to Start: Mix ink and water in a separate container using precise ratios. Begin with a 10:1 ink-to-water ratio and adjust as needed.
- Best Practices: Test diluted ink on paper before use, avoid diluting in the original bottle, and store mixtures in clean, labeled containers.
Dilution is safe for most water-based inks but avoid over-thinning or using unsuitable inks like iron gall or printer ink. Experiment in small batches to find your perfect mix.
Materials and Preparation
Tools You Will Need
Having the right tools makes the process smoother and ensures consistent results. The most essential item is distilled water, but you’ll also need additional supplies to measure and mix with precision.
A blunt-tip syringe or dropper with milliliter markings is ideal for controlling ratios accurately - guessing measurements can lead to uneven results. For mixing, small glass vials or "dinky dips" are excellent choices. They’re easy to seal, simple to clean, and perfectly sized for test batches. A metal cocktail stick or toothpick works well for stirring without reacting with the ink.
Here’s a quick checklist of what to have on hand:
| Category | Recommended Items |
|---|---|
| Measuring & Transfer | Blunt syringe, pipette, or mini dropper with mL markings |
| Mixing Containers | Ink sample vials, dinky dips, small glass jars |
| Stirring Tools | Metal cocktail stick, toothpick |
| Testing & Cleanup | Dip pen, cotton swabs, lint-free cloth |
You might also consider using a commercial dilution solution as an alternative - or supplement - to distilled water. Products like Birmingham Pen Co.'s Dilution Solution or De Atramentis Dilution Liquid are specifically designed to maintain the physical properties of fountain pen ink. These solutions help preserve the ink’s original pH balance, lubrication, and flow, which plain water can sometimes alter.
Once your tools are ready, the next step is selecting an ink that responds well to dilution.
Picking the Right Ink to Dilute
After setting up your materials, focus on choosing an ink that will produce the best results when diluted. The right ink can make all the difference, especially if you’re aiming for lighter, more refined hues. Additionally, thicker or more viscous inks tend to benefit from dilution, as thinning them improves flow and capillary action.
Pigment-based inks, like the De Atramentis Document line, are excellent candidates for dilution when used with a compatible dilution solution. For example, in March 2026, Thien-Kim Lam from The Well-Appointed Desk experimented with De Atramentis Document Violet and their Dilution Solution to create a custom lilac shade she named "Frosty Violet." She used the blend in a Mythic Pen with a Kanwrite flex nib and ebonite feed for three months without any clogging issues.
However, not all inks are suitable for dilution. Avoid diluting inks that are already thin, such as iron gall or walnut inks - they rarely need thinning. Similarly, low-quality inks with high water content don’t dilute well, and printer ink should never be used in a fountain pen as it’s pigment-based and will clog the feed. When in doubt, start with a well-known, saturated ink and experiment from there.
sbb-itb-1dd4fe9
Demonstration of Van Dieman’s Fountain Pen Ink Diluter and Rehydrator - Full Length
This diluter works effectively with concentrated colors like Diamine Blue-Black fountain pen ink to achieve softer, more nuanced tones.
Step-by-Step Guide to Diluting Ink
How to Dilute Fountain Pen Ink: Ratios, Steps & Troubleshooting
Starting with the Right Ratio
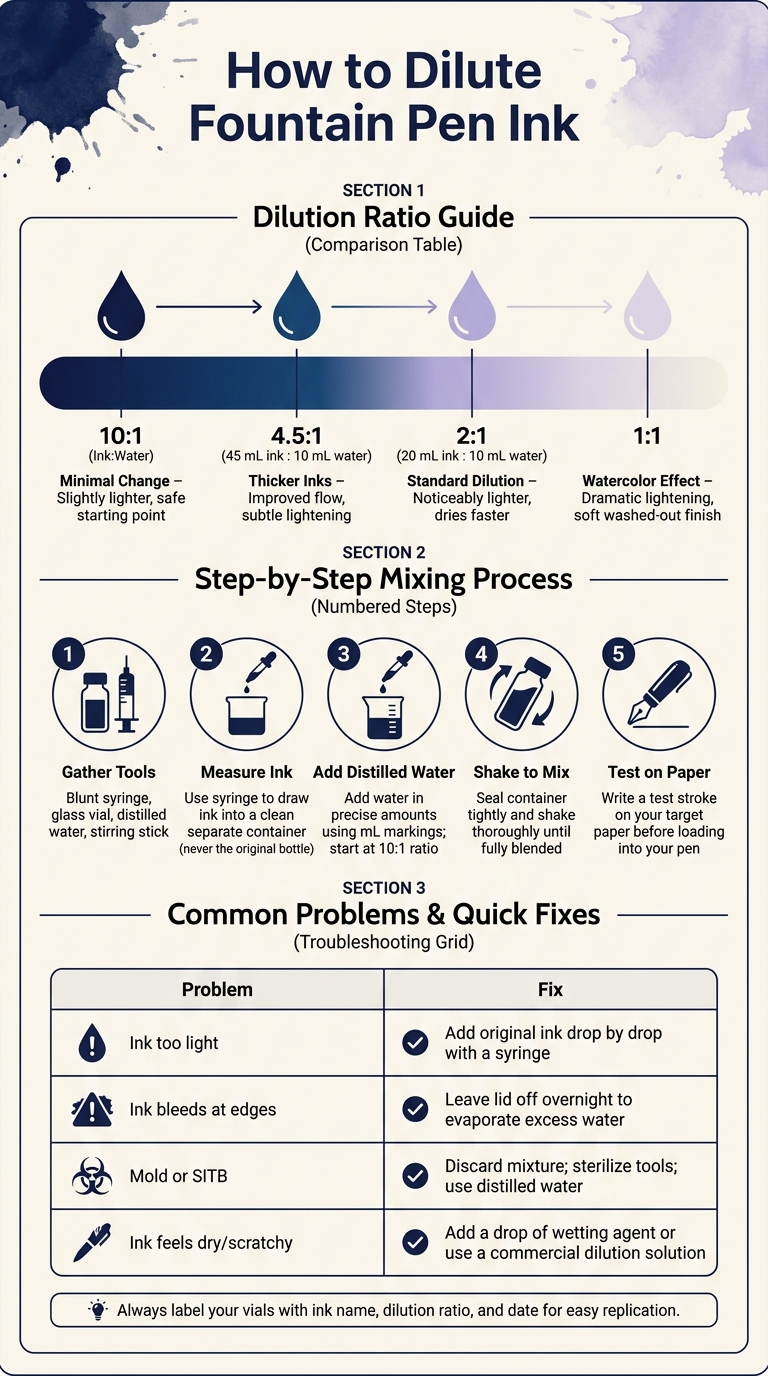
When diluting ink, it's best to begin cautiously. A 10:1 ratio (10 parts ink to 1 part water) is a good starting point. This method allows for gradual adjustments without over-thinning. From there, you can tweak the ratio depending on your needs. If you're working with thicker inks, a 4.5:1 mix (45 mL ink to 10 mL water) can help improve flow. For a lighter shade that still maintains good performance, many prefer a 2:1 ratio (20 mL ink to 10 mL water).
Here's a quick guide to common dilution goals:
| Dilution Goal | Ratio (Ink:Water) | What to Expect |
|---|---|---|
| Minimal change | 10:1 | Slightly lighter; a safe starting point |
| For thicker inks | 4.5:1 (45 mL ink to 10 mL water) | Improved flow with a subtle lightening |
| Standard dilution | 2:1 (20 mL ink to 10 mL water) | Noticeably lighter shade; dries faster |
| Watercolor effect | 1:1 | Dramatic lightening; creates a soft, washed-out finish |
How to Mix Ink and Water
Always mix your ink in a clean, separate container. Avoid pouring water directly into the original ink bottle - it’s better to use a small vial or mixing cup for testing. Use a blunt syringe or dropper to measure the ink, and then add distilled water in precise amounts.
Seal the container tightly and shake it thoroughly. As Danny Watts advises:
"The water must mix completely with the ink so shake don't stir the mix."
If you notice the mixture separating after shaking, it could mean the water contains impurities. In such cases, discard the batch and start over using distilled water to ensure consistency.
Testing Your Diluted Ink
Before using the diluted ink in your fountain pen, test it on the same type of paper you plan to use. Paper quality can greatly influence how the ink looks.
As Kakimori explains:
"Testing the ink using a similar line width to the pen you plan to use will give you the best indication of the final colour."
Fixing Common Problems
Getting the right ink consistency often comes down to fixing over-dilution and avoiding contamination. Here's how to tackle these common issues.
What to Do If You Over-Dilute
Over-diluted ink often appears faded, with colors looking washed out and strokes bleeding at the edges. To fix this, carefully add the original ink back into the mixture. Use a blunt syringe or pipette to add it drop by drop, testing on paper after each addition to avoid over-correcting.
For minor over-dilution, you can also let the ink sit uncovered overnight to allow excess water to evaporate. Calligrapher and illustrator Lindsey Bugbee shares this tip:
"If you get too much water in there, no big deal! Just let the ink sit with the lid off overnight. That way, some of the water can evaporate out."
However, if the ink is significantly diluted, adding the original ink drop by drop offers better control.
Keeping your ink mixture clean is just as important as getting the dilution right.
Keeping Your Ink Mixture Clean
To ensure your ink performs consistently, it's crucial to keep it free of contaminants. Using distilled water is a simple way to prevent issues like mineral buildup or mold, which fountain pen users often call "SITB" (Stuff In The Bottle). Sterilizing your tools - such as bottles and lids - by boiling them and letting them air-dry can also help reduce contamination risks.
For storage, amber glass dropper bottles are ideal since they protect the ink from light exposure, which can degrade its quality. Don't forget to label each bottle with the ink name, dilution ratio, and date. This makes it easier to replicate a mixture or identify older batches that might need to be discarded.
One thing to note: plain distilled water can slightly change an ink's pH and surface tension, which may result in a dry or scratchy writing experience. If this happens, try adding a tiny drop of a wetting agent or use a commercial diluting solution like the Birmingham Pen Co. Dilution Solution ($25.00 for 110 mL), designed to maintain the ink's original flow and viscosity.
| Problem | Immediate Solution | Prevention |
|---|---|---|
| Ink is too light | Add original ink drop by drop | Start with a 2:1 ink-to-water ratio |
| Ink bleeds at edges | Leave lid off overnight to evaporate | Use a commercial diluting solution |
| Mold or SITB | Discard mixture; sterilize tools | Use distilled water and boiled containers |
| Ink feels dry/scratchy | Add a drop of wetting agent | Avoid over-diluting with plain water |
Conclusion: Getting the Most Out of Ink Dilution
Diluting fountain pen ink opens up a world of possibilities, letting you tweak colors to create softer, more versatile shades. Since fountain pen inks are water-based, dilution is completely safe. This guide has covered the basics - ratios, mixing methods, and troubleshooting tips - to help you refine your writing experience.
A key takeaway? Always mix in small batches and avoid diluting ink directly in its original bottle. If plain water alters the ink’s performance, making it feel dry or scratchy, consider using a commercial dilution solution like De Atramentis Dilution Liquid ($21.50 for 250 mL). It can lighten the color while maintaining the ink’s flow and smoothness.
Dilution doesn’t just change the color; it can also improve how ink behaves on different paper types, reduce bleed-through, and enhance shading - showcasing subtle tonal variations in a single stroke. As Moritz Pratt of ArtofScribing.com wisely notes:
"The only way to find which solution works best is to experiment a little and find the perfect ink for you and your fountain pens!"
To keep your experiments organized, label your vials with the ink name, dilution ratio, and date. Documenting your process ensures that your favorite blends are easy to recreate. If you need a fresh bottle to start your custom blends, browse our selection of FPR fountain pen ink. Happy experimenting!
FAQs
Will diluting ink damage my fountain pen?
Diluting fountain pen ink with distilled water can be a handy way to improve ink flow and reduce clogging - if done properly. Because fountain pen ink is water-soluble, adding a small amount of distilled water won't harm it. However, it's best to mix the ink and water in a separate vial to avoid accidentally altering the entire bottle.
Be especially careful with permanent or pigment-based inks, as they may react differently, leading to sediment or other issues. To play it safe, test any diluted ink in an affordable pen, such as those from Fountain Pen Revolution, before using it in your favorite writing tools.
How long can I store diluted ink safely?
When mixing ink, it's a good idea to prepare small, measured batches instead of diluting an entire bottle. After mixing, let the ink sit for about 24 hours. This waiting period helps you spot potential issues like cloudiness or particles.
Although diluted ink doesn't have a specific expiration date, it's wise to test it first with a dip pen or glass pen before using it in a fountain pen. If you notice any separation or changes in the ink's consistency over time, it's best to discard the mixture.
Can I dilute shimmer, pigment, or iron gall inks?
You can thin out shimmer and pigment inks, but proceed with caution. Diluting these inks lowers the concentration of particles, which might impact their performance, waterproof qualities, or the intensity of their shimmer. If you decide to dilute, work with small amounts, stir the mixture well, and always use distilled water to avoid contamination. On the other hand, iron gall inks are generally thinner and usually don’t need dilution. Before making changes to larger quantities, always test your adjustments in a separate container.