
Calligraphy can be frustrating when ink issues disrupt your work. The good news? Most problems have simple fixes. Here's a quick rundown of the most common ink challenges and how to resolve them:
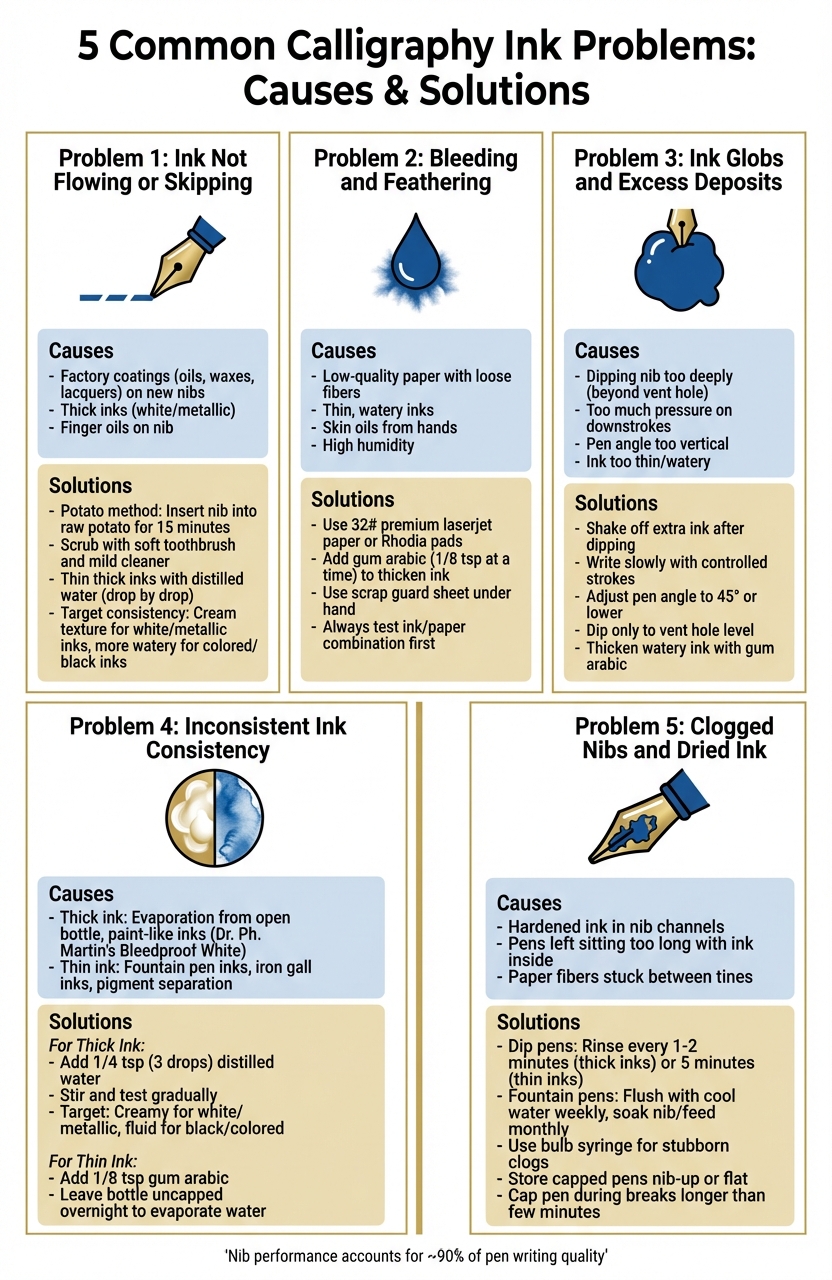
- Ink Not Flowing or Skipping: Caused by factory coatings on nibs or thick inks. Fix it by cleaning the nib (e.g., using the potato method) or thinning ink with distilled water.
- Bleeding and Feathering: Happens when ink spreads or soaks through paper. Use high-quality paper, thicken ink with gum arabic, or protect your paper from skin oils.
- Ink Globs and Excess Deposits: Often due to over-dipping the nib or applying too much pressure. Shake off extra ink, write slowly, and adjust your pen angle.
- Inconsistent Ink Consistency: Thick ink skips, while thin ink bleeds. Thin ink with distilled water or thicken it with gum arabic.
- Clogged Nibs and Dried Ink: Dried ink blocks flow. Clean nibs regularly with water or a soft brush, and store pens properly.
5 Common Calligraphy Ink Problems: Causes and Solutions Guide
Top 5 Solutions to Common Calligraphy Ink Problems
Problem 1: Ink Not Flowing or Skipping on Upstrokes
When ink skips or creates uneven "railroad tracks", it throws off the rhythm of your calligraphy. Let’s dig into why this happens and how you can fix it right away.
What Causes Ink Flow Issues
Many new nibs come coated with oils, waxes, or lacquers to prevent rust. While this protective layer is helpful for storage, it creates a hydrophobic surface that causes ink to bead up instead of flowing smoothly.
"Whenever you buy a new calligraphy nib, you can bet that its manufacturer has applied oils or waxes to it... Unfortunately, oil doesn't mix well with other liquids (i.e. ink), which can cause your ink to bead up on your nib."
- Lindsey Bugbee, Founder, The Postman's Knock
Thicker inks, like white or metallic ones, tend to stick to the nib rather than flow freely. Add to that finger oils, which repel water-based inks, and you’ve got a recipe for uneven strokes.
How to Fix Ink Flow Problems
To remove the factory coating, try the potato method: stick the nib’s tip into a raw potato for about 15 minutes, then wipe it clean. Another option is to scrub the nib gently with a soft toothbrush and a mild cleaner.
For thick inks, adjust the consistency by adding distilled water one drop at a time. Stir gently until the ink reaches the right texture.
"You should stir white and metallic inks to the consistency of cream. Go a bit thinner with colored inks and black inks - you want them to be more watery."
- Lindsey Bugbee, Founder, The Postman's Knock
Still having trouble? Use the "dot method" by wiggling the nib to break the surface tension. For particularly thick inks like Bleedproof White, rinse the nib in water every 1–2 minutes to keep it clean and flowing smoothly.
Problem 2: Ink Bleeding and Feathering on Paper
Nothing ruins crisp calligraphy lines faster than ink spreading where it shouldn’t. Those fuzzy edges or ink soaking through the page? That’s bleeding and feathering - two common frustrations for calligraphy enthusiasts. Let’s break down what’s happening and how to fix it.
What Bleeding and Feathering Are
Feathering happens when ink spreads outward along the paper fibers, creating a blurry, spiderweb-like effect. Bleeding, on the other hand, is when ink fully soaks through the paper.
The culprit? Often, it’s the paper and ink combination. Low-quality paper with loose fibers pulls ink through capillary action, while thin, watery inks seep into the fibers too quickly.
"The problem is nearly always the paper and ink combination. If the ink is thin and the paper tends to absorb liquid quickly, then you'll get bleed!"
- Lindsey Bugbee, Founder, The Postman's Knock
Even external factors like skin oils from your hands or high humidity can make matters worse by increasing ink absorption and encouraging feathering.
Tips to Prevent Bleeding and Feathering
- Choose Better Paper: Opt for tightly bound paper, such as 32# premium laserjet paper or Rhodia pads. These are far less absorbent than standard 20# printer paper.
- Thicken Thin Inks: If your ink is too watery, mix in a small amount of gum arabic - about 1/8 teaspoon at a time. This thickens the ink, helping it sit on the paper surface rather than sinking in.
"When you add gum arabic to an ink... the ink thickens up. Instead of soaking into the paper fibers, it sits on top of the paper."
- Lindsey Bugbee, Founder, The Postman's Knock
- Protect Your Paper: Use a scrap guard sheet under your hand to prevent skin oils from transferring to your work.
- Test First: Always test your ink and paper combination on a scrap piece before diving into your final project.
Problem 3: Ink Globs and Excess Ink Deposits
Ink globs can be a frustrating issue for calligraphers, often ruining an otherwise perfect piece. Understanding why they happen is the first step to preventing them.
What Causes Ink Globs
One of the main reasons for ink globs is taking up too much ink when dipping your nib. If you dip too deeply - beyond the vent hole or into the flange - the nib holds more ink than it can handle. This results in an uncontrollable rush of ink onto the paper instead of the smooth flow you're aiming for.
Another common cause is applying too much pressure during downstrokes. When you press too hard or too quickly, the nib tines splay apart, releasing all the ink at once.
"If you apply pressure to the nib very quickly and try to make a fast downstroke, the tines of the nib tend to splay apart and deposit everything they have onto the paper."
- The Postman's Knock
The angle at which you hold your pen also plays a role. A pen held too vertically encourages ink to flow too freely. Additionally, ink that’s too thin or watery lacks the thickness to stay on the nib, leading to unwanted ink dumps on the page.
With these causes in mind, making a few simple changes can help you avoid excess ink deposits.
How to Avoid Excess Ink
Start by shaking off extra ink after dipping your nib. You can either shake the nib gently over your cleaning water or tap it against the rim of the ink bottle. Then, test the nib on scrap paper to release any heavy ink buildup before starting your work.
Slow and steady wins the race. A more controlled writing pace helps prevent inconsistent pressure and keeps the nib tines from splaying too wide. Aim for smooth, deliberate strokes instead of rushing through your letters.
Adjust your pen angle to around 45° or lower. This lets the nib glide across the paper instead of digging in, which can help regulate the ink flow. If you're using a new nib, clean off any oily residue from the manufacturing process. You can do this by wiping it with rubbing alcohol, scrubbing gently with non-abrasive toothpaste, or even sticking the nib into a raw potato for 15 minutes - a classic calligraphy trick.
For ink that’s too watery, try adding a small amount of gum arabic to thicken it. Alternatively, leave the ink bottle open overnight to allow some of the water to evaporate. Finally, when dipping your nib, aim to coat just the vent hole and avoid overloading it with ink.
These simple adjustments can make a big difference in keeping your calligraphy clean and precise.
sbb-itb-1dd4fe9
Problem 4: Inconsistent Ink Consistency
Even after addressing flow issues and excess ink, managing ink consistency remains a significant hurdle in achieving clean, sharp strokes.
The consistency of your ink plays a huge role in creating smooth, controlled lines. If the ink is too thick, it tends to cling stubbornly to the nib, leading to skips and gaps - particularly noticeable on delicate upstrokes. On the flip side, ink that’s too thin flows too freely, often bleeding into the paper and requiring constant re-dipping after every few letters.
Several factors can disrupt ink consistency. Leaving the ink bottle open for extended periods allows water to evaporate, turning the ink into a thick, sticky mess. Some inks, such as Dr. Ph. Martin's Bleedproof White, are intentionally thick, as they’re designed more like paints. Meanwhile, fountain pen inks and iron gall inks are naturally thinner and can separate over time, with pigments settling at the bottom, which creates uneven consistency.
"Ink that is too thin runs out after every letter, while ink that is too thick may not flow at all."
- Kristin, Author, JetPens
The good news? Adjusting ink consistency is a straightforward process. Whether you need to thin down thick ink or give watery ink more body, a few simple techniques can help you achieve smooth, consistent strokes.
How to Thin Thick Ink
To thin out overly thick ink, start by transferring a small amount into a separate container. Always use distilled water instead of tap water to avoid mold growth and maintain the ink’s quality.
Add about 1/4 teaspoon (roughly three drops) of distilled water, stir thoroughly with a toothpick, and test the ink on scrap paper. Adjust gradually until you reach the desired consistency. For white and metallic inks, aim for a creamy texture, while black and colored inks should feel slightly more fluid.
"If you dilute your thick inks with water, the ink flow will often improve. You'll notice that the ink will go from nib to paper without much of a fuss, making your writing more enjoyable and consistent!"
- Lindsey Bugbee, Founder, The Postman’s Knock
Be cautious not to over-dilute. If the ink becomes too runny, leaving the container uncapped overnight can help restore some thickness.
How to Thicken Thin Ink
If your ink is too watery, gum arabic is your go-to solution. This thickening agent helps the ink sit on the surface of the paper rather than soaking in immediately. Gum arabic is available in both liquid and powder forms at most art supply stores.
Start by adding a small amount - about 1/8 teaspoon - of gum arabic to the ink. Stir thoroughly and test on your chosen paper. Since different types of paper absorb ink at varying rates, adjust incrementally until the ink flows smoothly without bleeding.
"Gum arabic is a thickener, so eventually your ink will become too thick to bleed - but not so thick that you can't write with it!"
- Lindsey Bugbee, Founder, The Postman’s Knock
For ink that’s only slightly too thin, you can skip the gum arabic altogether. Simply leave the bottle uncapped overnight to allow excess water to evaporate naturally, resulting in a thicker consistency.
Problem 5: Clogged Nibs and Dried Ink Buildup
When dried ink builds up in your pen, it can bring your calligraphy to a screeching halt by blocking fresh ink from reaching the paper. Hardened ink in the nib's channels is a common culprit behind this issue. Both dip pens and fountain pens are prone to clogging, but fountain pens demand extra attention because of their intricate internal feed systems.
Since the nib plays a significant role - about 90% - in determining how a pen performs, any blockage can severely impact your writing experience.
How to Spot Clogged Nibs
A clogged nib often leads to hard starts, where you need several strokes before the ink begins to flow, or it may stop the ink flow entirely. Another telltale sign is inconsistent flow, where your lines look patchy or fade during longer writing sessions.
If your pen feels rough or scratchy while writing, it could mean dried ink or even paper fibers are stuck between the tines.
"A dry or clogged fountain pen is every writing enthusiast's worst nightmare. This often happens when pens are left to sit for too long with ink inside."
Once you recognize these signs, it’s time to clean and maintain your pen to restore smooth ink flow.
Cleaning and Maintenance Methods
For dip pens, rinse the nib in room-temperature water every 1–2 minutes if you're using thick inks, or every 5 minutes for thinner, watery inks. After rinsing, wipe the nib with a lint-free cloth and ensure it's completely dry before storing.
Fountain pens require more detailed care. Flush the nib with cool water weekly, and for a deeper clean, soak the disassembled nib and feed overnight once a month. For stubborn clogs, try using a bulb syringe to push water through the feed channels, or gently scrub away dried ink with a soft toothbrush.
"Cleaning them out resolves most problems people have with fountain pens, like skipping, writing dry or being hard-starting."
- Shawn Buckles, Pentuner
To prevent future clogs, store your capped fountain pen either with the nib facing up or lying flat to avoid ink pooling in the feed. Always cap your pen if you're taking a break for more than a few minutes to keep the nib from drying out.
Conclusion
The most common ink challenges often come down to three key factors: ink consistency, nib preparation, and paper quality. By understanding how these elements interact, you can tackle issues more effectively and save yourself a lot of frustration.
Every calligrapher’s journey is unique, and finding what works best for you takes time. As Charlotte Andrews from Mirabelle Makery wisely notes:
"As there are a whole host of moving parts to getting your calligraphy to look and feel just right... you'll need to hold on in there."
To recap, focus on the basics: properly prepping your nibs, fine-tuning your ink’s consistency, and adjusting your writing angle. Small adjustments, like adding a few drops of distilled water to thick ink or cleaning your nib regularly, can lead to noticeable improvements in your lettering.
Beyond these basics, external factors like humidity and temperature also play a role in how your ink behaves. Even familiar tools might require slight tweaks depending on your environment. With time, you’ll develop a natural sense for when your ink needs thinning or when it’s time to retire a worn-out nib.
Patience and practice will guide you toward techniques that deliver smooth, polished results every time.
FAQs
How can I stop ink from bleeding on different types of paper?
To keep ink from bleeding, opt for smooth, high-quality paper with low absorbency, like Bristol or marker paper. Combine this with pigment-based ink or ink made specifically for calligraphy. Also, make sure your workspace is dry - high humidity can make the bleeding worse.
If bleeding continues to be an issue, try tweaking the ink by adding a small amount of gum arabic. This increases the ink's thickness, helping it stay on the paper's surface instead of soaking in. Choosing the right combination of paper and ink is essential for achieving sharp, clean results.
How can I quickly clean a clogged calligraphy nib?
To clean a clogged calligraphy nib, begin by carefully taking apart your pen to remove the ink cartridge or converter. This gives you direct access to the nib and feed. Rinse the nib under lukewarm water, or use a bulb syringe to push water through the feed until the water comes out clear. If dried ink is stubborn, soak the nib tip in warm water for a minute or two, then gently swirl it to help loosen the clog. Once clean, pat the nib dry with a lint-free cloth before putting the pen back together. These simple steps usually get the ink flowing smoothly again.
How can I adjust ink consistency for different calligraphy styles?
Adjusting the consistency of your ink is essential for nailing the look of your calligraphy style. If you're working on bold, dramatic scripts like Gothic, slightly thicker ink works best, giving you those rich, opaque strokes that stand out. On the other hand, for intricate styles like Copperplate, thinner, smoother ink is ideal - it flows effortlessly, creating those delicate, refined lines.
To thin your ink, start small. Add about 1/4 teaspoon of distilled water and mix thoroughly. For white or metallic inks, aim for a texture similar to light cream. For colored or black inks, think of a thin watercolor consistency. If you accidentally make the ink too watery, don’t panic - just leave it uncovered overnight to let some of the moisture evaporate and regain thickness.
If your ink feels too thick or has dried out, you can revive it by stirring in a bit of water with a clean tool, like a chopstick. Test the flow on scrap paper as you mix to ensure you're getting the right balance. Take your time - slow, thorough mixing is key to achieving the perfect consistency. And having a dependable range of pens and inks, such as those from Fountain Pen Revolution, makes switching between styles easy and hassle-free.