
Low-saturation inks, known for their muted tones and shading effects, often face flow issues in fountain pens due to their drier nature. These inks lack the lubricants found in standard inks, which can lead to skipping, hard starts, or inconsistent writing. To fix this, you need to fine-tune your pen by addressing nib alignment, feed settings, and ink flow.
Key Steps:
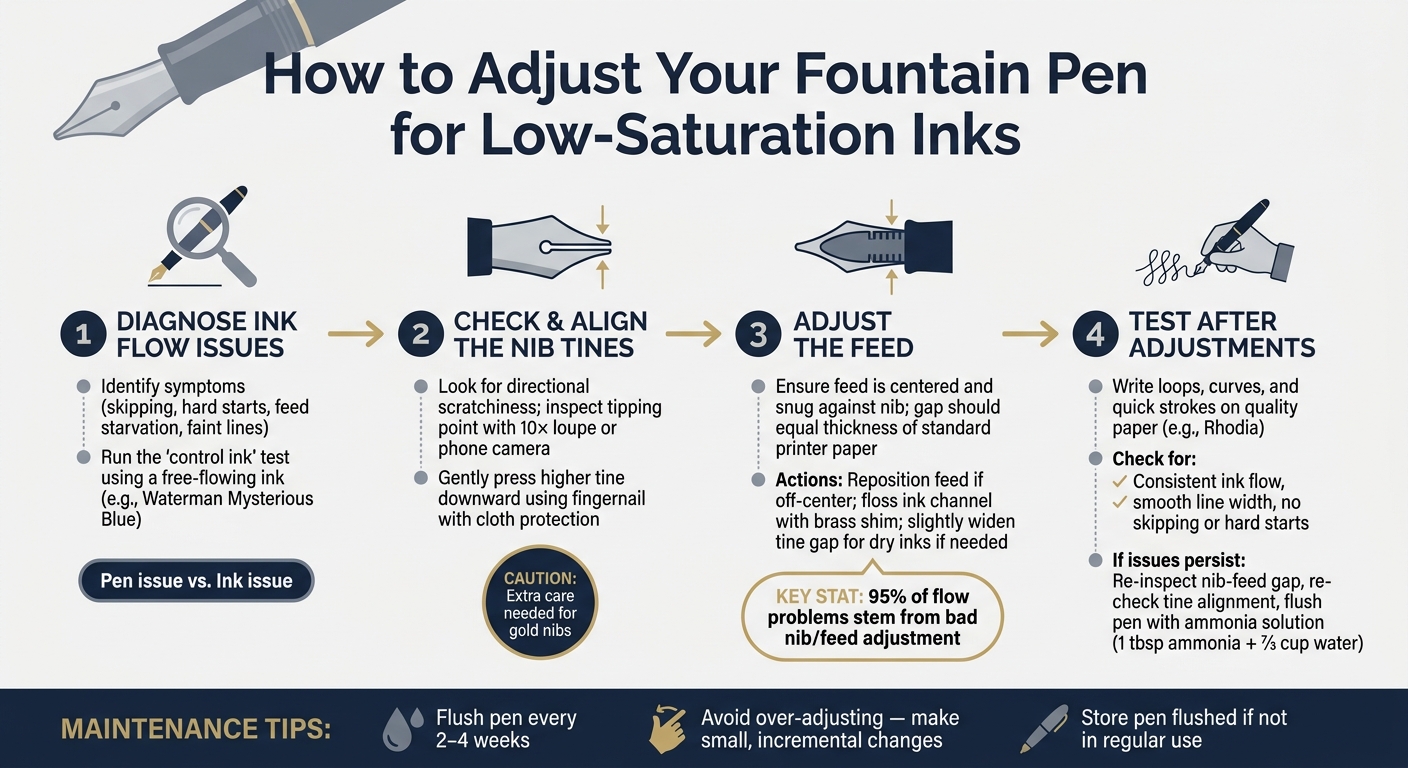
- Diagnose Ink Flow Issues: Identify problems like skipping or hard starts and determine if the issue is with the pen or the ink.
- Check Nib Alignment: Misaligned tines can cause scratchiness and uneven flow. Adjust carefully using a loupe or phone camera.
- Adjust the Feed: Ensure the feed is centered and properly aligned with the nib to maintain consistent ink flow.
- Test After Adjustments: Write on high-quality paper to confirm smooth performance. Use a reference ink to rule out ink-specific issues.
Maintenance Tips:
- Regularly flush your pen every 2–4 weeks to avoid clogs.
- Avoid over-adjusting, as it can damage the nib or feed.
By following these steps, you can ensure your pen performs well with low-saturation inks, delivering smooth, consistent writing without frustration.
How to Adjust a Fountain Pen for Low-Saturation Inks: 4-Step Guide
Five ways of improving wetness of a fountain pen
Step 1: Diagnosing Ink Flow Issues
Before making any adjustments to your fountain pen, it's crucial to figure out what's causing the problem. Jumping straight into fixes without understanding the issue can make things worse - or even create new problems.
Spotting the Signs of Poor Ink Flow
If your pen has ink flow issues, you'll often notice them more with low-saturation inks. These inks tend to highlight problems that wetter inks might hide. One of the most common symptoms is skipping - where the pen writes fine, then suddenly stops for a moment before resuming. This usually indicates an issue with the feed's air-exchange channels. As nib specialist Richard Binder explains:
"If a pen's feed isn't designed just right, the air burps can be insufficient to balance the ink flow - and the pen's feed starves."
Another common sign is hard starts, where the nib touches the paper but no ink flows for a second or two. Then there's feed starvation, where the ink flow gradually thins out or stops altogether during extended writing. Other signs include dry, faint lines or ink pooling in the converter instead of flowing properly into the feed.
If the issue only happens on upstrokes, it’s likely due to tine misalignment. To get a clearer picture, test the pen with horizontal, vertical, and diagonal strokes. Also, be sure to use high-quality paper, like Rhodia, so the paper itself doesn’t interfere with your diagnosis.
Once you’ve identified the symptoms, the next step is figuring out whether the problem lies with the pen or the ink.
Figuring Out If the Problem Is the Pen or the Ink
To pinpoint the source of the issue, try the "control ink" test. Fill the pen with a well-known, free-flowing ink - Waterman Mysterious Blue is a popular choice among pen enthusiasts - and write as you normally would. If the pen works fine with the control ink, the issue is likely due to the properties of your low-saturation ink, not the pen itself.
If the pen still struggles with the control ink, the issue is likely mechanical. In this case, start by flushing the pen thoroughly with cool water. Many "broken pen" complaints are actually caused by dried ink, paper fibers, or other residues. For brand-new pens, flush with a cleaning solution made from 1 tablespoon of ammonia mixed with 2/3 cup of water to remove any manufacturing residues. Only after ensuring the pen is clean should you inspect the nib and feed for further issues.
Step 2: Checking and Adjusting Nib Alignment
Once you've ruled out ink residue and diagnosed flow issues, it's time to focus on the nib alignment. Misaligned tines are one of the most frequent mechanical problems in fountain pens. Low-saturation inks, which provide less lubrication, can make even slight misalignments noticeable. If you discover this issue, you’ll need to carefully adjust the nib.
Checking the Tines for Misalignment
The most obvious indicator of misaligned tines is directional scratchiness. This happens when the pen feels rough moving in one direction but glides smoothly in others. Brian K. from Goulet Pen Company explains:
"If one tine is higher than the other, it will cause the low one to drag on the page. If you are holding your pen and it's scratchy in one direction only, it's likely a misalignment."
To inspect the nib, look straight at the tipping point. A 10× magnification loupe (costing around $29.50) is ideal for this task, but a high-resolution phone camera with zoom can also work in a pinch.
Before adjusting the tines, check the feed alignment. If the feed is off-center, realign it first. Sometimes, correcting the feed placement alone can resolve tine issues.
How to Carefully Align the Tines
If you confirm misalignment, take these steps to realign the nib. Start by covering the nib with a thin, clean cloth to protect it from oils and scratches. Gently press the higher tine downward using your fingernail, applying small, controlled movements. Avoid using hard tools directly on the nib’s tipping material, as they can cause damage. Be extra cautious with gold nibs, as they are softer and more prone to deformation compared to stainless steel.
After each adjustment, test the nib by writing strokes in multiple directions on high-quality paper. Most improvements in ink flow with low-saturation inks come from achieving proper alignment rather than extensive smoothing. Take your time - patience will pay off.
sbb-itb-1dd4fe9
Step 3: Adjusting the Feed for Better Ink Delivery
How the Feed Works and What It Does
The feed, typically made of plastic or hard rubber, sits beneath the nib and guides ink from the reservoir to the tip using capillary action. For inks with lower saturation, maintaining a tight capillary connection is crucial. Even a slight gap can disrupt the flow, leading to skipping or hard starts. Arthur Twydle, also known as The Pen Wizard, emphasizes this point:
"In 95% of cases the problem is bad nib/feed adjustment, and curing the problem is simply a matter of getting this right."
To ensure smooth ink delivery, the feed must fit snugly against the nib, creating an uninterrupted capillary path. This alignment plays a key role in achieving consistent ink flow and sets the foundation for making precise adjustments to improve performance.
Practical Steps to Improve Ink Flow Through the Feed
Understanding how the feed works allows for targeted adjustments to enhance ink flow. Start by checking the feed’s position - it should sit just slightly behind the nib and be properly centered. If the feed leans to one side, it can cause uneven ink flow and a scratchy writing experience. LarryPOST nib tuner Jen offers a helpful reminder:
"Avoid feed leftovers: It's a play on the perils of leftover food, but reminds you to avoid a left leaning feed. It causes the left tine (writer's POV) to sit closer to the page and will catch as the pen is moved left to write."
Straightening the feed often resolves uneven ink flow and scratchiness without requiring additional tools like a loupe.
If repositioning the feed doesn’t fully fix the issue, try flossing the ink channel. Use a thin brass shim to clean between the tines, starting at the tip and moving toward the body of the nib. This can remove dried ink or debris that might be clogging the channel.
For particularly dry inks, you can slightly widen the tine gap to improve ink delivery. Gently pull the nib’s shoulders outward or carefully wiggle a brass shim in the slit. The gap between the feed and the underside of the nib should be about the thickness of standard printer paper - tight enough to maintain capillary action but wide enough for ink to flow freely. After each adjustment, test the pen on smooth paper like Rhodia to ensure the flow has improved.
Step 4: Testing Your Pen After Adjustments
Running a Basic Writing Test
Once you've made your adjustments, it's time to put your pen to the test. Grab a high-quality sheet of paper, like Rhodia, and write several lines of text. Include loops, curves, and quick strokes to see how the pen performs in various motions. You're checking for three key things: consistent ink flow, smooth line width, and no skipping or hard starts.
Pay attention to how the ink behaves on the page. If you notice feathering - where the ink spreads into the paper fibers - or ink smudging onto your hand, it means the ink flow is too heavy and needs adjustment. Conversely, if the pen writes smoothly at first but then skips or stutters, it could indicate a misaligned feed. This disrupts the capillary action, leading to inconsistent ink flow.
For a reliable test, use a reference ink like Waterman Mysterious Blue. If the pen flows well with this ink but struggles with another, the issue may lie with the ink itself rather than your pen adjustments. If problems persist, it's time to inspect the nib-feed interface.
Fixing Problems That Persist After Adjustments
If the writing test uncovers ongoing issues, follow these steps to troubleshoot:
- Nib-feed gap: Use a 10x magnifier to examine the gap between the nib and feed. The gap should match the thickness of standard printer paper to maintain proper capillary action. As Richard Binder explains:
"If the pen's capillary is squeezed closed, ink can't flow. If it's spread too widely open, capillary action can't pull ink from the feed down to the paper. Either way, the pen won't flow."
- Tine alignment: Check the alignment of the nib tines under magnification. Even a slight difference in height can cause scratchiness or uneven ink flow. Correct any misalignment before proceeding.
- Flush the pen: If everything looks fine but issues persist, flush the pen. Mix 1 tablespoon of clear household ammonia with ⅔ cup of water to create a cleaning solution. This can dissolve dried ink and residue that plain water might miss, often resolving lingering problems.
These steps should help you identify and fix any remaining issues, ensuring your pen writes as smoothly as it should.
Conclusion: Keeping Your Pen in Good Working Order
Low-saturation inks are a great way to identify misalignments or feed issues in your fountain pen. Following the steps outlined - diagnosing flow problems, aligning the tines, adjusting the feed, and testing - ensures your pen stays dependable and performs consistently.
Basic Maintenance to Prevent Flow Problems
Once your pen is writing smoothly, regular upkeep is key. Flush your pen every 2 to 4 weeks using tap water or a pen flush solution. This routine prevents ink from drying out and clogging the nib or feed. If you’re not using your pen regularly, don’t leave it inked - flush it before storing to avoid clogs.
Why You Should Avoid Over-Adjusting
While basic care is essential, going overboard with adjustments can do more harm than good. Nib technician Richard Binder warns:
"Smoothing a nib might seem like a simple thing, but unless you have years of training and experience under your belt, you... risk damaging your nib permanently."
Make small, incremental changes, and always test on high-quality paper like Rhodia. Stop adjusting as soon as your pen writes effortlessly. The goal is for the pen to write under its own weight, requiring no extra pressure.
As Jen, a nib tuner, wisely notes:
"Most improvements come from alignment, not smoothing."
Stick to a routine of cleaning, minimal adjustments, and consistent testing. With this approach, your pen will deliver excellent performance, even with low-saturation inks.
FAQs
Will widening the tine gap damage my nib?
Widening the tine gap can improve ink flow, but it’s a delicate process that requires care. Many use a brass shim for this adjustment, but if the gap is widened too much, it can lead to problems like leaks, feathering, or even ink burping. Applying too much pressure can also splay the tines, damaging the nib’s capillary system.
To avoid these issues, make adjustments gradually and check your progress frequently with a jeweler's loupe. It's also important to resist the temptation to pry the tines apart using the shim, as this can cause irreversible damage. Patience and precision are key!
When should I stop adjusting and see a nib professional?
If your adjustments don’t fix the problem or you notice visible damage to the nib, it’s time to consult a professional. Permanent changes, like modifying the feed or removing the tipping, require expertise. If you’re unsure about handling these, it’s better to leave it to someone experienced. Also, if the nib is sprung - meaning it’s misaligned and no longer works with the feed to ensure proper ink flow - professional repair is the best way to restore its functionality.
Which low-saturation inks are hardest for dry pens?
Dry pens tend to have a tough time with low-saturation inks, especially those with drier formulas. Inks that are highly concentrated with dyes, have permanent qualities, or include additives like shimmer or pigment can make flow problems even worse. When these factors mix with tight nib tines or restricted feed channels, you might experience hard starts, skipping, or faint lines. To tackle these issues, adjusting the nib alignment or feed can often improve the ink flow, even with these more challenging ink types.