
Want to make your own fountain pen ink using natural ingredients? Here's how you can create eco-friendly inks from everyday materials like avocado pits, berries, and walnut husks. This method is simple, cost-effective, and uses items you might already have at home. Plus, it avoids the harmful chemicals found in many commercial inks.
Key Steps:
- Choose Your Ingredients: Use plant materials high in tannins, like black walnut husks (for dark brown ink), avocado pits (for pink tones), or berries (for purples and reds).
- Simmer and Extract: Combine plant material with distilled water, vinegar, and salt. Simmer gently to extract pigments.
- Filter and Preserve: Strain thoroughly to avoid clogs, then add gum Arabic and essential oils for thickness and longevity.
- Test and Store: Test your ink with a large eyedropper fountain pen, dip pen, or brush, then store it in airtight bottles in a cool, dark place.
This process is great for experimenting with colors and textures, allowing you to create inks tailored to your preferences. Learn how to prepare materials, avoid common mistakes, and preserve your ink for months.
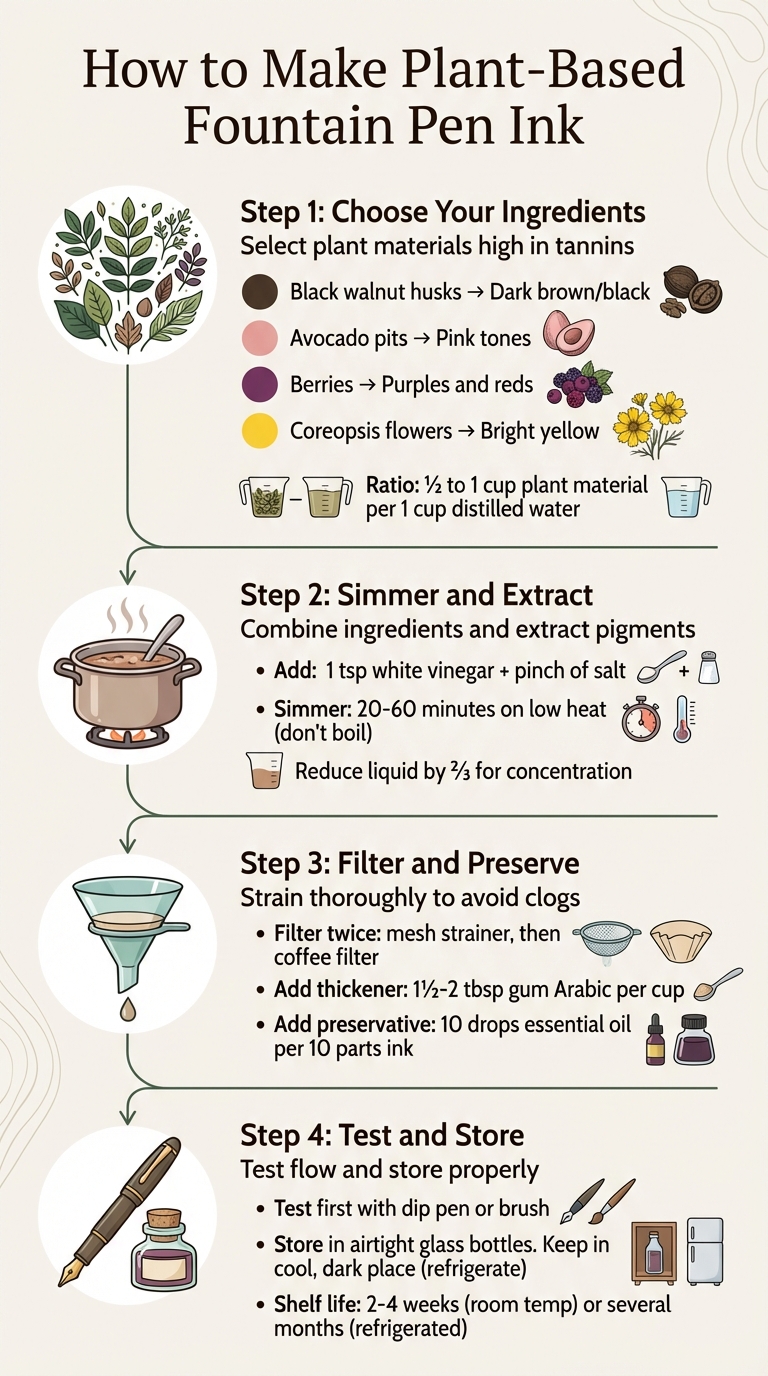
How to Make Plant-Based Fountain Pen Ink: 4-Step Process
Let's MAKE INK Together ~ natural and eco-friendly homemade artist ink
sbb-itb-1dd4fe9
Materials Needed
Making plant-based ink is surprisingly accessible, requiring everyday kitchen items and a few fountain pen supplies. Chances are, you already have most of what you need, or you can easily find the rest at a local grocery store. The key is selecting the right plant materials and combining them with basic supplies to extract, preserve, and thicken your ink.
Plant Materials
The best plants for ink-making are those high in tannins, as they produce richer colors and longer-lasting inks. For example, black walnut husks are highly valued for their deep, dark brown to black ink, which is both lightfast and permanent. Other great options include:
- Black tea: Perfect for iron gall ink recipes.
- Avocado pits: Create soft pink tones.
- Berries: Black raspberries or huckleberries are ideal for vibrant purples and reds.
- Turmeric or coreopsis flowers: Yield bright yellow hues.
- Onion skins: Can produce orange or green shades, depending on the variety.
Keep in mind that berry-based inks, while vibrant, tend to fade when exposed to sunlight. A good starting point is to use about ½ cup of plant material per 1 cup of water.
Additional Ingredients and Tools
Aside from your plant materials, you'll need a few extra ingredients to ensure your ink is stable and performs well:
- Distilled water: Maintains a neutral pH and prevents premature mold growth.
- White vinegar (1 tsp per batch): Helps lower the pH and bind pigments better.
- Salt (a pinch per batch): Improves the ink's longevity.
- Gum Arabic (1½ to 2 tbsp per cup of ink): Thickens the ink and reduces bleeding on paper.
- Essential oils (10 drops per 10 parts ink): Options like thyme, wintergreen, or clove add preservation. Whole cloves can also work but should be removed before use.
For tools, gather an old stainless steel or enameled pot, a fine mesh strainer, coffee filters, cheesecloth, and small glass bottles with airtight lids. To test your ink, use watercolor paper strips or acid-free paper. Having all these on hand will make the process smoother.
Safety Precautions
Making natural inks can get messy, as plant-based dyes tend to stain permanently. Protect yourself and your workspace by:
- Wearing rubber or latex gloves.
- Covering surfaces with old newspapers or plastic sheeting.
Be especially cautious with black walnut husks, as they can stain almost anything they touch.
"Don't use any pots, jars, or utensils you would use for cooking food afterward. I sometimes find old pots and utensils from a dollar store or thrift shop and dedicate those to ink projects only." – Erika Karl, Artist
Always work in a well-ventilated area since simmering plant materials can release strong odors. If you're using powdered additives like ferrous iron, wear a mask to avoid inhaling particles. Finally, if anyone in your household has a nut allergy, steer clear of walnut-based inks to ensure safety.
Step-by-Step Ink Preparation
Making your own ink might sound intimidating, but the process is quite simple. The trick is to be patient and keep an eye on the color as it develops. Here’s how you can turn raw plant materials into fountain pen ink.
Preparing Plant Materials
Start by breaking down your plant materials to get as much pigment out as possible. For softer items like berries, use a potato masher to crush them. Leafy greens are best chopped finely, while tougher materials like avocado pits, walnut husks, or bark should be sliced into small pieces or ground into a fine powder using a mortar and pestle.
Use a ratio of ½ to 1 cup of plant material for every 1 cup of distilled water. Add 1 teaspoon of white vinegar to help release the pigments and lower the pH, and a pinch of salt to improve the ink’s resistance to fading. Once combined, your mixture is ready to move on to the next step.
Simmering and Extracting Color
Place the mixture in a pot and heat it gently over low heat. Bring it to a simmer - avoid letting it boil, as high heat can damage delicate pigments, causing them to brown or lose vibrancy. Let it simmer for 20 to 60 minutes, or longer if you’re working with bark or roots. Test the color every 10–15 minutes with white paper strips and aim for the liquid to reduce by about two-thirds. For instance, if you start with 2 cups, reduce it to approximately ½ or ⅔ cup. This ensures the ink is concentrated enough to avoid clogging your pen without needing heavy thickeners.
"Natural ink isn't that complicated. You can throw almost any pigment-rich base ingredient into an old pot with vinegar and salt, boil it up for an hour or two, add a couple drops of gum arabic, and voila, you have an ink."
– Jason Logan, Founder, The Toronto Ink Company
Straining and Thickening
Once your mixture is ready, strain it through a fine mesh sieve or cheesecloth to remove large particles. Then, filter it again with a coffee filter to catch any smaller bits that could clog your pen’s feed system.
To improve the ink’s flow and reduce bleeding on paper, add gum Arabic sparingly - about 10 drops per 2 ounces of ink. For preservation, include 1–2 drops of essential oil like wintergreen, thyme, or clove to prevent mold growth. Always test the ink on paper strips; if it’s too thick, thin it out with distilled water. If it’s too watery, put it back on low heat to reduce further. Once you’ve got the consistency just right, your ink is ready to test in your fountain pen.
"To keep a pen writing smoothly, you need to use less binder, which can gum up the nib, and filter out any little grains of plant matter."
– Jason Logan, Founder, The Toronto Ink Company
Plant-Based Ink Recipes
After learning the basics of ink preparation, why not experiment with these vibrant plant-based ink recipes? Here are three options tailored for fountain pen enthusiasts.
Coreopsis Ink (Yellow)
This recipe uses Coreopsis flowers (Coreopsis tinctoria), which are packed with tannins, to create a bright yellow ink. Here's how to make it:
- Combine ½ cup of dried coreopsis blooms, 1 cup of distilled water, and 1 teaspoon of alum in a non-reactive pot.
- Simmer the mixture for about 20 minutes, then strain it using a coffee filter.
- While the liquid is still warm, whisk in ½ teaspoon of gum Arabic until it dissolves completely.
- Once cooled, add 3 drops of thyme essential oil to help prevent mold.
"Coreopsis... is, apparently, very exciting as not only does it give a lovely yellow, if you add a sprinkle of bicarbonate of soda to the ink it will darken to an orange and if you add a squeeze of lemon juice it will turn to an almost neon yellow."
– Felicity Jenkins, Artist
For fountain pen use, keep the gum Arabic amount low and ensure thorough filtering.
Avocado Pit Ink (Pink)
Avocado pits can produce a soft pink ink, perfect for fountain pens. Follow these steps:
- Clean and chop 2 large avocado pits into small pieces.
- Simmer the pieces in 1 cup of water for 20 to 40 minutes.
- For a brighter pink, stir in 1 teaspoon of soda ash (or baking powder) while the mixture is still hot.
- Strain the liquid through a coffee filter, then mix in ½ teaspoon of gum Arabic and 3–5 drops of essential oil.
- To preserve the ink, add about 10% isopropyl alcohol (99%) based on the total volume.
Fresh avocado pits yield a more vibrant color, so avoid using older ones. Also, be careful not to overcook the pits, as excessive heat can dull the pigment and turn the ink brown.
"The beauty of avocado ink is that you can create a variety of colors from peach to blush pink to a deep brownish-red."
– Dr. Jyotsna B. Pippal, Scientist and Watercolor Artist
Black Walnut Ink (Brown-Black)
Black walnut husks are known for producing a rich brown-black ink. Here's how to make it:
- Use whole black walnuts and allow the husks to oxidize until they turn black and soft (this can take several weeks).
- Soak the husks in water for 1–2 days.
- Simmer the husks over medium-low heat for several hours (or even up to a full day) to extract the pigment.
- Add 2 tablespoons of white vinegar and 1 tablespoon of salt to enhance pigment release and improve colorfastness.
- Remove the husks and continue simmering the liquid until it reduces by half.
- Filter the ink multiple times using a coffee filter to remove any particles.
- Add a few drops of wintergreen or thyme essential oil (or up to 20% rubbing alcohol) to preserve the ink.
Black walnut husks can stain skin and clothing permanently, so wear gloves and work in a well-ventilated area or outdoors to handle the strong odor during simmering.
Testing and Storage
Testing Ink in Fountain Pens
Once your ink is ready, testing it is key to ensuring it works well in your pens. Before filling a fountain pen, try the ink with a dip pen, glass pen, or brush. This quick test lets you check its flow and color while avoiding potential pen issues.
When you're ready to test with a fountain pen, opt for an affordable, easy-to-clean model. For instance, the FPR Indus Fountain Pen from Fountain Pen Revolution ($20.00) is a solid choice for trying out new ink recipes.
Filtering is the most important step before using your ink in a fountain pen. Any leftover plant particles or grit can clog the pen's feed. To prevent this, double-filter the ink using a coffee filter. If you still notice sediment, filter it again with a fine mesh or cotton cloth. If the ink feels too thick and flows poorly, thin it by adding distilled water one drop at a time. On the other hand, if it bleeds excessively, mix in a small amount of gum arabic.
Once the ink writes smoothly in your tests, you can move on to storing it properly.
Storage and Shelf Life
After confirming your ink's performance, proper storage will help it last longer. Use small, airtight glass bottles and keep them in a cool, dark place. Refrigeration is highly recommended to slow the growth of mold or bacteria. Leave a small amount of air space at the top of the bottle to allow for temperature changes.
Plant-based inks typically last 2–4 weeks at room temperature, but refrigeration can extend their shelf life to several months. If you notice fuzzy growth, slime, or an unpleasant smell, it's time to discard the batch. To prevent mold, add 10 drops of thyme or wintergreen essential oil for every 10 parts ink. Using distilled water throughout the process also helps reduce the chance of contamination.
Troubleshooting Common Problems
If your ink causes issues with your pen, a thorough cleaning can often solve the problem. Use a Fountain Pen Tuning/Cleaning Kit ($27.90) to flush the feed and nib. If dried particles are stuck in the nib slit, carefully remove them with brass flossing sheets ($3.25).
Here’s a quick guide to addressing common ink problems:
| Problem | Likely Cause | Recommended Fix |
|---|---|---|
| Ink Clogging | Solid plant particles/mold | Flush with cleaning kit; use brass flossing sheets |
| Bleed-through | Ink is too thin/watery | Add gum arabic (1 part to 10 parts ink) |
| Poor Flow | Ink is too thick/viscous | Add distilled water drop by drop |
| Fuzzy Growth | Mold/bacteria (SITB) | Discard batch; add clove oil to new batches |
Homemade inks need more care than store-bought ones. Clean your pen regularly and avoid leaving plant-based ink in the pen for long periods. If you're worried about damaging an expensive fountain pen, consider this advice from Silas, Founder of Flavor365:
"Stick to using your homemade inks with dip pens, glass pens, or brushes. It's the safest and most enjoyable way to appreciate your creation without risking damage to an expensive writing instrument."
Conclusion
Crafting plant-based fountain pen ink at home connects you to nature and traditional techniques while giving you full control over your writing tools. The process is simple: simmer plant materials, strain them, add your chosen ingredients, and store the ink properly. Using biodegradable materials like avocado pits, black walnuts, or even kitchen scraps, you can create eco-conscious inks that turn waste into something practical and beautiful. Every batch carries its own character, reflecting the natural essence of its ingredients.
Homemade ink isn't just about sustainability - it’s also an invitation to experiment. As abstract painter and forager Tanya Val beautifully puts it:
"Unlike synthetic inks, these colors are alive - they shift, fade, deepen, and transform over time. That's part of what makes them so magical".
The natural variations in plant-based inks can lead to unexpected and fascinating hues. You can even mix different extracts to craft colors that are truly one of a kind.
Keep in mind, homemade inks require a bit more care than store-bought ones. Regularly clean your pens to prevent clogs, refrigerate your ink to keep it fresh, and always double-filter to avoid debris. This extra effort is worth it when you experience the joy of writing with a personal, sustainable ink. It’s a creative process that combines mindfulness with a touch of artistry.
FAQs
Will homemade plant ink damage my fountain pen?
Homemade plant-based ink can work well with fountain pens, but only if it's prepared with care. To avoid issues, make sure to strain the ink thoroughly to eliminate particles that could clog the pen. Stick to safe ingredients like gum arabic, and steer clear of anything corrosive. If the ink isn't properly filtered or contains impurities, it might damage the nib or cause blockages over time. To keep your pen in good shape, clean it regularly after using homemade ink and double-check that the ink is free of solids and contaminants.
How do I make natural ink more water-resistant?
To make natural ink more resistant to water, you can mix in a fixative or binder like gum arabic. This improves the ink's ability to adhere to surfaces and boosts its durability. Some methods also recommend adding oil-based components, such as burnt plate oil, which further enhances water resistance. These tweaks result in a sturdier, longer-lasting ink that works well for different applications.
Which plants make the most lightfast ink colors?
Oak galls and red cabbage are two plants commonly used to produce ink with lasting color. Oak galls are rich in tannins and create a deep brown ink that darkens as it ages. Red cabbage, on the other hand, offers vibrant colors that change depending on pH levels. Adding mordants can help stabilize these inks, improving their durability and performance.