

If I want cleaner handwriting with a fountain pen, I need to train four things: pressure, spacing, oval shape, and joins. This article breaks that into 10 short drills, from simple upstrokes and line rows to letter groups, word chunks, and short phrases. The point is not fancy penmanship. It’s writing that looks steady and is easy to read.
A few takeaways stood out to me right away:
- Press less. Heavy pressure can hurt legibility.
- Keep practice short. Handwriting often gets worse after about 10 minutes of nonstop writing.
- Use spacing rules I can see. About an i-width between letters and an m-width between words.
- Work in order. Start with strokes, then shapes, then joins, then words.
- Stay consistent. A 10-minute daily session can clean things up over time.
The 10 drills covered are:
- Light upstrokes and controlled downstrokes
- Even horizontal and vertical line rows
- Consistent oval rows
- Entry strokes into ovals
- Exit strokes and simple joins
- Entry-letter-exit patterns
- Repeated oval letter groups: a, d, g, o, q
- Repeated hump letter groups: n, m, u, v, w
- Common letter pairs and chunks: th, er, ed, ing
- Short words and phrase rhythm practice
Here’s the short version: I’d pick one weak spot, practice 2–3 matching drills, and keep each session short and calm. The article’s main message is simple: <u>clean letters come from repeatable motion, not extra effort</u>.
| Drill | Main job | Fixes |
|---|---|---|
| 1–3 | Pressure, straight lines, ovals | Wobble, flat shapes, uneven darkness |
| 4–6 | Entries, exits, full letter motion | Clunky starts, heavy joins, broken flow |
| 7–8 | Letter families | Confusing round and hump letters |
| 9–10 | Chunks, words, rhythm | Crowding, drift, messy spacing |
If I want better results fast, this is the path: slow down to about 50% speed, write with light pressure, and train one pattern at a time.
What Makes Fountain Pen Letters Look Cleaner
Grip and pressure shape every stroke. If you grip the pen too hard, your fingers stiffen up. That tension travels straight into the line, and you’ll often see it as shaky downstrokes or a slant that drifts from letter to letter. Loosen your hold until the pen rests lightly in your hand, then use only enough pressure to stay in control. With a fountain pen, the nib needs just light, steady contact with the paper to keep ink flowing. Pressing harder doesn’t help. In fact, heavier pressure is linked to less legible handwriting. That’s why the drills below work better when your hand stays relaxed.
Pace matters more than speed. Rush, and your joins start to fall apart and spacing gets messy. Crawl along too slowly, and you stop writing naturally and start drawing each letter. A steady rhythm works best. Write at an even pace, then take a short pause between words. Legibility often drops after about 10 minutes of continuous writing, even as speed rises. Short, focused sessions are usually much easier to keep neat.
Slant and spacing organize the page. When slant changes from word to word, the whole line looks unsettled, and it takes more effort to read. A slight right slant is usually easier to keep steady than a mix of angles. Spacing matters just as much. Leave about an i-width between letters and an m-width between words. If you want one fast visual fix, this is it: even spacing makes handwriting look cleaner almost right away.
Keep counters open - the spaces inside letters like a, o, e, and g. Fountain pens for beginners often put down more ink than most ballpoints, so tight counters can fill in fast. Making the round parts of letters a bit larger, and not squeezing them too narrow, helps the writing stay readable. Next, start with light upstrokes and controlled downstrokes.
sbb-itb-1dd4fe9
1. Light Upstrokes and Controlled Downstrokes
Primary Skill Focus
Start with pressure control before you worry about letter shapes. That’s the main job of this drill. Keep your upstrokes light and your downstrokes steady. A simple way to remember it: light upstrokes, steady downstrokes. When you do that well, the line weight stays even across the word.
Best Letter Families
Use this drill with vertical stems in l, t, k, b, h, and f. For upstrokes, focus on the thin entry and exit connectors you see in cursive letters like a, c, e, i, u, n, and m. Working on both parts by themselves makes these letters look much cleaner once you start writing full words.
Most Common Legibility Problem It Fixes
This drill helps fix blobby downstrokes and scratchy upstrokes. With a fountain pen, pressing too hard on an upstroke can make the nib catch on the paper. That often leads to scratchiness or sudden ink blobs. Too much pressure on downstrokes can also make lines bleed and look fuzzy. Keep the nib angle steady so the ink flow stays even. If you experience flow issues, there are several fountain pen quick fixes to try.
Suggested Practice Time Per Line
Write one line of upstrokes, one line of downstrokes, and then one alternating line. Spend 30–45 seconds per line. The full drill takes about 3–4 minutes. If your hand starts to feel stiff, pause between lines, shake out your fingers, and reset your grip before you keep going. Once the stroke weight feels even, move to line rows.
2. Even Horizontal and Vertical Line Rows
Primary Skill Focus
Once pressure feels steady, the next step is repeating that motion in clean, even rows. This drill is about stroke consistency. You want lines that stay straight, parallel, and evenly spaced from start to finish.
That means repeating the same stroke length, angle, and spacing again and again. Vertical rows help you keep stems upright at the same slant. Horizontal rows help baselines and crossbars stay level. Put those two together, and you can improve everyday handwriting so it looks more even and easier to read.
Best Letter Families
Vertical rows connect directly to stem-heavy letters like l, t, k, h, b, p, and r. Horizontal rows train the side-to-side motion used in e, f, z, and x. Letters with humps, like n, m, u, v, and w, also depend on that same upright stroke control.
Most Common Legibility Problem It Fixes
This drill helps fix slant inconsistency, shaky stems, and crossbars that drift out of place. When one letter leans left and the next leans right, words can look jumpy and harder to scan.
Practicing rows of straight lines on lined or grid paper gives your eye and hand a simple target. Over time, that makes it easier to keep letters aligned instead of letting them wander.
Suggested Practice Time Per Line
Spend about 20–30 seconds per line. A simple session can include:
- 2–3 lines of horizontals
- 2–3 lines of verticals
That brings the full drill to about 3–4 minutes, which fits neatly into a 10-minute daily routine.
Keep each stroke smooth and repeatable. Then finish with one freehand row. That steady control carries into the next shape drills.
3. Consistent Oval Rows
Primary Skill Focus
Once lines and stems start to feel steady, ovals are the next shape to dial in. This drill trains your hand to make smooth, repeatable curves with the same height and width across a full row. The goal is simple: make the same oval every time.
Trace each oval in one smooth motion. Keep your pressure light and close each loop cleanly. If a loop caves in, slow down a bit and give the curve more room to stay open.
Best Letter Families
Oval rows build the main shape inside a, d, g, o, and q. Those letters are, at their core, an oval with one extra stroke added, such as a stem or descender. So when you practice the oval by itself, you're drilling the part that matters most before adding the rest. Open-round letters like c and e also improve from that same curved motion.
Most Common Legibility Problem It Fixes
This drill goes after some of the easiest handwriting issues to spot: flattened ovals, uneven sizing, and messy joins. If the oval in a turns too narrow while the oval in o spreads too wide, words start to look uneven and take more effort to scan. And with wet ink, even a small wobble or moment of hesitation tends to show up fast.
Suggested Practice Time Per Line
Aim for 30–60 seconds per line, based on how slowly and carefully you're working. If you're new to the drill, the slower end usually helps more. A slight pause at the top and bottom of each oval can help smooth out the curve. A short set of 5–8 lines is usually enough and fits neatly into a 10-minute routine. Once the row stays even, move on to entry strokes.
4. Entry Strokes Into Ovals
Primary Skill Focus
Once your ovals look clean, the next thing to train is the stroke that leads into them.
Practice the entry stroke: a light upstroke that starts at the baseline and flows into the oval. The goal is simple, but a little unforgiving. Each stroke should match the last one in length, angle, and pressure. When those lead-ins stay even, round letters stay open and connect more neatly.
With a fountain pen, pressure is where people often slip. Keep this stroke light. If you press too hard, you’ll leave a dark, heavy join where the entry stroke meets the oval, and that can make the letter look clunky. Keep the lead-in short, then ease it into the oval before the stroke climbs too high.
Best Letter Families
This drill helps most with oval-based letters:
- a, d, g, o, and q
- some cursive forms of c and e, because they follow the same round motion
Most Common Legibility Problem It Fixes
Weak entry strokes can lead to cramped spacing, lopsided ovals, and choppy joins.
Suggested Practice Time Per Line
Spend about 1 minute per line. Do 3–5 lines: plain entry strokes, then a/d, then g/q, then one mixed line. When the entry starts to feel smooth and even, move on to the exit stroke.
5. Exit Strokes and Simple Joins
Primary Skill Focus
Entry strokes get you into a letter. Exit strokes carry you out of it and into the next one.
A clean join is a thin exit stroke that meets the next letter’s entry without a bump, a gap, or added pressure. Keep that exit light. If you press too hard at the end, the join gets thick and starts to warp the letters around it. When your exits stay even, the next letter begins cleanly.
Best Letter Families
Start with joins like in, an, un, ni, am, and ov.
These patterns let you practice common connection movements without too much going on at once. They help build muscle memory before you move to harder transitions like th, er, re, and ing.
Most Common Legibility Problem It Fixes
Bad exits make letters blur together. For example, "an" can start to look like "m". In other cases, the join gets so heavy that it changes the shapes of the letters around it.
Keeping each connection the same length and angle makes words easier to read.
Suggested Practice Time Per Line
Spend 30–45 seconds per line. Using a calligraphy practice set can help you master these movements with different nib styles.
Write:
-
5–6 lines of single-letter exits, such as
a a a a aorn n n n n - 4–5 lines of simple pairs
- 3–4 lines of short chains
Move on when the exits match in length and angle. Then start combining the entry, the letter, and the exit into one continuous pattern.
6. Entry-Letter-Exit Patterns
Primary Skill Focus
This drill puts three parts together in one continuous motion: the entry, the letter shape, and the exit. It’s the point where single strokes start turning into complete letterforms.
Write each letter in one smooth pass: entry, shape, exit. When those three parts stay steady, your writing starts to look more even and easier to read.
Best Letter Families
Work through one family at a time:
- Oval letters (a, d, g, o, q) first
- Hump letters (n, m, u, v, w) next
- Tall-stem letters (h, k, l, b, f) last
Most Common Legibility Problem It Fixes
When entry height changes from letter to letter, or the exit angle drifts, letters can start to crowd together or blur. Practicing the full entry-letter-exit cycle trains each letter to start and finish in the same spot each time. That keeps shapes clear and spacing more even.
Suggested Practice Time Per Line
Aim for 30–60 seconds per line. Write the pattern all the way across the line in one continuous motion. For example: entry–a–exit entry–a–exit. Don’t lift the pen between repetitions.
After each line, check whether the exits land at the same height.
Next, carry that same control into repeated oval-letter groups.
7. Repeated Oval Letter Groups: a, d, g, o, q
Primary Skill Focus
This drill takes the oval work from sections 3–6 and puts it into full letters. The goal is simple: use the same entry, oval, and exit pattern each time. These five letters are your first full check on oval control and joins working together. Keep the motion smooth from start to finish. If you pause in the curve, the shape tends to flatten out or turn into a blob.
Best Letter Families
The letters a, d, g, o, q all grow from the same rounded oval body. From there, you only add a small change: a stem for d, and descenders for g and q. Practicing them as one group helps you build one main oval that you adjust as needed, instead of trying to learn five separate forms from scratch.
Use the same entry and exit control from the last drill. Start with a warm-up row of ovals, then move into the full letter set, one letter per line.
Most Common Legibility Problem It Fixes
Most reading problems with these letters come from three trouble spots:
- Open or broken ovals, which can make a letter look like u, cl, or i
- Flat spots that show up when your hand hesitates in the middle of the curve
- Uneven ascenders and descenders, where d runs too tall or g and q drop too far or form tight, cramped loops
When those issues pile up, the letters get harder to read. Clean oval shapes give you cleaner counters, steadier slant, and round letters that look much easier on the eye.
Suggested Practice Time Per Line
Spend about 1 minute on each line. Start with 2–3 warm-up lines, then do 3–4 lines of the full letters. Once the oval begins to drift, stop there.
Next, move to the hump letters: n, m, u, v, and w.
8. Repeated Hump Letter Groups: n, m, u, v, w
Primary Skill Focus
After oval letters, move that same control into arch letters. This drill helps you build smooth arches, even spacing, and clear hump counts in n, m, u, v, and w. When the arches stay even, words look less cramped and much easier to read. The aim here is clean, repeatable form, not speed or flair.
Best Letter Families
n has 2 humps, m has 3, u ends in a curve, and v ends in a point. That curve-versus-point difference is what keeps u and v from blending together. w is made of two even v shapes.
Start with single-letter rows, then mix close shapes like nmnmnm or vwvwvw.
Most Common Legibility Problem It Fixes
- n vs. m: Tight spacing can make n look like a cut-off m. Keep the hump count clear and the arch width even.
- u vs. v: A flat v can read like u, while a sharp u can read like v. Keep a soft curve in u and a clean point in v.
- w: Uneven v shapes can make w look off-balance. Practice two matching v forms with steady spacing between them.
Suggested Practice Time Per Line
Aim for about 30–60 seconds per line. A 5- to 6-line set takes about 5–7 minutes: one line each for n, m, u, v, w, plus one mixed row. A short, careful line will do more for your writing than a long messy one. Once the humps stay even, move on to common letter pairs and chunks.
9. Common Letter Pairs and Chunks: th, er, ed, ing
Primary Skill Focus
Once single letters feel more steady, shift to the letter pairs and chunks you use all the time. This is where practice starts to pay off in everyday handwriting. These patterns show up again and again, so cleaner joins can make your writing look better fast.
The goal here is simple: take the same join control you used on single letters and use it in common combinations.
Best Letter Families
Use oval shapes for er, ed, and ing. Use hump shapes for n and r. Use tall letters for th.
Start by repeating one chunk across a full line. Then move into short, familiar words like the, then, there; her, over; red, bed; going, writing.
Most Common Legibility Problem It Fixes
This drill mainly helps with merged joins, uneven spacing, and cramped endings. That last issue shows up a lot in ing, where the ending can get tight and messy.
Keep the join stroke light. Keep the slant steady from letter to letter.
Suggested Practice Time Per Line
Each focused line takes about 1–2 minutes at a controlled pace. In a 10-minute session, aim for 4–5 lines as you rotate through all four chunks. For example:
- 2 lines of th
- 1 line of er
- 1 line of ed
- 1 line of ing
Stop the line when the joins start to slip.
10. Short Words and Phrase Rhythm Practice
Primary Skill Focus
After drill 9, move from repeated chunks to full words and short phrases. The goal stays the same: keep the motion smooth from one letter to the next. This drill isn’t mainly about letter shape. It’s about holding a steady rhythm so your writing doesn’t pause, bunch up, or speed off halfway through a word.
Best Letter Families
Start with words built from the same shapes you just worked on. Short words like "man", "time", and "home" work well. For short phrases, stick with plain, everyday language such as "in the", "at home," and "for you."
For rhythm work, "minimum" and "maximum" are especially helpful. They repeat the same hump strokes across the whole word, so uneven rhythm stands out fast. If one part looks cramped or another part stretches too far, you’ll spot it right away.
Most Common Legibility Problem It Fixes
This drill helps fix crowding, drifting size, uneven slant, and sudden pressure changes.
Suggested Practice Time Per Line
Write one word or phrase per line, then review the whole line for even spacing. Spend about 30–45 seconds per line for a single short word and 45–60 seconds for a short phrase. Use a normal writing pace, then check spacing and baseline. In a 10-minute session, that gives you about 6–10 lines of focused rhythm practice.
A practical tip: after every line, step back or squint to spot tight clusters and wide gaps.
Drill Comparison Table
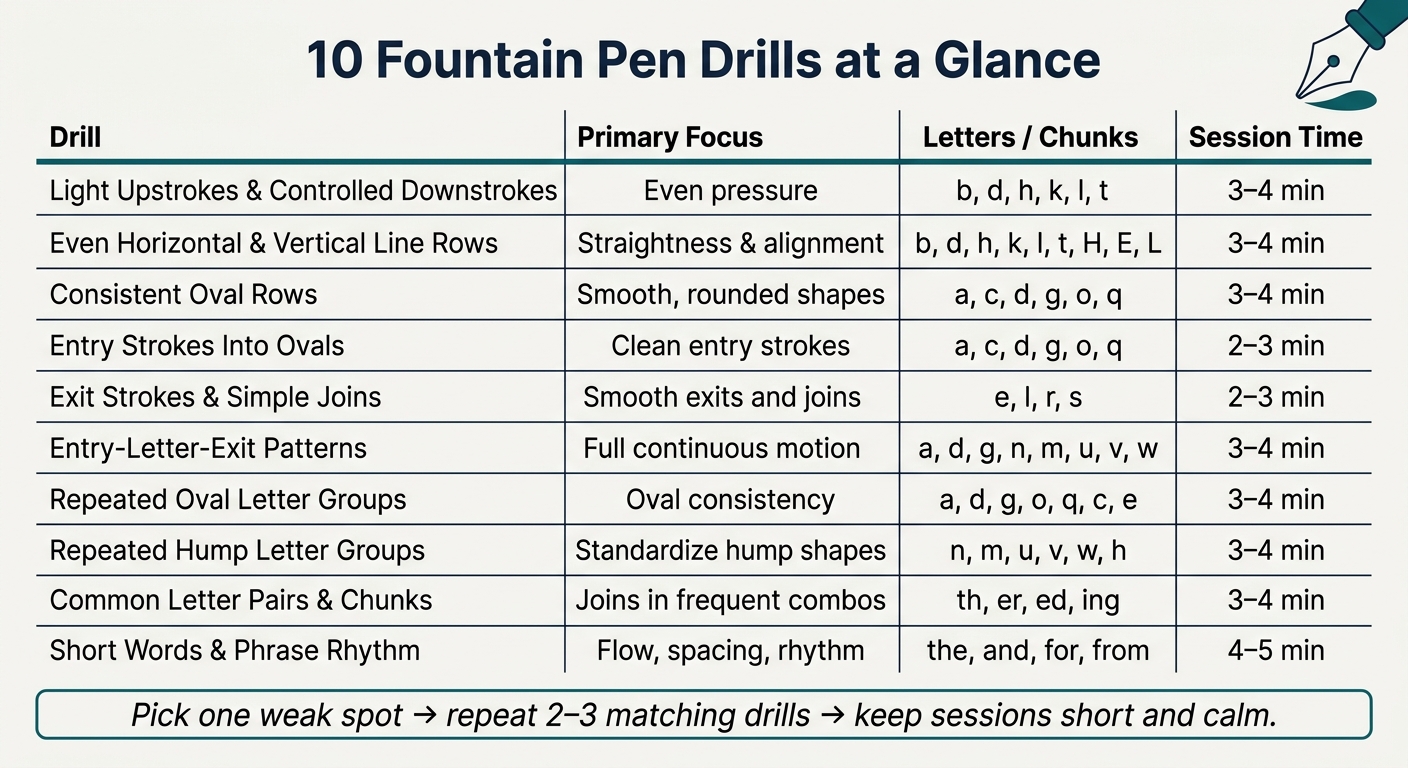
10 Fountain Pen Drills: Quick Reference Guide
Use this table as a quick match-up. Find your main handwriting issue in the Legibility Issue Addressed column, then start with that drill first. After that, add one or two more that support the same problem.
| Drill | Primary Focus | Letters Helped Most | Legibility Issue Addressed | Session Length |
|---|---|---|---|---|
| 1. Light Upstrokes & Controlled Downstrokes | Even pressure for lighter upstrokes and controlled downstrokes | b, d, h, k, l, t, g, j, p, q, y | Uneven line darkness, scratchy strokes, heavy blobs on downstrokes | 3–4 min |
| 2. Even Horizontal & Vertical Line Rows | Straightness, alignment, and consistent stroke height | b, d, h, k, l, t, H, E, L | Letters that lean in different directions, drift off the baseline, or vary a lot in height | 3–4 min |
| 3. Consistent Oval Rows | Smooth, rounded shapes so ovals look regular, not flat or lopsided | a, c, d, g, o, q, O, C | Ovals that look flat, egg-shaped, or uneven from one letter to the next | 3–4 min |
| 4. Entry Strokes Into Ovals | Clean, deliberate entry strokes into round letters | a, c, d, g, o, q | Entry strokes that are too long, too short, or hooked, which makes letters look messy at the start | 2–3 min |
| 5. Exit Strokes & Simple Joins | Smooth exits and joins so words connect without tangling | e, l, r, s, and joined letters | Exits that swing too far, cross into nearby letters, or stop too suddenly | 2–3 min |
| 6. Entry-Letter-Exit Patterns | Coordinating entry, body, and exit in one continuous movement | a, d, g, n, m, u, v, w | Letters that look built from separate pieces instead of moving as one flow | 3–4 min |
| 7. Repeated Oval Letter Groups | Consistency in oval-based letters to reduce letter-by-letter variation | a, d, g, o, q, c, e | Words with repeated letters that look uneven | 3–4 min |
| 8. Repeated Hump Letter Groups | Standardizing hump shapes so mid-height letters don't blur together | n, m, u, v, w, h | Hump letters that blend together or become hard to tell apart, which leads to misread words | 3–4 min |
| 9. Common Letter Pairs & Chunks | Consistent spacing and joins in frequent letter combinations | th, er, ed, ing, -ly, -ion | Letter chunks like "th" or "ing" that look cramped, tangled, or spaced too far apart | 3–4 min |
| 10. Short Words & Phrase Rhythm | Overall flow, spacing, and rhythm at the word and phrase level | the, and, for, from; short phrases | Uneven word spacing, changing slant, and inconsistent size that only shows up in real writing | 4–5 min |
The simplest way to use this: pick one main problem, then repeat the 2–3 drills that go after it. Next week, shift to a new weak spot.
All 10 drills work for both print and cursive. Drills 5 and 6 matter most for joined writing, but print writers still get better results from cleaner entries and exits. Keep your grip relaxed, use light pressure, and tilt the paper about 15–30 degrees.
Pick one or two drills from this table, then use them to build the 10-minute daily routine below.
How to Build a 10-Minute Daily Practice Routine
Pick one weak spot from the table above, then give your next 10 minutes to that ONE thing. That’s the whole idea here.
Ten minutes is enough if each minute has a clear job: warm up, drill one shape, then write short words. This simple three-part flow helps clean up slant, spacing, and joins without turning practice into a chore.
Minutes 1–3 are your warm-up. Write slow rows of vertical and horizontal lines. Then add a few rows of light upstrokes and controlled downstrokes. The goal is to loosen your hand and settle into a steady rhythm. Write at about 50% of your normal speed. A good gut check: if you can’t stop in the middle of a stroke without a wobble, you’re going too fast.
Minutes 4–7 are your drill block. Pick just one area for the day:
- ovals
- hump letters
- common chunks like "th", "er", "ed," or "ing"
Write 2–3 careful lines of that one pattern. After each line, pause, reset, and fix one problem on the next row. Maybe the slant drifted. Maybe the spacing got tight. Maybe the downstrokes got heavy. One row, one fix. That keeps your practice sharp instead of scattered.
Then move from pure drill work into actual words that use the same shapes.
Minutes 8–10 are where practice starts to feel like normal writing. Use short words that repeat those patterns: add, good, ago, never, wave, under. Write slowly and pay attention to letter height, slant, and spacing across the full line. This is where the drill starts to stick.
Keep the structure the same and rotate the middle section through the week. Ovals on Monday, joins on Tuesday, letter chunks on Wednesday. That way, you’re not guessing what to do each day.
A 2022 meta-analysis published in Frontiers in Psychology found that 20–30 minutes of structured daily handwriting practice produces visible improvement within 4–6 weeks. If you’re working with 10 minutes a day, consistency matters most.
If you want a practice pen you don’t have to baby, Fountain Pen Revolution has low-cost options for heavy-use practice.
Conclusion
Cleaner fountain pen letters come from repeating simple shapes until they feel smooth and automatic. These drills help because they train the same small set of motions behind almost every letter.
Short, focused daily practice beats the occasional long session. Keep each session aimed at one weak spot.
Write a sentence, then find the first thing that looks off. Match that issue to the right drill: verticals, ovals, or joins. Work on 2–3 drills at a time, then switch them out as your writing gets better. Fix that first weak spot, and the whole page starts to look cleaner.
That’s the goal: functional legibility. Meeting notes you can actually read later, journal entries that stay clear, and handwritten cards that look polished without feeling fussy - that’s what these drills are for.
A dependable practice pen also makes daily drills easier.
FAQs
Which drills should I start with first?
Start with basic stroke drills: parallel vertical, horizontal, and diagonal lines. They warm up your hand and help you get better control over how the nib moves.
Then move to ovals. They tend to expose issues with slant, spacing, and pressure right away. From there, practice loops, slant lines, and pressure-control drills to build muscle memory and make your strokes more consistent.
How long will it take to see cleaner handwriting?
With steady practice each day, most people start to see clear improvement in 1 to 2 weeks.
The best approach is simple: do 10 to 20 minutes of focused drills each day instead of cramming in long sessions once in a while. It works a bit like exercise. A short daily routine usually beats one big effort every few days.
To track your progress, compare photos or scans of your writing every 1 to 2 weeks.
Can I use these drills for print and cursive?
Yes. These drills work for both print and cursive because they build muscle memory and pen control for clearer writing.
Ovals, loops, and simple strokes help with spacing, slant, and letter shape in print. Loop chains are especially useful for the connected movements in cursive. And both styles get better with steady practice.