

If I reassemble a fountain pen too soon, leftover water inside the barrel or cap can thin ink and throw off flow for the next 12–24 hours of use. That’s why I treat body drying as its own step in my fountain pen maintenance routine.
Here’s the short version:
- I place barrels, caps, and sections open-end down
- I leave about 1.5 in. between supports
- I keep the stand 1–1.5 in. above an absorbent drip liner
- I use gentle room airflow, not heat
- I wait about 12–24 hours before reassembly
The main point: nibs and feeds dry fast, but hollow pen parts hold hidden water in threads, liners, and inner walls. A simple stand fixes that by improving drainage and air movement.
A body stand makes the most sense when I’m drying several pens at once, dealing with dark or opaque barrels, or cleaning pens with larger inner chambers like eyedroppers and piston fillers. In those cases, trapped moisture is harder to spot and more likely to affect the next fill.
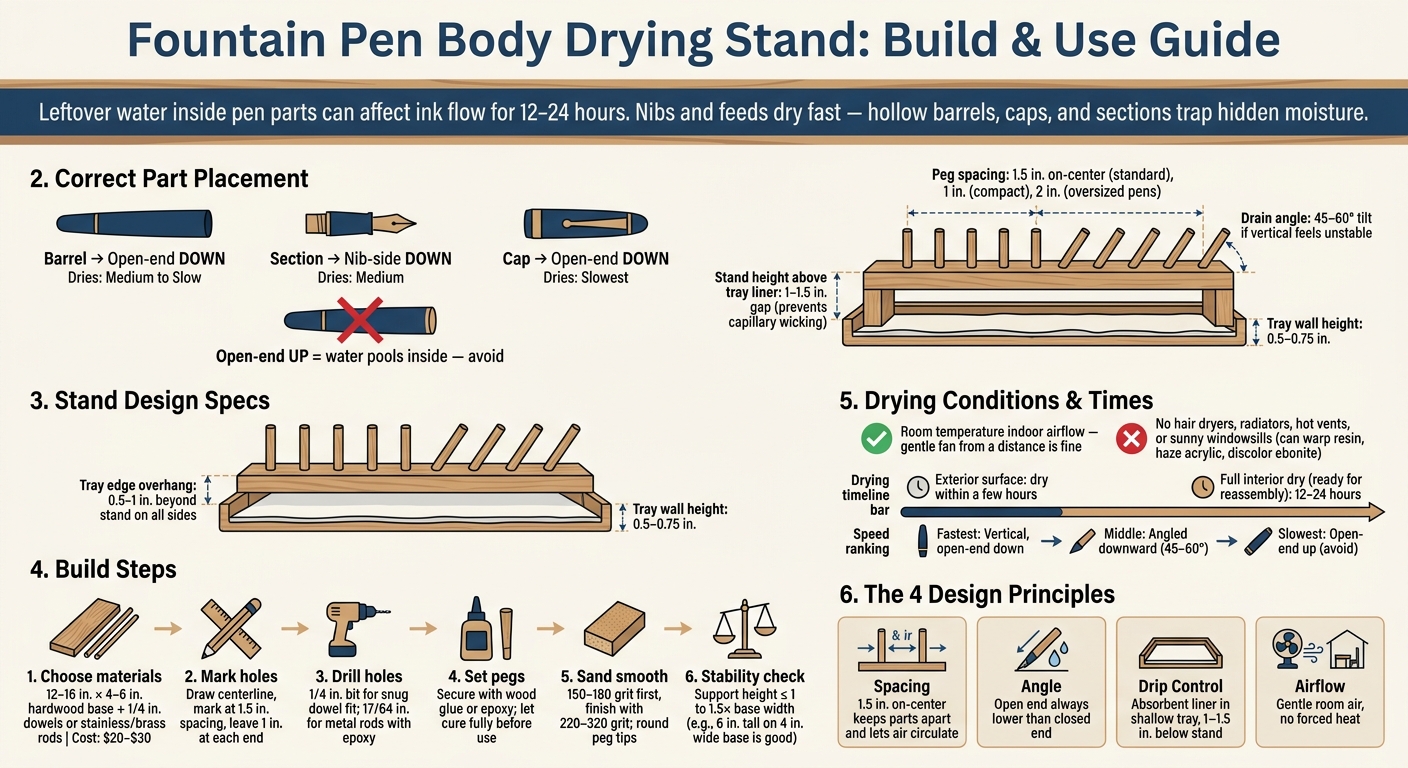
Fountain Pen Body Drying Stand: Build & Use Guide
Quick comparison
| Part / setup | Best position | Typical dry pace | Watch for |
|---|---|---|---|
| Barrel | Open-end down | Medium to slow | Water on inner walls |
| Section | Nib-side down | Medium | Moisture in threads and recesses |
| Cap | Open-end down | Slowest | Water near cap liner |
| Vertical stand | Straight down | Fastest | Stability on tall pegs |
| Angled stand | 45–60° downward | Middle | Keep opening lower than the closed end |
| Open-end up | Not preferred | Slow | Water pooling inside |
When I build or pick a stand, I focus on only four things: spacing, angle, drip control, and airflow. Get those right, and the rest is simple. For a complete setup, consider using a fountain pen tuning and cleaning kit to maintain your parts before drying.
sbb-itb-1dd4fe9
Stand design basics: spacing, angle, drip control, and airflow
Good stand design comes down to a few simple things: spacing, drainage angle, and drip control. Get those right, and the rack does its job. Then you can move on to building it.
Section spacing that keeps parts apart and lets air move
For most home setups, a good starting point is 1.5 in. on-center between supports. That usually gives standard barrels and grip sections enough room to sit without touching.
You can go tighter. At 1 in. spacing, more parts fit on a smaller stand. But there’s a tradeoff: thicker oversized barrels and wider sections can start to feel cramped. If you dry larger pens on a regular basis, moving closer to 2 in. gives more breathing room.
Spacing also affects airflow. If parts are packed too close together, damp pockets form between them and air doesn’t move much. That slows evaporation. An open frame or slotted rail design works better than solid walls because it lets room air reach the parts from more than one direction.
Vertical and angled positions that help water drain out
Place parts open-end-down. Use a 45–60° tilt only if a straight vertical drop feels unstable.
That slight angle can help with longer or tapered barrels. More of the barrel touches the support, which helps keep the part from slipping. One rule matters more than anything else here: never put the open end above the rest of the body. If you do, water collects inside instead of draining out.
Drip trays and absorbent surfaces under the stand
Let the tray extend 0.5–1 in. beyond the stand on all sides. Shallow plastic trays with edges around 0.5–0.75 in. high tend to work well. They catch drips without making it annoying to slide liners in and out.
Use a shallow tray with an absorbent liner underneath the stand. Here’s a plain-English look at the most common options:
| Absorbent option | Pros | Cons | Best use cases |
|---|---|---|---|
| Paper towels | Inexpensive, easy to find, disposable, good initial absorption | Tear when saturated, can stick to wet parts if they touch, recurring cost | Occasional deep cleanings, quick setup when you want to toss liners after one use |
| Microfiber cloths | High absorption, good wicking, gentle on finishes, washable and reusable | Higher upfront cost, can hold ink stains, need washing between uses | Regular cleaning routines for multiple pens, situations where ink drips are likely and you want durable liners |
| Cotton cloths (e.g., old T-shirts) | Cheap or free if repurposed, reasonably absorbent, easy to cut to size | Slower wicking than microfiber, may shed lint, can stain permanently | Budget setups, larger trays where you want a continuous, soft surface |
| Reusable sponge pads | Excellent absorption, good at catching large drips, reusable, can be rinsed | Bulkier, slower to dry, may retain ink odors or discoloration over time | High-volume rinsing sessions, setups where vertical drainage produces frequent drips |
Keep the stand 1–1.5 in. above the tray liner. That gap matters. If a soaked liner touches the pen body, capillary action can pull moisture back up into the part. Small rubber feet or spacers under the stand legs make it easy to keep that space open.
Once the tray and liner are in place, the rack is ready to build.
These dimensions lead directly into the build steps below.
How to build a simple fountain pen body drying stand
Materials and dimensions for a small home rack
Build the stand so the open ends face down, the parts stay apart, and air can move through them.
You don’t need much for a small rack. Start with a 12–16 in. by 4–6 in. hardwood base and add 1/4 in. dowels or stainless steel/brass rods. A basic build usually costs $20–$30.
For most people at home, the easiest setup is also the steadiest: a flat base with vertical pegs.
Once you’ve settled on the layout, mark the base and drill the support holes.
Assembly steps from layout to final sanding
Draw a centerline down the length of the base. Then mark the holes using the 1.5 in. spacing above, while leaving 1 in. at each end. A tape measure, pencil, and square are enough for this part.
Drill the holes with a 1/4 in. bit if you want a snug fit for dowels. If you’re using metal rods with epoxy, go a bit larger with a 17/64 in. hole so insertion is easier. For a vertical stand, drill straight down.
You can keep the pegs straight for normal vertical drying, or angle them if you want faster drainage. If you choose the angled setup, cut a guide block at 15° and clamp it to the base while drilling. That keeps every hole lined up the same way. Set each dowel or rod with wood glue or epoxy, then let it cure all the way before touching the stand again.
After the glue cures, test the fit with actual pen bodies, sections, and caps. Make sure nothing wobbles and no part touches the support next to it.
Then sand the whole stand:
- Start with 150–180 grit to soften sharp edges
- Finish with 220–320 grit for a smooth surface
- Round each peg tip a little so it won’t mark a barrel
If you used metal rods, smooth them with a fine file first, then use 400–600 grit emery cloth to remove burrs. Wipe off all dust before you put any pens on the stand.
Once the stand feels smooth and stable, it’s ready for drying cleaned barrels, sections, and caps.
Stability checks before first use
Put the finished stand on a flat surface and press gently on the outermost supports. If the base rocks, the footprint is too narrow for the support height.
A good rule is to keep support height at no more than 1 to 1.5 times the base width. So 6 in. tall supports on a 4 in. wide base work well. Go taller on that same base, and the stand can start to feel tippy when it’s loaded.
Test it with your heaviest barrels first, because they show wobble fast. Place them off-center to check balance. If the stand shifts, widen the base or add rubber non-slip feet underneath. Small adhesive rubber pads from any fountain pen supplies store do the job well.
After the stand passes the stability test, move on to loading and drying the pen parts.
Using the stand after deep cleaning: placement and drying times
How to place barrels, sections, caps, and larger parts
After you rinse each part and shake off extra water, place it so gravity can do most of the work.
Set barrels open-end down or at a slight downward angle. Put grip sections nib-side down, because water often hangs around there after flushing. Caps should also go open-end down or slightly angled down. Don’t leave caps open-end up. That traps moisture inside and slows drying.
Give each part a little space. Threads, inner corners, and small recesses dry better when parts aren’t touching.
Once everything is in place, gently rotate each piece and check for droplets still sliding around inside seams or corners. If you see water moving, change the angle before you leave it alone.
Then move the stand to a spot with steady indoor airflow and let it sit undisturbed.
Airflow paths and safe indoor drying conditions
Use normal indoor airflow at room temperature. That’s what the stand is meant for.
Skip forced heat. Hair dryers, radiators, space heaters, hot vents, and sunny windowsills can cause problems fast. They may warp resin, haze acrylic, discolor ebonite, and dull plated trim.
If you want to help things along, use a fan from a distance. The airflow should be gentle and steady, not blasting straight at the parts.
Drying times and how to check for leftover moisture
A part can feel dry on the outside and still hold water inside. That’s the part people miss.
Under decent airflow, exterior surfaces often feel dry within a few hours. Inside, drying usually takes 12–24 hours before reassembly. That matters even more for:
- barrels with narrow chambers
- caps with inner liners
- sections with threaded recesses
To check for leftover moisture, hold each part under good light and tilt it slowly. Watch for sheen, tiny beads, or any movement inside. You can also blot the open ends with a lint-free microfiber cloth. If moisture transfers to the cloth, give it more time.
Here’s the simple rule:
- Vertical, open-end down dries fastest
- Angled downward dries at a middle pace
- Open-end up is slow and should be used only for parts that are almost dry
Conclusion: the simplest setup that dries pen bodies well
A simple body drying stand is enough. A setup you can count on comes down to three things: about 1.5 in. on-center spacing between each piece, a shallow drip tray underneath, and gentle room airflow at room temperature. Get those basics right, and the stand handles the rest.
Give each part enough space so air can move around it. Put a shallow drip tray underneath. Surface drying happens fast, but wait overnight before reassembly. Dry fully, then reassemble.
FAQs
Do I need a stand for just one pen?
Yes. Even if you own just one pen, a stand can still make sense.
It keeps your go-to pen safe, visible, and within easy reach. That means less chance of it rolling off your desk, hitting the floor, and getting scratched or damaged.
A desk stand or pen rest also gives your pen a set place to stay, instead of leaving it loose in a drawer where it can get buried or bumped around.
Can I dry pen parts without a drip tray?
Yes. After rinsing, shake off the extra water and dry the parts with a lint-free cloth or a microfiber cloth.
Then let everything air-dry fully:
- Stand the nib and feed nib-down in a glass or cup lined with a folded paper towel.
- Lay the barrel and cap flat on a clean, lint-free cloth in a well-ventilated room at normal room temperature for 12 to 24 hours.
How do I know a barrel or cap is fully dry?
Check the inside closely for any water droplets or condensation. If you're not sure, gently wipe the interior with a soft, lint-free cloth and see whether any moisture is still there.
Next, separate the cap from the barrel so air can reach the threads and tight inner areas. Let both parts air-dry in a well-ventilated spot for 12 to 24 hours before you put them back together.