
Skipping in vintage fountain pens can be frustrating, but it's usually easy to fix. Most issues stem from dried ink, misaligned nibs, or incompatible paper or ink. (See our fountain pen buying checklist for more on compatibility.) Here's a quick guide to get your pen writing smoothly again:
- Start by cleaning: Flush the pen with cool water to remove dried ink. For stubborn clogs, use a mild soap solution or an ammonia mix (1:10 with water). Soak the nib and feed if needed.
- Inspect the nib: Check for misaligned tines or a "baby's bottom" (an overly rounded nib tip). Adjust tines carefully or use Micro-Mesh to smooth the nib.
- Test ink and paper: Try different inks (like free-flowing Pilot Iroshizuku) and smoother paper to rule out compatibility issues.
- Maintain regularly: Clean every 1–2 weeks if used often, or monthly for less frequent use. Always store capped and nib-down to avoid drying out.
Cleaning solves most problems, but for advanced repairs, consult a professional. Regular care ensures your pen writes consistently for years.
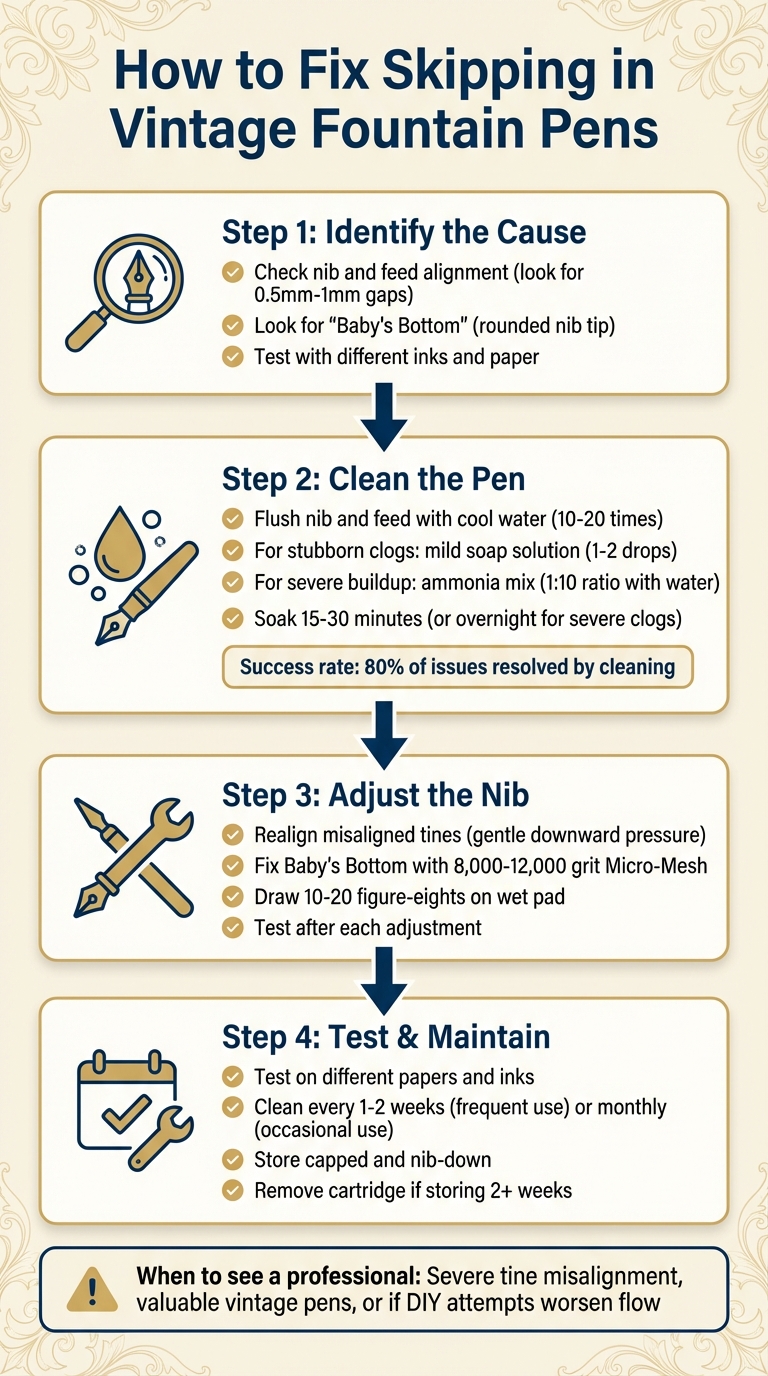
4-Step Guide to Fix Skipping in Vintage Fountain Pens
Skipping Fountain Pens & Troubleshooting
sbb-itb-1dd4fe9
Step 1: Identify What's Causing the Skipping
Before diving into fixes, it's crucial to figure out why your pen is skipping. Skipping can happen for several reasons, and the solution depends on pinpointing the root cause. Start with these quick fixes for a fountain pen not writing before exploring more complicated repairs.
Check Nib and Feed Alignment
Take a close look at the connection between the nib and feed using a magnifying glass. The nib should sit perfectly aligned with the feed, with no noticeable gap. Even a tiny separation - around 0.5mm to 1mm - can disrupt the ink flow entirely. This gap interrupts the capillary action needed to draw ink from the feed to the paper.
Inspect the nib from both side and top views. Uneven tines, where one sits higher than the other, can also cause skipping. This misalignment creates inconsistent contact with the paper, leading to broken or patchy lines.
Look for Baby's Bottom
"Baby's Bottom" refers to a rounded tip on the nib, which can develop over time. This rounded surface creates a small hump that prevents ink from transferring to the paper. You'll notice this issue most at the start of a stroke - your pen might glide smoothly but fail to leave a mark until you press harder or adjust the writing angle.
Test with Different Inks and Paper
Sometimes, the culprit isn't the pen but the ink or paper. Thick or dried-up ink and overly absorbent paper can both lead to skipping. Start by flushing the pen thoroughly and refilling it with a more free-flowing ink, like Pilot Iroshizuku. Write on smooth paper first, then try textured options. If the skipping stops with certain combinations, you've found the issue - it's the ink or paper, not the pen itself. However, if the pen skips no matter what ink or paper you use, the problem likely lies with the nib or feed and will require further adjustments.
Once you've identified the source of the skipping, you're ready to move on to cleaning and fine-tuning in the next steps.
Step 2: Clean the Pen to Restore Ink Flow
Cleaning your pen is essential for clearing out dried ink, paper fibers, and other residue that may be clogging the feed channels. Before tinkering with the nib itself, start with a thorough cleaning - it’s often the quickest and easiest solution.
Flush the Nib and Feed
Carefully disassemble your pen, removing the nib and feed from the section if possible. Fill the reservoir or converter with cool water, then flush it through the pen 10–20 times until the water runs clear.
If the clog persists, try adding 1–2 drops of mild, lemon-scented dish soap to a cup of cool water. Use this solution to flush the pen 5–10 times. For more stubborn buildup, mix 1 part ammonia with 10 parts water, adding a few drops of detergent, and flush the pen using this mixture. A bulb syringe can help force the solution through tight feed channels.
Stick to cool or lukewarm water - avoid hot water as it can damage your pen. Also, steer clear of harsh chemicals like bleach, which can harm the materials.
If flushing doesn’t resolve the issue, move on to soaking the pen.
Soak the Pen and Prevent Future Clogs
For moderate clogs, soak the nib and feed in cool water or a pen flush solution for 15–30 minutes. For more severe buildup, an overnight soak may be necessary. After soaking, flush the pen with clean water until no residue remains.
To prevent clogs in the future, always store your pen capped and nib-down between writing sessions to keep the feed from drying out. If you don’t plan to use the pen for several weeks, flush it thoroughly and store it dry. Removing cartridges or converters during long-term storage can also help avoid blockages.
Step 3: Adjust the Nib
If your pen continues to skip even after cleaning, it's time to adjust the nib. This process requires a gentle touch, as the nib's tines are delicate and can easily be damaged.
Realign the Nib Tines
Start by checking if the tines are misaligned. Look closely - if one tine sits higher than the other, you've found the problem. The tines should be parallel to each other and rest evenly on the feed, with a visible gap narrowing toward the tip along the slit.
To fix this, lay the nib on a flat surface and apply gentle downward pressure to realign the tines. Be careful not to push sideways, as this can cause further damage. After each small adjustment, test the pen by writing a few lines. If you're not confident in making these adjustments yourself, it's best to consult a professional nibmeister or browse replacement fountain pen nibs.
If realigning the tines doesn't solve the skipping issue, move on to fine-tuning the nib tip size.
Fix Baby's Bottom with Micro-Mesh

"Baby's bottom" is a common issue where the nib tip is overly polished and rounded, making it difficult for the ink to flow properly onto the paper. Under magnification, the tip will appear curved instead of flat.
To address this, use an 8,000 to 12,000 grit Micro-Mesh pad (or the finest side of a nail buffing block). Wet the pad and add a drop of water to its surface. Gently draw 10–20 figure-eights with the nib tip on the pad, then rinse and test the pen on paper. If skipping continues, you can repeat the process once, but stop immediately if the ink flow worsens. This method gradually flattens the rounded edges, improving ink delivery. However, if you're working with a valuable vintage pen or feel unsure, it's safer to leave this task to a professional. DIY attempts can risk removing too much tipping material, which may permanently alter the nib.
Step 4: Test and Maintain Your Pen
Once you've cleaned and adjusted your nib, the next step is to ensure everything works smoothly and set up a care routine to keep your pen in great shape.
Test the Pen After Repairs
Start by testing your pen on different types of paper to see how it performs. Use inks with varying flow properties, and try writing at different nib angles and pressure levels. If you notice issues like skipping on downstrokes or hard starts after pauses, it might be time for another cleaning. Re-clean the nib and feed, or consider switching to a thinner ink for better flow.
Maintain Your Pen Properly
Regular maintenance goes a long way in keeping your pen functional. If you use it frequently, clean it every 1–2 weeks. For less frequent use, a monthly cleaning should suffice. Flush the pen with water until it runs clear, then soak the nib and feed in a mild water-and-dish-soap solution.
If you're storing the pen for more than two weeks, take extra steps: fully flush it, dry it thoroughly, and remove the cartridge or converter. Always recap your pen right after use and store it upright in a pen case. To avoid damage, keep it away from extreme temperatures and high humidity.
Conclusion
Ensuring your vintage fountain pen writes smoothly involves following a clear troubleshooting process. To address skipping, focus on diagnosing, cleaning, adjusting, and maintaining your pen. Since cleaning resolves around 80% of issues, it’s the best place to begin. A simple flush with water or a mild ammonia solution can often clear blockages and restore proper ink flow.
If cleaning doesn’t fix the problem, revisit earlier steps like checking nib alignment or inspecting for a baby's bottom. When adjusting the tines, handle them carefully - too much pressure can permanently damage the nib. Each step, from diagnosing to cleaning and fine-tuning, contributes to achieving smooth, consistent writing.
After repairs, test your pen with various papers and inks. If skipping continues, try switching to thinner or wetter inks. To keep your pen in top condition, flush it every 1–2 weeks and always cap it immediately after use. For more complex problems, such as severe tine misalignment or a baby's bottom that requires regrinding, it’s best to consult a skilled nibmeister to avoid further damage. Regular maintenance and careful handling can prevent most skipping issues from occurring in the first place.
For additional care tips and a range of pens, nibs, and accessories, check out Fountain Pen Revolution (https://fprevolutionusa.com).
FAQs
How do I tell if my pen is skipping because of ink flow or a nib issue?
To figure out why your pen is skipping, start by cleaning the nib and feed to clear out any dried ink or debris - this often fixes ink flow problems. If the issue continues, inspect the nib for misaligned or uneven tines. Skipping is usually caused by one of two things: clogs or debris affecting ink flow, or alignment issues with the nib's tines. Pinpoint the exact problem to resolve it effectively.
When should I avoid DIY nib adjustments and see a nibmeister instead?
When it comes to serious nib issues, it’s best to leave the adjustments to a professional nibmeister. This applies to problems like sprung tines, cracks, severely bent tines, or any kind of structural damage. Attempting to fix these yourself can often make matters worse. For anything more complicated than minor tuning or correcting slight misalignment, seeking expert help is the safest choice to avoid causing additional damage to the nib.
What’s the safest way to store a vintage fountain pen so it won’t dry out?
To keep your vintage fountain pen in great condition, store it in a dark, ventilated area where the temperature stays between 64–72°F and the humidity level is around 40–60%. Depending on how often you use it, place the pen either horizontally or with the nib facing up.
Before storing, take the pen apart and clean all its parts using distilled water. Allow everything to dry completely for 12–24 hours to avoid any moisture issues. If your pen is made of celluloid, steer clear of airtight containers, as they can cause damage. Always make sure every component is thoroughly dry before putting it away.