
Cleaning your fountain pen converter ensures smooth writing and prevents clogs caused by dried ink. Whether you're switching ink colors or storing your pen, regular maintenance is quick and easy. Here's a summary of the process:
- Tools Needed: Distilled water, bulb syringe, lint-free cloth, and optional items like dish soap or silicone grease.
-
Steps:
- Disassemble the pen, separating the converter from the grip section.
- Flush the converter with distilled water until it runs clear.
- Use a bulb syringe for deeper cleaning.
- Let all parts air-dry completely before reassembling.
A clean converter keeps ink flowing properly and extends your pen's lifespan. Stick to these steps, and your pen will always be ready to write.
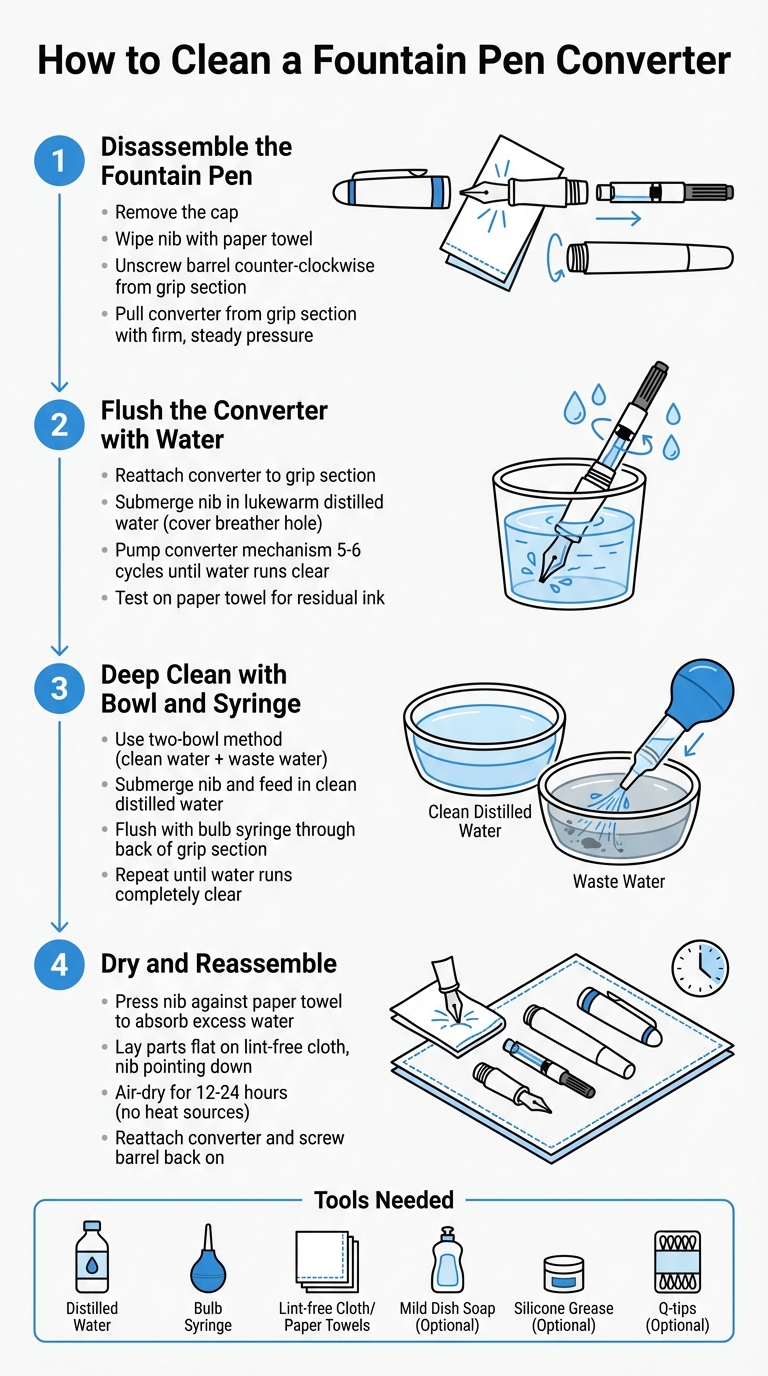
4-Step Process to Clean a Fountain Pen Converter
How to Clean a Cartridge Converter Fountain Pen
Tools and Supplies You'll Need
Cleaning a fountain pen converter doesn't require much, but having the right tools makes the process easier and keeps your pen writing smoothly.
Basic Tools: Distilled Water, Lint-Free Cloth, and a Bulb Syringe
Start with distilled water - it’s the go-to cleaning agent. Unlike tap water, it doesn’t leave behind mineral deposits that could cause buildup.
A bulb syringe is another handy tool. It fits over the pen's section and pushes water through the feed with more force than the converter alone can manage. As Shawn Buckles from One Pen Show shares:
I've got one [bulb syringe] and I can recommend getting one as soon as possible. They're affordable and really speed up a somewhat painstaking process.
You can even trim the nozzle of a universal bulb syringe for a snugger fit.
Lastly, lint-free cloths or paper towels are essential for wiping down the nib and removing any leftover ink or moisture. After flushing, press the nib against a clean paper towel - if you still see ink, it’s a sign you need more cleaning. To avoid recontaminating your pen, use separate containers for clean and waste water.
For tougher cleaning jobs, you might need a few additional tools.
Optional Tools: Dish Soap, Silicone Grease, and Q-Tips
For stubborn stains or oils, mild dish soap (like Dawn) works wonders. As Kit from dappr.net explains:
A mild cleanser, such as Dawn, can get under oil so it can float out with the water.
Use it sparingly, though - soap residue can be tricky to rinse out completely.
Silicone grease (100% pure) is helpful for maintaining piston-style converters. Apply a small amount if the mechanism feels stiff or after a thorough cleaning to ensure smooth movement and a proper seal.
Q-tips are perfect for soaking up water from hard-to-reach channels, ensuring your converter is completely dry before refilling it.
And if you’re dealing with dried ink that refuses to budge, try a specialized pen flush. You can even make a homemade version for about $2.00.
With these tools in hand, you’ll be ready to tackle the cleaning process with ease.
Step-by-Step Guide to Cleaning Your Fountain Pen Converter
Now that your tools are ready, let's dive into the cleaning process. These steps are straightforward and will help ensure your fountain pen's converter stays in great shape, whether you're a beginner or a seasoned user.
Step 1: Disassemble the Fountain Pen
Start by removing the cap to expose the nib and grip section. Before proceeding, gently wipe the nib with a paper towel to remove any excess ink and minimize mess.
Next, separate the barrel from the grip section. Hold the grip section (the part you grip while writing) in one hand and the barrel in the other. Twist the barrel counter-clockwise to unscrew it. As Shawn Buckles from One Pen Show notes:
Uncap the pen. Take the section and turn it counter-clockwise to unscrew it from the body. You should end up with a pen in two pieces.
Now, carefully remove the converter from the back of the grip section. It’s held in place by friction, so you may need to use a firm, steady pull. If it feels stuck, dry your hands or use a rubber grip for better traction. Be cautious not to let the grip section drop onto the nib, as this could result in permanent damage.
With the converter detached, you’re ready to start flushing it in the next step.
Step 2: Flush the Converter with Water
Reattach the converter to the grip section, then submerge the nib in lukewarm water. Make sure the water covers the breather hole (the small opening on the nib) to allow the converter to create the necessary vacuum for drawing water in.
Pump the converter mechanism several times - around five to six cycles - until the water being drawn in and expelled runs clear. To check for residual ink, touch the nib to a clean paper towel; if the towel stays clean, you’re ready to move on.
Step 3: Deep Clean with a Bowl and Syringe
For a more thorough cleaning, try the two-bowl method. Fill one bowl with clean distilled water and keep a second bowl empty for waste water. Submerge the nib and feed in the clean water, then use a bulb syringe to flush water through the back of the grip section. This creates more pressure than the converter alone, effectively clearing out any ink buildup in the feed.
Repeat this process - refilling from the clean bowl and flushing into the waste bowl - until the expelled water is completely clear. While it may take several rounds, this extra effort helps prevent clogs and keeps your pen writing smoothly.
Step 4: Clean Piston-Style Converters
Piston converters sometimes require additional care. If you notice ink leaking behind the piston seal, you’ll need to disassemble the converter for a deeper clean. Unscrew the back metal housing counter-clockwise to access the internal plunger mechanism. Brian Goulet from The Goulet Pen Company explains:
You can actually unscrew the back metal section of the converter, which then allows you to completely disassemble and clean the inside of the converter.
Rinse each part separately under lukewarm water, ensuring all ink residue is removed from the plunger and seal. When reassembling, apply a thin layer of silicone grease to the piston seal. This helps the mechanism move smoothly and ensures a proper seal. Finally, screw the metal housing back on securely, but avoid overtightening.
With these steps complete, you're ready to dry and reassemble your fountain pen, restoring it to perfect working order.
sbb-itb-1dd4fe9
Drying and Reassembling Your Fountain Pen
Air-Dry All Components
Make sure every part of your fountain pen is completely dry to prevent any leftover moisture from diluting fresh ink. Start by pressing a paper towel gently against the nib to absorb excess water. Lay all the parts flat on a lint-free cloth, with the nib pointing down, to help draw out any remaining moisture.
"Leave your pen nib down on a cloth or paper towel to draw out any moisture. You can do this overnight, and it's particularly important if you're cleaning your pen because you're not using it and you want to store it - you don't want moisture trapped in".
Let the components air-dry for 12 to 24 hours. Resist the urge to speed up the process with hair dryers or placing parts near heat sources, as these can warp plastic or damage seals. To check if drying is complete, inspect the cloth for any ink traces - if it’s clean, your pen is ready for the next step.
Ensuring everything is thoroughly dry is essential for optimal ink performance. Once you're confident all moisture is gone, you're ready to reassemble.
Reassemble and Test the Pen
After drying, it’s time to reassemble your fountain pen with care. Start by securely attaching the clean converter to the back of the grip section. If your pen uses a screw-in converter, twist it clockwise gently while applying slight pressure to avoid damaging the threads. Next, screw the barrel back onto the grip section, turning it clockwise until it feels snug - but avoid overtightening, as this could cause unnecessary strain.
Once reassembled, fill your pen with fresh ink and test it to ensure smooth, consistent ink flow. If the ink doesn’t flow evenly, consider re-cleaning the pen or double-checking the assembly. A properly cleaned and carefully reassembled fountain pen should deliver a smooth, vibrant writing experience right from the first stroke.
Conclusion
Cleaning your fountain pen converter takes just a few minutes and requires only basic supplies. Using distilled water and regularly flushing your converter can help keep it clog-free and ensure smooth writing. By sticking to the steps outlined in this guide, you’ll prevent clogs, maintain the purity of your ink colors, and keep your pen performing beautifully for years.
Make cleaning a habit - flush your pen every time you change inks or before storing it for an extended period. As Pen Chalet puts it:
Regular cleaning of your luxury fountain pens will extend their life, and ensure they operate at peak performance!
Fountain pen inks are water-based, which means residue buildup can happen over time, leading to clogs. A simple rinse with water until it runs clear is often enough to avoid these issues. For tougher clogs, a pen flush solution can come to the rescue.
The more often you clean your pen, the quicker and easier it becomes. By making converter cleaning a regular part of your fountain pen care routine, you’ll enjoy consistent ink flow and top-notch performance every time you write. Stick to these simple steps, and your pen will always be ready to deliver a smooth writing experience.
FAQs
How often should I clean my converter?
To keep your fountain pen working smoothly, it's a good idea to clean the converter regularly. A quick flush with lukewarm water every week should do the trick. For a more thorough cleaning, including the converter, aim for once a month. If you notice problems like ink flow issues, drying, or skipping, clean it more frequently. This simple routine can help your pen deliver consistent performance.
Can I use tap water instead of distilled water?
When cleaning a fountain pen converter, it's best to stick with distilled water. This helps prevent mineral buildup and reduces the risk of damage over time. While room-temperature tap water can be used if you're in a bind, distilled water is the safer choice to keep your pen in good shape for the long haul.
What if the water still looks tinted after flushing?
If the water still appears tinted after flushing, it means some ink residue is lingering inside. Keep flushing with clean water or try using a pen cleaning solution. Another method is to fill the converter with water, shake it gently, and repeat this process several times to loosen any stubborn ink. For a deeper clean, let a cleaning solution sit in the converter for about 10 minutes before flushing again. Repeat these steps until the water runs clear.