
Smooth fountain pen nibs make writing enjoyable, but scratchy nibs can ruin the experience. With micro-mesh sheets, you can fix rough nibs at home without damaging them - if done properly. Here's how to start:
- What You'll Need: A 12,000-grit micro-mesh sheet ($5), a jeweler's loupe (10x magnification), brass flossing sheets, and basic cleaning tools like a bulb syringe and lint-free cloth.
- Practice First: Use inexpensive pens like the Jinhao 992 to avoid costly mistakes.
- Techniques: Use figure-8 motions for even smoothing, directional strokes for specific rough spots, and circular polishing for a shiny finish.
- Common Mistakes: Avoid over-smoothing, which can ruin the nib's tipping material. Always test progress on paper to ensure smoothness.
How to use FPR Micro-mesh Nib Smoothing Sheets
sbb-itb-1dd4fe9
Tools and Materials You'll Need
Having the right tools on hand can make nib smoothing both safer and more effective. The good news? You don’t need a pricey kit to get started - just a handful of affordable items will do the trick.
Micro-Mesh Sheets and Grit Levels
A 12,000 grit micro-mesh sheet is the go-to for smoothing fountain pen nibs. At just $5.00 for a 3" x 4" sheet, it’s a durable option that can polish hundreds of nibs. To use it, apply water to the sheet or fill the pen with ink, ensuring a smoother process. Be cautious about grit levels - anything too coarse could remove excessive material and potentially ruin the nib.
Additional Tools for Precision
To ensure accuracy, a few extra tools come in handy:
- Jeweler's loupe or magnifying glass (10x magnification or higher): Crucial for checking tine alignment before smoothing, as misaligned tines can’t be corrected by polishing alone.
- Brass flossing sheets ($3.25): Perfect for clearing debris between the tines, which can also slightly enhance ink flow.
- 2 oz bulb syringe ($2.97): Useful for flushing out grit or ink residue after smoothing.
- Rubber grip ($2.00): Makes removing nibs and feeds easier.
- Silicone grease ($3.25): Helps secure parts when reassembling the pen.
Once you have these tools, you’re ready to practice your smoothing skills.
Practice Pens for Beginners
It’s always a good idea to practice on inexpensive pens before working on more cherished ones. Brands like Fountain Pen Revolution offer budget-friendly models and replacement nibs that are perfect for honing your technique. For instance, a pen like the Jinhao C100 is a solid choice for beginners. Starting with these affordable options minimizes the risk of costly mistakes, giving you the confidence to handle more valuable pens later on.
Step-by-Step Smoothing Techniques
Preparing the Nib
Start by cleaning the nib thoroughly with warm soapy water or isopropyl alcohol. This removes any ink residue, oils, or debris that could interfere with the smoothing process. Once cleaned, dry the nib completely using a lint-free cloth.
Inspect the nib closely with a loupe or magnifying glass. Check that the tines are aligned and ensure the gap between them is approximately the thickness of a credit card. Test the nib on smooth paper to identify any rough spots or areas that catch. Once the nib is clean and aligned, you’re ready to move on to smoothing techniques that will refine its tip.
Technique 1: Figure-8 Motion
The figure-8 motion is designed to evenly smooth the nib's tipping without creating flat spots. Start with 4,000-grit micro-mesh for initial smoothing, then progress to 8,000 and 12,000 grits. Secure the micro-mesh to a flat, stable surface like glass or an acrylic block.
Hold the pen at a slight angle (10–15°) and apply feather-light pressure - about 1 ounce. Use overlapping figure-8 strokes over a 1–2 inch area, completing 20–30 strokes per grit level. Rotate the pen slightly as you work to ensure even smoothing across all sides of the nib's round tip. Halfway through, rotate the micro-mesh 90° to avoid forming grooves. On steel nibs vs. gold nibs, like those from Fountain Pen Revolution, this technique can noticeably reduce feedback in about 5 minutes per grit, resulting in a smoother writing experience while maintaining the tine gap.
Once you’ve established an even base with the figure-8 motion, focus on specific rough areas using directional strokes.
Technique 2: Directional Smoothing
Directional smoothing is ideal for addressing specific scratchy areas you noticed during testing. For example, if the nib feels smooth vertically but catches when moving horizontally, the issue may lie with vertical rails.
Choose a micro-mesh between 6,000 and 12,000 grit. Apply short strokes (about 1/4 inch) perpendicular to the direction of the scratch. For vertical scratches, move left-to-right; for horizontal scratches, move up and down. Apply light pressure and perform 10–15 strokes in each problem area. After each set, test the nib to check your progress. For nibs with vertical rail issues, about 12 strokes on 8,000-grit micro-mesh can eliminate most of the roughness without over-flattening the tip.
Technique 3: Circular Polishing
Circular polishing provides the final refinement and gives the nib a smooth, shiny finish. Start with dry 12,000-grit micro-mesh. Use small, tight circles (about 1/8 inch in diameter) on the nib's tip, rotating clockwise for 20 rotations, then counterclockwise. To polish the nib’s sides and shoulders, hold the pen at a 45° angle and repeat the circular motion.
For the final step, switch to a wet micro-mesh pad. Soak the pad in distilled water to reduce heat and minimize dust. Using the same circular motion, polish each side of the nib for 10–15 seconds. This wet polish enhances the finish, leaving the nib with a mirror-like shine. Nibmeisters report that even affordable steel nibs, such as those from Fountain Pen Revolution, can achieve a high-end look comparable to custom grinds costing $100 or more. With regular use, these results can last 6–12 months. Be sure to flush the nib between grit levels to prevent cross-contamination.
Testing and Finishing
Micro-Mesh Grit Progression Guide for Fountain Pen Nib Smoothing
Polishing with Brass Sheets
Once you've completed the 12,000-grit micro-mesh stage, brass sheets are the secret weapon for that final, flawless polish. These sheets help remove any lingering micro-scratches and give the nib a sleek, mirror-like finish. For the best results, use pure, non-lubricated brass sheets that are about 0.003 inches (0.08 mm) thick. Anything thicker can be too abrasive and might damage the nib's tipping material. This specific thickness is perfect for gentle polishing that aligns with the nib's natural movement without altering its shape.
To begin, secure the brass sheet on a flat, sturdy surface. Hold the pen at a 10–15° angle and apply light pressure - around 1–2 oz. Perform 10–20 straight strokes along the nib, then rotate the nib 90° and repeat the process. For the finishing touch, use 5–10 circular motions to ensure the polish is even across the surface. Brass polishing should only come after the 12,000-grit stage; it provides a finish comparable to a 20,000+ grit polish. This technique can even transform affordable steel nibs, like those from Fountain Pen Revolution, into smooth performers with a brilliant shine. After this step, the nib is ready for performance testing on paper.
Testing the Nib on Paper
With the nib polished to a mirror-like finish, it's time to test its performance. Use high-quality sacrificial paper, such as Rhodia or Clairefontaine (80–100 gsm), to check for smoothness and consistency. Test the nib by drawing continuous lines, figure-8s, X shapes, and loops at different speeds and pressures. A properly smoothed nib should glide effortlessly, produce consistent line widths, and start writing immediately after pauses without skipping.
If you encounter rail scratches, it could mean you applied too much pressure during the finer grit stages. In that case, a quick touch-up with 8,000-grit micro-mesh can help. On the other hand, hard starts might indicate over-polished tines; a gentle re-polish with brass could resolve this issue. Testing on various paper types is also a good practice to ensure the nib performs consistently across different surfaces.
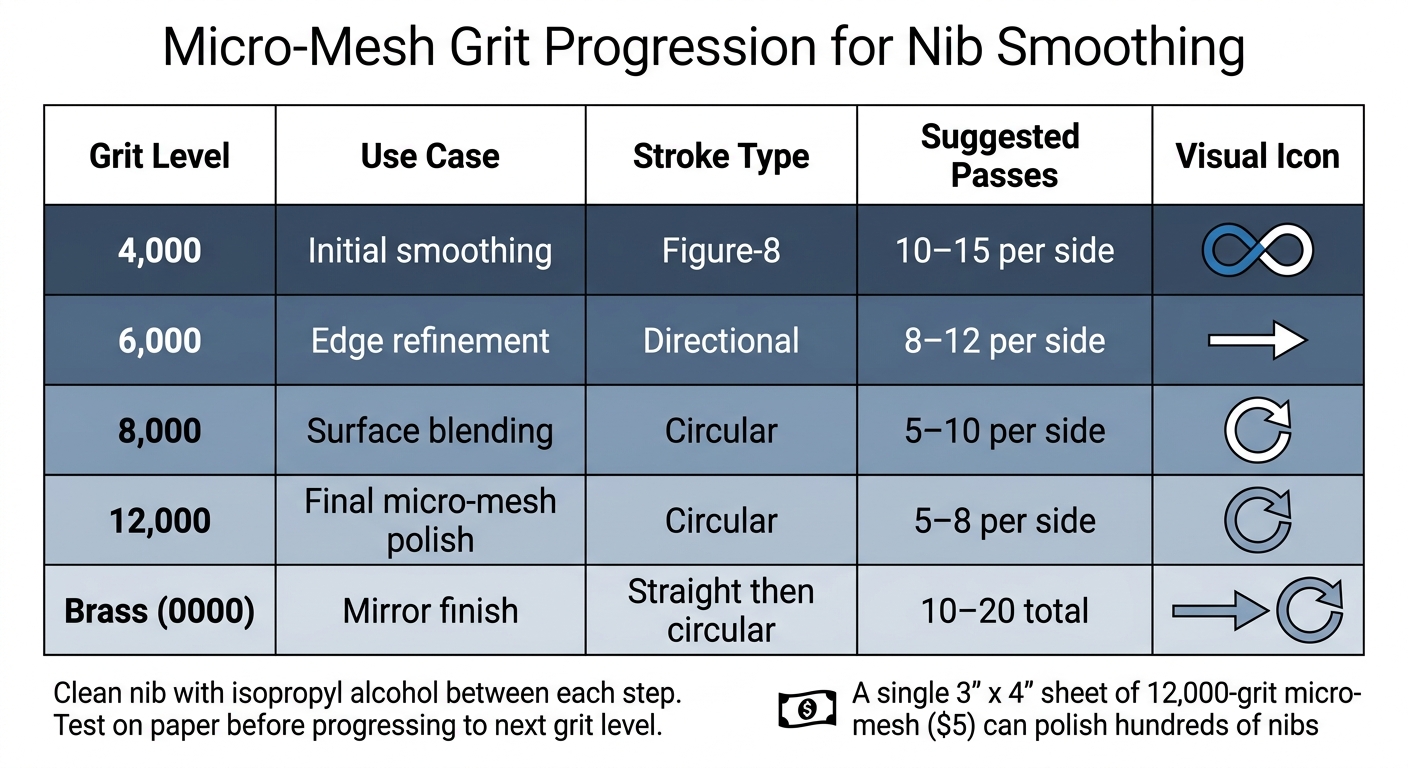
Micro-Mesh Grit Progression Table
| Grit Level | Use Case | Stroke Type | Suggested Passes |
|---|---|---|---|
| 4,000 | Initial smoothing | Figure-8 | 10–15 per side |
| 6,000 | Edge refinement | Directional | 8–12 per side |
| 8,000 | Surface blending | Circular | 5–10 per side |
| 12,000 | Final micro-mesh polish | Circular | 5–8 per side |
| Brass (0000) | Mirror finish | Straight then circular | 10–20 total |
Only move to the next grit level after the nib passes the paper test at its current stage. Be sure to clean the nib with isopropyl alcohol between each step to avoid cross-contamination. A single 3" x 4" sheet of 12,000-grit micro-mesh, costing about $5.00, can last for years and polish hundreds of nibs.
Common Mistakes to Avoid
Over-Smoothing Risks
One major pitfall in nib smoothing is overdoing it and removing too much of the tipping material. This material is crucial for the nib's performance, and once it's gone, there's no way to restore it. In December 2023, nib expert Richard Binder shared an example of a pen owner who tried to fix a "tiny skritchy spot" but ended up removing all the nib's tipping material.
"Nib smoothing accuracy worsens if tipping material is removed too quickly."
– Richard Binder, Nib Technician
Over-smoothing can cause several issues, including skipping, difficulty starting, paper fibers getting trapped in the nib slit, and flat spots forming on the nib's rounded tipping ball. These problems often occur when the pen isn't rotated during the smoothing process. To minimize these risks, make sure to rotate the pen gently while smoothing. A good approach is to draw just 2–3 figure-eights at a time, then immediately test the nib on paper to check your progress. Also, take a moment to understand how smoothing might impact your pen's warranty before starting.
Warranty Considerations
Keep in mind that most warranties become void if you attempt DIY nib smoothing.
Practice on Inexpensive Pens First
Before working on pens you care about, it’s wise to start with inexpensive fountain pens for beginners. This reduces the chances of costly mistakes.
"Learn on inexpensive pens before working on those you value."
– Richard Binder, Nib Technician
Conclusion
Key Takeaways
Using micro-mesh to smooth a scratchy nib can turn an unpleasant writing experience into a satisfying one - if you approach it with care and precision. Since the nib accounts for about 90% of a fountain pen's performance, investing time in refining it can make a noticeable difference in how your pen writes. Before you begin, check that the nib is aligned correctly and that the pen is clean with a steady ink flow. Sometimes, dried ink or debris can create the illusion of scratchiness.
When working with micro-mesh, remember to lubricate it with water or ink for better results. Use light pressure and limit yourself to 2–3 figure-eight motions at a time. Testing frequently on paper helps you track your progress. To preserve the rounded shape of the nib's tipping material, rotate the pen slightly as you work, avoiding any flat spots. A single 3" x 4" sheet of 12,000-grit micro-mesh is a budget-friendly tool that can last for years and handle the polishing of hundreds of pens.
By following these steps, you'll be well on your way to mastering this technique.
Next Steps
Build your confidence by practicing on affordable pens before moving on to your treasured collection. Brands like Fountain Pen Revolution offer a range of inexpensive models and replacement nibs, including flex and ultra-flex options, which are perfect for honing your skills.
To maintain your nib's smoothness over time, use tools like brass flossing sheets and silicone grease. For additional guidance, check out Fountain Pen Revolution's YouTube channel, which features video tutorials on smoothing nibs and other helpful tips. Regular practice and proper maintenance will ensure your pens write beautifully for years to come.
FAQs
How do I know if my nib is misaligned or just scratchy?
To figure out if your nib is misaligned or simply scratchy, grab a 10× loupe and take a close look at the tines. Uneven tines or rough edges are common culprits. Misaligned tines often make the nib feel scratchy when writing in certain directions. Test this by using fountain-pen-friendly paper - if the scratchiness happens only in specific directions, misalignment is the likely cause.
On the other hand, if the nib feels rough but the tines are properly aligned, the issue might be resolved by smoothing the nib with micro-mesh.
When should I stop smoothing to avoid ruining the tipping?
Stop working on your nib as soon as it writes smoothly and consistently without any scratchiness or skipping. Overdoing it can wear away too much of the tipping material and potentially ruin the nib. Use tools like micro-mesh cautiously and test the nib on paper frequently during the process. If you notice the nib becoming scratchy, skipping more often, or the tipping material looking uneven, stop right away to avoid causing permanent damage.
What should I do if the nib skips or hard-starts after polishing?
If your nib is skipping or hard-starting after polishing, it might be due to misaligned tines or burrs. Use a 10× loupe to inspect the nib closely. If you spot misalignment, gently adjust the tines or use brass shims to correct the issue.
If the alignment looks good, try smoothing the nib with 12,000-grit micro-mesh or Mylar paper. Be cautious not to overdo it, as over-polishing can damage the nib. Regular cleaning and careful inspections are essential for maintaining smooth ink flow and avoiding skips.