
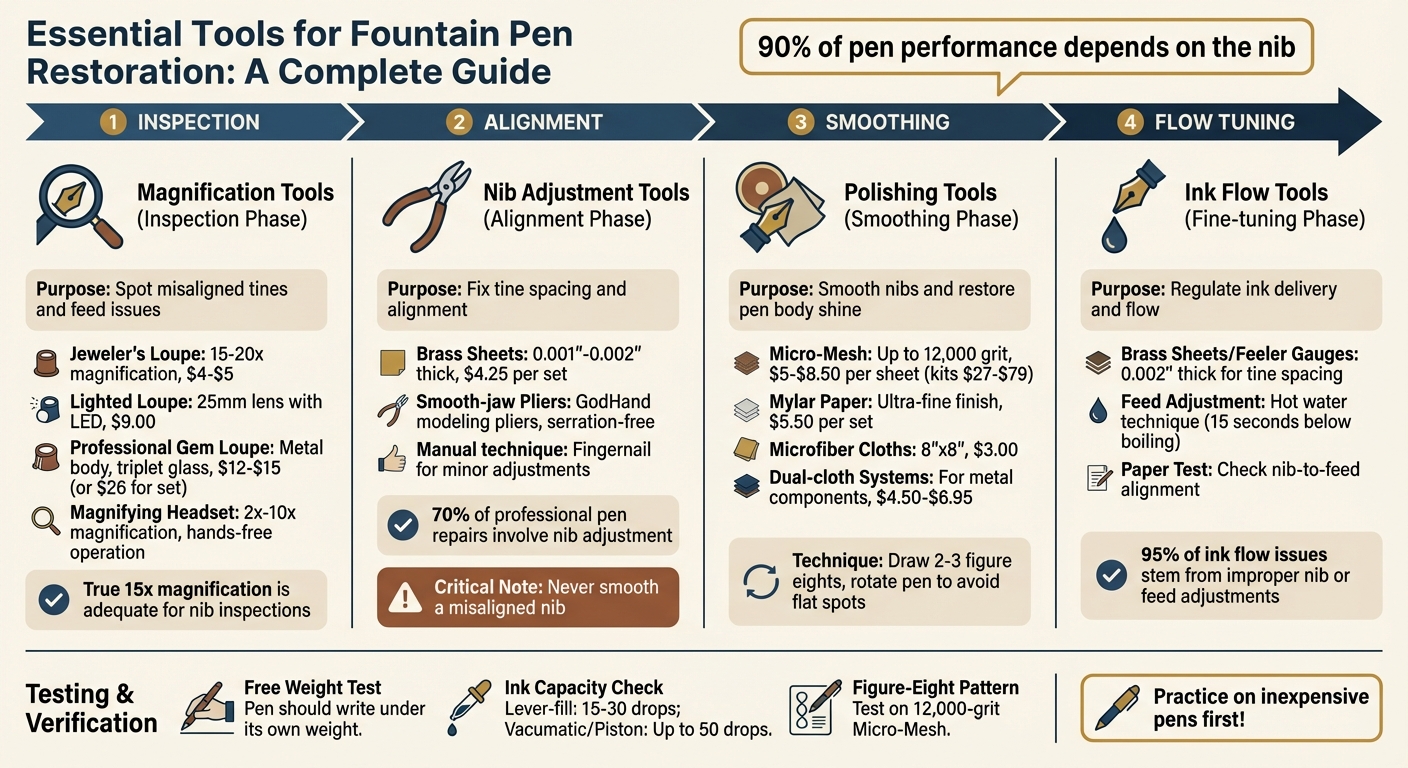
Restoring a vintage fountain pen isn’t just about cleaning or replacing parts - it’s about ensuring it writes smoothly. The nib, responsible for 90% of a pen’s performance, is often the root of issues like skipping, scratchiness, or inconsistent ink flow. Proper tools are essential for inspecting, adjusting, and polishing the nib and feed to achieve optimal performance. Here’s a quick rundown of what you’ll need:
- Magnification Tools: Use a 15–20x loupe or magnifying headset to spot misaligned tines or feed issues.
- Nib Adjustment Tools: Brass sheets ($4.25) and smooth-jaw pliers help fix tine spacing and alignment without damage.
- Polishing Tools: Micro-Mesh (up to 12,000 grit) and Mylar paper ($5.50 per set) smooth nibs, while microfiber cloths ($3.00) restore pen bodies.
- Ink Flow Tools: Brass sheets or feeler gauges adjust tine gaps to regulate ink flow, while feed alignment ensures consistent delivery.
Each tool plays a role in fine-tuning your pen. Test adjustments with the "free weight test" - a well-tuned pen should write effortlessly under its own weight. Patience and practice are key, especially when working with vintage pens. Start small, test often, and always double-check alignment before polishing or smoothing.
Essential Tools and Steps for Fountain Pen Restoration
10 Most Essential tools for tuning your Nibs
Magnification Tools for Inspecting Nibs and Feeds
When it comes to fountain pen nibs, many issues - like twisted tipping, misaligned tines, or poor contact with the feed - are almost impossible to spot with the naked eye. That’s why having a loupe with 15–20x magnification is a must. It helps you avoid making adjustments that might permanently damage the nib.
Loupe Magnifiers
A simple handheld jeweler's loupe with 30x21mm dimensions, priced around $4–$5, works well for inspecting tine alignment and feed placement. If you want better visibility, a lighted loupe is a great upgrade. For example, Fountain Pen Revolution offers a lighted loupe with a 25mm lens and built-in LED for $9.00. The combination of a wide lens and good lighting makes it a favorite among enthusiasts.
Keep in mind, though, that some loupes labeled as 40x magnification actually provide closer to 15x. For nib inspections, true 15x magnification is more than adequate. Higher-quality loupes, especially those with triplet glass optics, deliver sharper and distortion-free images compared to cheaper plastic models. If you're looking for something more durable, professional gem loupes made with metal bodies and fused glass construction are available. These typically cost $12.00 to $15.00 each, or $26.00 for a set.
Magnifying Headsets
If you're doing hands-on nib adjustments, a magnifying headset is a game-changer. These devices let you work with both hands free, making it easier to hold the pen and use tools simultaneously. While handheld loupes usually offer magnification between 10x and 20x, headsets generally range from 2x to 7x, with some specialized models reaching up to 10x.
Headsets also provide a wider field of view and greater depth of field, allowing for a more comfortable working position. You won’t need to constantly reposition your head to keep the nib in focus. As Deb from Goodwriterspens, a restoration expert, explains:
If, as time goes on, you get deeper into repair and restoration, this is one of the areas you can spend quite a bit of money on as you acquire bench magnifiers and Donegan headsets.
With the right magnification tools, you’ll have the clarity and control needed to tackle precise nib adjustments confidently.
Nib Adjustment Tools
Once you've spotted alignment issues using magnification, having the right tools on hand is key to fixing them. Brass sheets, typically 0.001"–0.002" thick, are perfect for clearing out dried ink and gently widening tines to improve ink flow. A set of two brass sheets usually costs about $4.25, making them an affordable must-have for any pen restoration kit. With precise findings from your magnification, these tools can help you correct nib misalignments with ease.
Nib Alignment Tools
For more severe misalignments, smooth-jaw pliers are essential. Standard pliers won’t do the trick - opt for specialized modeling pliers like GodHand, which feature serration-free jaws designed to realign twisted tines without causing damage. This is especially important for softer gold nibs, particularly those with a gold content of 14k (58.5%) or higher, as they are more susceptible to misalignment.
Professional nib technician Richard Binder offers an important piece of advice:
Thou Shalt Not Attempt to Smooth a Misaligned Nib. When you try to smooth a nib that is not aligned properly, you will discover very quickly that it doesn't work.
Interestingly, about 70% of professional pen repairs involve some form of nib adjustment. This underscores the importance of getting the alignment right before attempting any smoothing or polishing. Proper alignment ensures your pen writes smoothly and without any issues.
Manual Adjustment Techniques
For minor adjustments, you don’t always need specialized tools - your fingernail can work for small corrections. With gentle pressure, you can nudge the tines back into parallel alignment. This approach requires patience and a delicate touch. It’s a good idea to practice on less expensive pens, like the Jinhao 992, before tackling adjustments on valuable pieces.
To gauge your progress, use consistent testing materials - a trusted ink like Waterman Serenity Blue and medium-quality paper. This ensures that any performance changes are directly tied to your adjustments. As Restorer's Art wisely points out, "Unless the tines are properly parallel first, nothing else will make it a smooth writer".
Polishing Tools for Nibs and Pen Surfaces
Once your nib is aligned, the next step is all about refining the finish - both on the nib and the pen body. Polishing tools help smooth out any roughness, ensuring a sleek and enjoyable writing experience. These tools range from ultra-fine abrasives for nibs to polishing cloths for the pen’s exterior. The key is to achieve smoothness without removing too much material or harming delicate finishes.
Micromesh and Smoothing Papers
Micro-Mesh sheets are a popular choice for tackling scratchy nibs. For the final polish, the 12,000-grit sheet is ideal - it smooths without being overly abrasive. Individual sheets typically cost between $5.00 and $8.50, while restoration kits (spanning grits from 3,200 to 12,000) are priced from $27 to $79.
But the technique you use is just as important as the tools. Fountain Pen Revolution recommends using Micro-Mesh with water or ink for lubrication, which helps prevent damage. A common method involves drawing 2–3 figure eights at your usual writing angle, followed by immediate testing. As they advise:
It is a good idea to rotate the pen just a bit while making the figure eight pattern to avoid grinding a flat spot onto the round ball tipping of the nib.
For an even finer finish, follow up with Mylar paper (about $5.50 per set). Mylar gives the nib an ultra-smooth polish after using Micro-Mesh. However, there’s one critical reminder:
Tine misalignment is the most common reason for a scratchy nib and smoothing won't help.
Always double-check alignment with a magnifier before reaching for any abrasive. Once the nib is polished, you can turn your attention to restoring the pen body.
Polishing Cloths for Pen Bodies
While Micro-Mesh is great for nibs, polishing cloths are the go-to for restoring the shine on pen barrels, caps, and metal trim. High-density microfiber cloths (around $3.00 for an 8" x 8" piece) are perfect for removing fingerprints and oils without scratching. For metal components like cap bands or clips, dual-cloth systems (priced between $4.50 and $6.95) work wonders. These systems typically include one cloth for removing tarnish and another for buffing to a high shine.
Different materials require different care. Silver and plated silver benefit from cloths treated with anti-tarnish formulas, while hard metals like chrome or stainless steel just need a soft buffing cloth. For delicate materials like celluloid, lacquer, or resin, stick to ultra-soft microfiber cloths - harsh chemicals can damage vintage finishes. Danny Watts, author of Fountain Pen Chronicles, shares his approach:
I use the Sunshine cloth to remove dried ink, grime and stains from the nibs, barrel and cap... The entire process 'polishes' the pen.
sbb-itb-1dd4fe9
Ink Flow Adjustment Tools
Once polishing is complete, the next step is fine-tuning the ink flow. If the flow is too dry, the pen may skip, while overly wet flow can lead to flooding. Interestingly, around 95% of ink flow issues stem from improper nib or feed adjustments. With the right tools and techniques, you can achieve precise ink flow to finalize your pen's restoration. Start by focusing on tine spacing adjustments to regulate the ink flow.
Feeler Gauges for Tine Spacing
The gap between the nib's tines plays a key role in controlling how much ink reaches the paper. A wider gap allows more ink to flow, while a narrower gap restricts it. For restored fountain pens, brass sheets - usually 0.002 inches thick - act as feeler gauges to measure and adjust this critical spacing.
To widen the gap, gently insert a brass sheet into the breather (pierce) hole and carefully move it toward the tip. As Arthur Twydle explains:
A wider gap between the prongs increases the flow. Adjustment is simply by inserting a nib spacer (a heavy razor blade or fine penknife) in the pierce hole and moving it gently towards the tip.
Brass sheets also serve another purpose - they can "floss" between the tines to remove dried ink or debris that might block the flow. If the pen writes too wet and you need to reduce the flow, remove the nib and carefully flex or cross the tines to narrow the slit. Always inspect your adjustments with a 10× loupe to ensure the tines remain aligned.
Once the tine spacing is properly set, the next focus is on adjusting the feed.
Feed Adjustment Techniques
Even perfectly spaced tines won't deliver consistent ink flow if the feed isn't correctly positioned. The feed should sit snugly against the underside of the nib, with its shoulders aligned with the nib's shoulders. Twydle offers this guidance:
The correct position is for the shoulders of the feed to be in line with the shoulders of the nib. In other words, when looking at the nib from the front, the feed should not be visible - but only just.
To check the alignment, use the paper test. Slide a thin piece of paper between the nib and feed - if the paper slides in, there's a gap that needs to be closed.
For hard rubber or vulcanite feeds, immerse the nib and feed in very hot water (just below boiling) for about 15 seconds to make the material pliable. Then press the feed firmly against the nib to close any gaps. For plastic feeds, stick to hot water or steam, as open flames or excessive heat can cause warping.
Incorrect feed positioning can lead to issues like blotting or flooding if the feed extends too far forward, or uneven ink delivery if it's set too deep. Small, careful adjustments are key. It's a good idea to practice these techniques on less expensive pens before working on valuable restored ones.
Testing and Verification Methods
Once you've adjusted the feed and tines, it's crucial to test the pen's performance before regular use. Testing helps pinpoint whether your adjustments are on target or if further tweaks are needed, allowing you to address any issues early.
Writing Tests
The free weight test is a reliable way to check if your adjustments are correct. Place the pen in the crook of your thumb and first finger, then glide your hand across the paper. The pen should write effortlessly under its own weight, requiring no additional pressure.
If you find that the pen needs downward pressure to produce a line, it might indicate that the nib requires smoothing or the feed needs repositioning. To smooth the nib, draw figure-eight patterns on high-grit abrasive paper, such as 12,000-grit Micro-Mesh, while gently rotating the pen between your thumb and finger. This helps remove any sharp edges from the nib's tip.
Next, check the pen's ink capacity to ensure the filling system is functioning properly. For example:
- A standard lever-fill pen typically holds 15 to 30 drops of ink.
- Vacumatics or piston fillers can hold up to 50 drops.
If the ink capacity is lower than expected, inspect the sac or seals for potential leaks. Also, monitor the pen's ink flow during extended writing sessions. Signs like skipping, irregular lines, or excessive wetness could point to alignment issues between the nib and feed.
If minor inconsistencies persist after these tests, proceed with small, precise adjustments.
Making Small Adjustments
Once the nib and feed pass preliminary checks, focus on fine-tuning. Make incremental changes and retest each time. Overcorrecting can easily damage a nib, especially vintage ones, which are more fragile and prone to cracking under excessive pressure.
Before smoothing the nib, use a 10× loupe to confirm that the tines are perfectly aligned. Misaligned tines often cause scratchiness, which smoothing alone won't fix. Realign the tines first if needed.
If the ink flow is too dry even after adjusting the tine spacing, try inserting a 0.002-inch brass sheet into the breather hole and gently move it toward the tip to slightly widen the gap. On the other hand, if the flow is too wet, carefully remove the nib and flex the tines inward to narrow the slit.
It's a good idea to practice these techniques on inexpensive pens before working on valuable ones. As the Goulet Pen Company wisely suggests:
It's best to practice on inexpensive pens that you don't mind screwing up and throwing away if things go bad.
Conclusion
Every tool and technique covered here plays a key role in restoring fountain pens with precision and care. Bringing a pen back to its best condition requires the right tools and a careful, step-by-step process. As Deb from Goodwriterspens aptly puts it, "You have to have a basic tool-kit or you're going to break pens". A jeweler's loupe with 10× to 30× magnification helps identify tiny misalignments, while brass shims and Micro-Mesh abrasives (up to 12,000 grit) allow for precise adjustments to ink flow and smoothing out scratchy nibs.
When working with hard rubber or plastic feeds, controlled heat is your best friend. Tools like a hair dryer - or even boiling water for just 15 seconds - make these materials pliable enough for safe adjustments without risking damage. Open flames, on the other hand, should be avoided to prevent irreparable harm.
Patience is key. Start with small adjustments, testing frequently. A properly tuned pen should pass the free weight test, gliding smoothly across the page under its own weight without added pressure. As G&C Abrasives wisely note, "A proper working nib is much more than just polishing and smoothing the tip". It’s about understanding how each tool and technique contributes to the pen’s overall performance and longevity. By following this methodical approach, you can ensure your restored fountain pen not only writes beautifully but also stands the test of time.
FAQs
What tools do I need to adjust and fine-tune vintage fountain pen nibs?
To fine-tune a vintage fountain pen nib with precision, you'll need a few key tools. Start with a magnifier - a 30×–45× jeweler’s loupe or a head-mounted loupe works perfectly - to closely inspect the nib’s tip, tines, and alignment. For small adjustments, such as aligning tines or freeing a stuck feed, fine-point tweezers or needle-nose pliers are essential.
When it comes to smoothing and polishing, a Micro-Mesh polishing kit is your go-to. These soft abrasive pads, ranging from 3,200 to 12,000 grit, are gentle yet effective in refining the nib's surface. Thin brass shim stock (about 0.001–0.002 inches thick) is incredibly useful for tasks like testing the nib spread or lifting a tine. To finish up, a soft cleaning cloth paired with a small amount of liquid abrasive polish will keep the nib spotless and ready for writing.
With these tools in hand, you’ll be well-equipped to adjust and restore your vintage fountain pen nibs with care and precision.
How do I maintain smooth ink flow in a restored fountain pen?
To keep your restored fountain pen writing smoothly, begin by giving the nib and feed a thorough cleaning. Use a soft-bristle brush or a gentle tool to remove any dried ink or debris. Once cleaned, let the parts air dry completely before putting the pen back together. After reassembling, prime the nib by filling the cartridge or converter and letting a few drops of ink flow through the feed. This ensures the channels are properly saturated, reducing the chances of hard starts.
Next, inspect the nib alignment with a jeweler’s loupe (30×–40× magnification is ideal). If one tine is higher than the other, carefully adjust it using tweezers or a fine tool to restore proper capillary action. Test the ink flow by writing with the pen using only its weight - this will help you gauge if the flow is too dry or too wet. Adjust the nib as needed until the writing feels smooth and balanced.
For best results, always opt for high-quality ink that suits your nib size, avoiding inks that are overly thick or dried out. When not in use, store your pen upright to prevent ink from settling improperly. If you’re looking for reliable tools, nibs, or inks to support your restoration work, Fountain Pen Revolution offers affordable solutions to keep your pen performing beautifully.
How can I polish and smooth a fountain pen nib effectively?
To refine and smooth a fountain pen nib, you’ll need a few key tools: a loupe or magnifier, micro-mesh pads (with grits from 3,200 to 12,000), a brass shim, and some polishing compound. Start by cleaning the nib thoroughly with lukewarm water to remove any ink residue. Once clean, use the magnifier to inspect the tines, ensuring they’re aligned and evenly spaced.
Begin the smoothing process with a low-grit micro-mesh pad. Gently rub the tip of the nib in small circular motions, applying only light pressure. Gradually work your way through finer grits, testing the nib on paper after each step to check for smoothness. For the finishing touch, use a clean cloth with a small dab of polishing compound to polish the nib tip until it glides effortlessly. With patience and care, you’ll transform your nib into one that writes smoothly and consistently.