

When your fountain pen feels scratchy or skips, the likely culprit is misaligned tines - the two halves of the nib that guide ink to the paper. Proper alignment ensures smooth writing by allowing the nib's tipping material to glide evenly. Here's how to fix it:
- Spot the Issue: Scratchiness in one direction or hard starts often indicate one tine is higher than the other.
- Inspect Closely: Use a magnifier (10× to 20×) to check the nib from the front. Misaligned tines are easy to identify when viewed head-on.
- Adjust Carefully: Gently press the higher tine down using a soft tool like a credit card edge. Avoid pulling the lower tine up to maintain proper feed contact.
- Test and Refine: After each adjustment, write short strokes to check smoothness. Use consistent materials like quality ink and paper.
- Avoid Rushing: Never smooth a nib before alignment, as this can cause permanent damage.
For beginners, practice on inexpensive pens before attempting adjustments on valuable ones. If the problem persists or the nib is damaged, consult a professional. Taking the time to align your nib ensures a smoother and more enjoyable writing experience.
Adjusting Your Fountain Pen - Part 2: Aligning the Tines
1. Learn the Basics of Tine Alignment
The tines - the two halves of a nib separated by a narrow slit - must meet the paper at the same height for smooth writing. When properly aligned, the rounded tipping material glides effortlessly across the page. Misaligned tines, however, can cause problems. The untipped edge of the lower tine may snag on paper fibers, disrupting ink flow and creating an unpleasant, scratchy writing experience.
"The two halves of the nib created by the slit are called the 'tines', and those are precisely adjusted to be aligned with each other so the nib feels smooth as it glides across the page."
- Brian Goulet, Founder, The Goulet Pen Company
The tipping material, often made from a durable alloy like rhodium or iridium, is the only part of the nib that should touch the paper. This small, rounded piece is attached to the tips of the tines. If one tine's tipping sits higher than the other, the exposed edge of the lower tine can catch on the paper, leading to discomfort and uneven ink flow.
Trying to smooth a scratchy nib with abrasive tools while the tines are still misaligned is a recipe for disaster. This can create an uneven tip and cause irreversible damage to the nib. It's worth noting that the nib plays a massive role - around 90% - in determining how a fountain pen performs.
"Thou Shalt Not Attempt to Smooth a Misaligned Nib."
- Richard Binder, Nib Specialist, RichardsPens.com
Understanding these fundamentals will help you identify and address misalignment issues effectively. Up next: how to recognize the early signs of misaligned tines.
2. Recognize the Signs of Misaligned Tines
One of the clearest indicators of misaligned tines is directional scratchiness - when your pen glides smoothly in one direction but feels scratchy when moved the other way. This often happens if one tine is positioned lower than the other, causing uneven contact with the paper.
Another red flag is when the nib's inner edge catches on paper fibers, which can pull debris into the slit. You might also notice issues like directional skipping or hard starts when writing.
"The down tine is also likely to be either rounded... or flattened... too much, while the up tine... ends up with a razor-sharp edge that will dig into the paper (but only in one direction)."
- Richard Binder, Nib Technician, RichardsPens.com
To confirm your suspicions, try drawing figure-eights or cross-hatched lines on paper. If the scratchiness only occurs during certain strokes, it’s a strong sign of misalignment. For a closer look, use a loupe to inspect the nib from the front. Misaligned tines will be easy to spot - one will sit visibly higher or lower than the other. Keep in mind, this problem can even show up in pens that are brand new and straight from the factory. These observations can guide you toward a more thorough inspection in the next step.
3. Gather the Right Tools for Alignment
Before diving into nib adjustments, it’s essential to have the right tools on hand. The good news? You don’t need to splurge on specialized equipment - common household items will do the trick. With an understanding of what misalignment looks like, you’re ready to gather what’s needed for the task.
The most important tool is a loupe or high-power magnifier. A magnification level of 10× to 20× is ideal for examining the nib closely. This allows you to clearly see if one tine is sitting higher or lower than the other. Without this, you’re essentially working blind, and accurate adjustments become nearly impossible.
For making those adjustments, an old credit card is surprisingly effective. Its edge is sharp enough to allow for precise corrections but soft enough to avoid scratching the nib. As pen blogger ChrisR puts it:
"The credit card has a nice sharp edge but it's soft enough not to scratch your nib and it isn't too thick – you'll only need very tiny adjustments."
Keep paper towels nearby to catch any stray ink during the process. When testing your adjustments, use a reliable ink like Waterman Serenity Blue and pair it with high-quality paper, such as Rhodia. This ensures you get consistent feedback on your progress.
If you’re new to nib adjustments, it’s best to practice on affordable pens first. Models like the Jinhao 992 or Pilot Metropolitan are great for beginners. They let you develop your skills without the fear of damaging a cherished pen. It’s also crucial to steer clear of metal tools like X-acto knives or brass shims unless you have professional experience. These can easily harm the delicate nib slit if not handled with precision.
Once you’ve gathered these tools, you’re all set to carefully inspect your nib and move on to the next step.
4. Check Your Nib with a Visual Inspection
Start by looking at your nib straight on. This angle is crucial for spotting any vertical misalignment, where one tine might sit higher or lower than the other. Getting this direct view gives you a clear starting point for a detailed check of the nib’s edge.
Use a magnifier (10× to 20× loupe) to carefully examine the nib from this perspective, focusing on the tipping material. Richard Binder explains that the down tine can sometimes round or flatten, while the up tine may turn razor-sharp. Ideally, the tipping material should form a perfectly split sphere, with both halves meeting precisely at the tip.
Next, hold the clean nib against a source of diffuse light, like a computer screen or natural daylight. You should notice a thin band of light shining through the slit. If you don’t see any light, the gap is too tight. On the other hand, if the tip halves don’t meet, the gap is too wide. Follow this by checking the slit from above to confirm the overall geometry.
From an overhead view, the slit should taper gently from the breather hole to the tip. If the tines aren’t parallel, a condition known as "canyoning", the uneven spacing can disrupt ink flow.
Before making any adjustments, wipe off extra ink to ensure a clean surface. Avoid using abrasive materials, as they can cause permanent damage to the nib.
sbb-itb-1dd4fe9
5. Adjust Tines Using Gentle Pressure
Now that you have a clear view of the nib, it’s time to fix any misalignment. Start by identifying the higher tine and gently press it downward toward the feed. Always push the higher tine down instead of pulling the lower tine up. This approach keeps the nib in close contact with the feed, ensuring smooth and consistent ink flow.
"We nearly always push the highest down, closer to the feed, because we want to keep the nib in close contact with it and pushing a tine up risks reducing that contact." – ChrisR
Use a fingertip or a soft-edged tool to apply gentle pressure, while supporting the feed at the same time. Work in small, gradual adjustments - metal tends to hold its shape, so patience is key.
For particularly stubborn cases, you can gently cross one tine over the other and hold it in place for a few seconds. After each adjustment, inspect your progress with a loupe and test the nib with short strokes. The goal is for the nib to glide smoothly in every direction.
"Using gentle pressure, realign the tines with your fingernails until the scratchiness goes away. Remember to make minor adjustments at a time." – EndlessPens
If your fountain pen is especially valuable, you might want to leave the adjustment to a professional nibmeister. DIY fixes can sometimes void manufacturer warranties. Once you’ve made the adjustments, test the nib with short strokes to ensure the issue is resolved.
6. Match Tine Alignment with Proper Ink Flow
Once your tines are aligned, the next step is ensuring the ink flow is just right. Even the best-aligned nib won’t perform well if it’s running dry. Ink does more than just leave a mark on the page - it lubricates the nib, reducing scratchiness and enhancing the writing experience. This step ties everything together, ensuring smooth strokes every time.
"A dry-writing pen will put down less ink so the color will be weaker and you'll feel more feedback. A wet-writing pen will gush ink out, look darker and take longer to dry." – Brian Goulet, Founder, Goulet Pens
The ink flow is controlled by the slit in the nib, which operates through capillary action. If the slit is too tight, it can lead to skipping or faint lines. To fix this, you can carefully widen the slit. Use your fingernail or a thin brass shim (0.001–0.002 inches thick) to gently adjust it, making sure to support the feed while you work.
Another important step is flushing your pen with lukewarm water. This removes dried ink that might be clogging the feed and causing hard starts. After cleaning, test your pen on high-quality paper with a dependable ink, such as Waterman Serenity Blue. This will help you determine if the issue lies with the nib.
Keep in mind, the nib accounts for about 90% of your fountain pen’s performance. When the tines are aligned and the ink flow is balanced, you’ll achieve the smooth, consistent lines that make writing with a fountain pen such a pleasure.
7. Smooth and Test After Making Adjustments
Before you even think about smoothing the nib, make sure it's perfectly aligned. Never smooth a misaligned nib. Doing so can cause uneven wear and permanent damage to the nib. Use a jeweler's loupe to double-check the alignment before moving forward.
Once you're certain the alignment is spot on, you can begin smoothing to enhance the nib's performance. Always lubricate the nib with water or ink before using micromesh. Ink acts as a lubricant, and smoothing a dry nib can lead to excessive grinding and potential damage. Hold the pen at your natural writing angle and make 12 gentle passes on the micromesh. Afterward, rinse the nib and test it immediately. Richard Binder, a well-known nib expert, emphasizes:
"The accuracy of nib smoothing is inversely proportional to the speed at which tipping material is removed".
Take your time - rushing can result in over-grinding and unnecessary wear.
After smoothing, it's essential to test the nib's performance. Let the pen write under its own weight, applying no additional pressure. To further evaluate smoothness, draw figure-eights while slowly rolling the pen between your fingers. This ensures the nib feels smooth across different angles.
For consistent results, stick with the same testing materials - such as Waterman Serenity Blue ink and Rhodia paper - as previously recommended. This consistency helps you identify whether the changes are due to your adjustments and not variations in materials. If you're just starting out, practice on inexpensive pens like the Jinhao 992 before attempting adjustments on more cherished pens.
Avoid using shortcuts like brown paper bags or copper pennies for smoothing. While these methods might offer temporary smoothness, they can leave fibers or soft metals in the nib, eventually clogging the feed and causing issues. Stick to proper tools like micromesh sheets for reliable, lasting results that make writing a joy.
Comparison Table
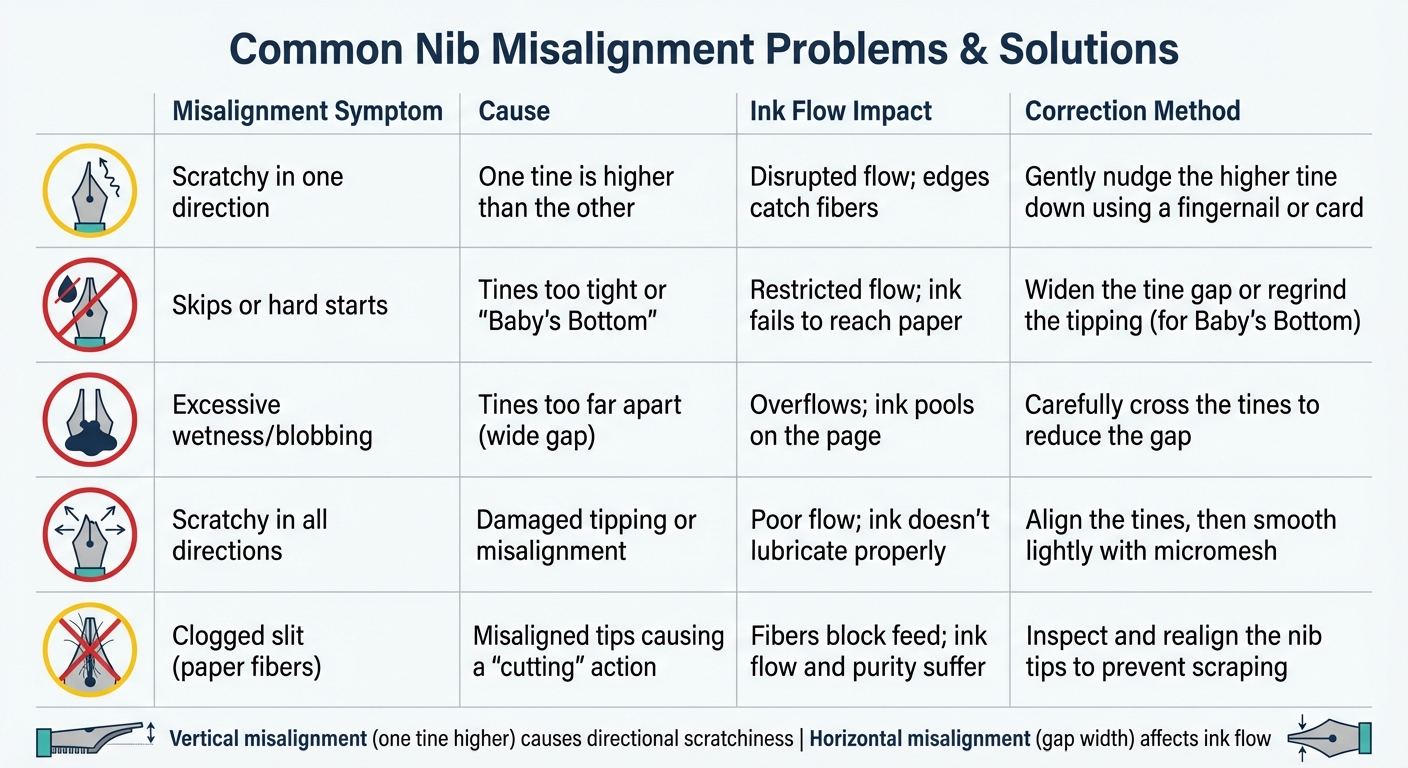
Common Fountain Pen Nib Misalignment Problems and Solutions
Here’s a handy table summarizing common nib misalignment problems and their solutions. It outlines symptoms, causes, the impact on ink flow, and how to fix them. This quick reference emphasizes the importance of precise adjustments for a smooth and consistent writing experience.
| Misalignment Symptom | Cause | Ink Flow Impact | Correction Method |
|---|---|---|---|
| Scratchy in one direction | One tine is higher than the other | Disrupted flow; edges catch fibers | Gently nudge the higher tine down using a fingernail or card |
| Skips or hard starts | Tines too tight or "Baby's Bottom" | Restricted flow; ink fails to reach paper | Widen the tine gap or regrind the tipping (for Baby's Bottom) |
| Excessive wetness/blobbing | Tines too far apart (wide gap) | Overflows; ink pools on the page | Carefully cross the tines to reduce the gap |
| Scratchy in all directions | Damaged tipping or misalignment | Poor flow; ink doesn’t lubricate properly | Align the tines, then smooth lightly with micromesh |
| Clogged slit (paper fibers) | Misaligned tips causing a "cutting" action | Fibers block feed; ink flow and purity suffer | Inspect and realign the nib tips to prevent scraping |
It’s worth noting how vertical misalignment (one tine higher) often leads to scratchiness in specific directions, while horizontal misalignment (tines too tight or too wide) directly influences the ink flow. These targeted fixes can help you fine-tune your nib for the best writing performance.
Conclusion
To wrap up, refining nib alignment starts with a careful inspection using a loupe, followed by gentle adjustments - lowering the higher tine toward the feed - and repeated testing with consistent materials. As nib expert Richard Binder wisely advises, "The accuracy of nib smoothing is inversely proportional to the speed at which tipping material is removed". In other words, patience is your most valuable tool in this process.
For beginners, practicing on affordable pens like the Jinhao 992 is a great way to build confidence. It’s critical to address alignment before moving on to smoothing, as working on a misaligned nib can create uneven edges that feel far scratchier than the original issue.
If you encounter more serious issues - like over-bent tines, a damaged slit, or missing tipping material - it’s best to seek help from a professional nibmeister. Repairs on premium 14K gold nibs can run as high as $200. Binder also cautions, "Smoothing a nib might seem like a simple thing, but unless you have years of training and experience under your belt, you... run the risk of destroying your nib".
With the right tools, a steady hand, and an understanding of your limits, you can turn a scratchy nib into a smooth writer. Small, precise adjustments are the key to success. By mastering these techniques, you’ll not only improve your pen’s performance but also transform it into a reliable companion for your daily writing needs.
FAQs
How can I tell if the tines on my fountain pen nib are misaligned?
If your fountain pen feels scratchy, skips, or only writes smoothly in one direction - like left to right - the tines might be out of alignment. To check, examine the nib carefully under bright light or with a magnifying glass. If one tine sits higher or lower than the other, you've likely found the problem. When the tines are properly aligned, the ink flows smoothly, making writing much more enjoyable.
What do I need to align fountain pen tines at home?
Aligning the tines of a fountain pen at home is easier than you might think, and you only need a few simple tools to get started:
- Magnifying loupe: A jeweler’s loupe or any magnification tool will let you see the nib and tines clearly. You can find affordable options for under $30.
- Thin plastic card: An old credit card or any soft-edged plastic card is perfect for gently adjusting the tines without risking damage.
- Paper towel or tissue: Place this under the nib to catch any ink that might leak during the process.
With these basic items, you can realign the tines and get your fountain pen writing smoothly again - all from the comfort of home.
Why should you align the tines before smoothing a fountain pen nib?
To achieve a smoother writing experience, the first step is aligning the tines of the nib. Misaligned tines are often the main culprit behind nib roughness, not the surface itself. If you skip this step and jump straight to smoothing, you risk wasting material, possibly damaging the nib, and still not fixing the underlying problem. Correct alignment is key to improving ink flow and ensuring a more enjoyable writing experience.