

Most nib tuning goes wrong when I change too many things at once. The fix is simple: I keep the same ink, same 2 paper types, same test phrase, and same grip, then I make one small nib change per round and test again.
If I want clean results, I check 3 things in order: tine alignment, scratch by stroke direction, and flow or railroading. After that, I test writing angle - about 40–55° - and hand pressure, because many “nib problems” are just technique problems.
Here’s the whole routine in one view:
- Use one known ink and flush with cool or room-temp water if flow is uneven
- Test on 2 papers: smooth fountain pen paper and standard 8.5 x 11 in printer paper
- Inspect with a 10x loupe
- Check tine alignment before any smoothing
- Test slow strokes: vertical, horizontal, diagonals, and circles
- Look for railroading on long fast strokes and loops
- Try angle shifts at 40°, 45°, and 50–55°
- Test lighter and heavier pressure
- Log each round with the date, setup, result, and one next change
A short log matters because it helps me stop when the pen is already writing well - instead of grinding away more tipping than I should.
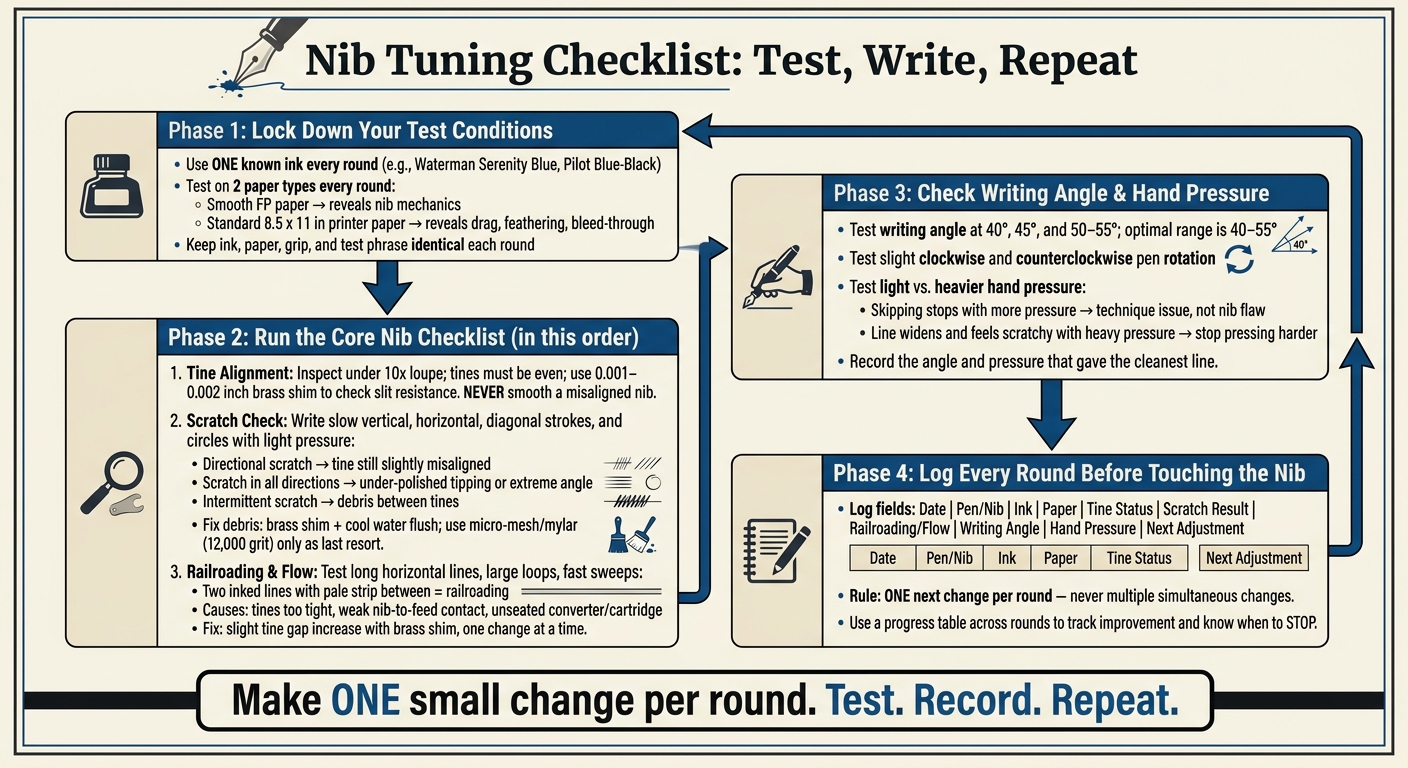
Nib Tuning Checklist: Step-by-Step Process for a Perfect Writing Nib
Tuning / adjusting a fountain pen nib in 3 steps
sbb-itb-1dd4fe9
Keep Test Conditions the Same Every Round
Keep the ink, paper, and writing setup the same each round. That way, when something changes, you can actually tell what changed.
Start with a Known Ink
Once your setup is fixed, check the ink first. Use one plain, moderate-flow dye ink for every round. Waterman Serenity Blue and Pilot Blue-Black are dependable picks. Fountain Pen Revolution's standard non-shimmer blue or blue-black inks work well for this too.
Before each round, make sure the pen is flowing well. If the flow is uneven, flush it with cool water or a fountain pen cleaning solution until the water runs clear, then refill. Avoid hot water.
Test on Two Paper Types for Clear Results
Next, run the same test on two papers. Use the same sample on smooth fountain-pen paper and standard 8.5 x 11 in printer paper. Smooth paper shows nib mechanics more clearly. Printer paper shows drag, feathering, and bleed-through.
Stick with the same paper pair every round so your results are easy to compare.
- Smooth FP paper: shows true smoothness and alignment.
- Printer paper: shows everyday drag, feathering, and bleed-through.
Match your test paper to the paper you use most often.
Run the Core Nib Tuning Checklist
Once you've ruled out ink and paper, run these three checks in the same order each time. That fixed sequence matters. It helps you connect each result to ONE change instead of guessing what caused what.
Check Tine Alignment First
Before you put the nib on paper, inspect the tip under a 10x loupe. Hold the pen at eye level with the nib facing you, then look straight down the slit. The tines should be even, and the slit should run straight to the breather hole.
If one tine sits higher than the other, press it down very gently with a fingertip or fingernail. Go in tiny nudges, then check again under the loupe. You can also slide a thin brass shim - about 0.001–0.002 inches thick - through the slit to feel whether resistance stays even from end to end.
Never smooth a misaligned nib. Abrasives will grind away tipping for good and lock the nib into bad geometry.
If the alignment looks clean, move to the scratch check.
Do a Scratch Check with Slow Strokes
Once alignment is set, switch to smooth test paper. Write slow vertical lines, horizontal lines, both diagonals, and small circles with very light pressure.
Here’s the basic read:
- Directional scratch - roughness mostly on upstrokes or one diagonal - often means a tine is still a little out of line.
- Scratch in every direction points more toward under-polished tipping, an overly fine grind, or weak contact between the tipping and the paper. In some cases, an extreme writing angle is the cause.
- If the scratchiness comes and goes, debris or paper fibers may be stuck between the tines or on the tipping.
If debris seems likely, run a brass shim through the slit gently and flush the pen with cool water. Then test again. Only use micro-mesh or mylar (12,000 grit) after you've confirmed alignment is correct, cleared debris, and still feel roughness across more than one stroke direction. Even then, use only a few light passes.
Test for Railroading and Flow Loss
Railroading looks like two inked lines with a pale or blank strip running between them. You'll see it most clearly on fast or wide strokes, so test with long horizontal lines that span at least half the page, large loops, and a few quick signature-style sweeps.
If railroading shows up during broad or fast strokes, the feed is likely not supplying enough ink. Common causes include tines that are too tight, weak nib-to-feed contact, or a converter or cartridge that isn't fully seated. The first fix to try is a slight increase in tine gap with a brass shim - again, one tiny change at a time. If the line starts dark and then slowly fades instead of showing clear railroading, that usually points to an underfed or blocked feed rather than tine spacing.
Match the Nib to Your Writing Angle and Hand Pressure
If the nib passes the mechanical checks, look at your grip next. And if alignment and flow checks still don't fix the problem, check your hand position and other writing factors before you touch the nib again.
Here's why: angle and pressure can act like nib problems. A pen can feel scratchy or skip even when the nib is fine. So run these two tests first.
Find the Right Writing Angle and Pen Rotation
Test the pen at about 40–55 degrees. That's often where the tipping meets the paper more evenly.
Use the same ink, paper, and test phrase each time so you're not comparing apples to oranges. Start at 45 degrees and write a few lines. Then try 40 degrees and 50–55 degrees and compare the feel.
Once you find the smoothest angle, test rotation in your grip. Turn the pen slightly clockwise, write a few lines, then turn it slightly counterclockwise and compare again. Some nibs have a narrow sweet spot, and being just a few degrees off-center can bring the scratchiness right back.
Write with Light, Consistent Pressure
Use light, steady pressure. First, write with your normal grip. Then test slightly lighter pressure and slightly heavier pressure.
If skipping goes away with just a bit more pressure, you were probably losing contact on upstrokes. That's a technique issue, not a nib flaw.
If the line gets wider and the pen feels scratchier with heavy pressure, the tines are being pushed apart. That's a sign to stop pressing harder and test with force you'd use in normal writing before deciding the nib needs any physical adjustment.
Record the angle and pressure that gave you the cleanest line before making another nib change.
Write Down Notes Before Making the Next Small Change
Once you finish your angle and pressure tests, write down what happened before you touch the nib again. That one habit keeps the process clean. You test, record the result, then make ONE small change.
If you skip that step, things get messy fast. You change angle, pressure, ink, and tine position all at once, and then you have no clue what fixed the problem - or what made it worse.
Use a Short Tuning Log
Keep each entry short and practical. The goal isn't to write a report. It's to log the result right after each test round, before you pick up any tool.
Use these fields:
- Date: 08/19/2026
- Pen/Nib: e.g., Steel fine nib, #6 size
- Ink: e.g., Blue-black, moderate flow
- Paper: e.g., 80 gsm notebook; 32 lb premium printer paper
- Tine status: e.g., Right tine slightly lower than left
- Scratch result: e.g., Scratchy on left-to-right strokes, smooth on downstrokes
- Railroading/flow: e.g., No railroading; flow slightly dry at fast writing speed
- Writing angle/rotation: e.g., ~35°, slight clockwise rotation
- Hand pressure: e.g., Light to moderate; scratch increases with heavier pressure
- Next adjustment: e.g., Gently raise right tine a tiny amount, then retest
That last field matters most. It should name one next change, not three.
Track Progress Across Multiple Rounds
Use the log to compare one round against the previous one. A simple table makes this easy. You can spot whether the nib is getting better, staying the same, or slipping backward across sessions.
Fill in each row as soon as a round ends:
| Round | Change Made | Result | Next Step |
|---|---|---|---|
| 1 | Slightly raised right tine | Scratch reduced on left-to-right strokes; still present on upstrokes | Test extra-smooth paper; consider tiny further adjustment |
| 2 | Switched to wetter ink | Flow improved; no railroading; scratch unchanged | Focus on writing angle; try ~50° |
| 3 | Adjusted writing angle to ~50° | Scratch nearly gone; only appears with heavy pressure | Practice lighter, consistent pressure |
| 4 | Practiced lighter hand pressure for 10 minutes | Smooth in all directions at normal writing speed | Stop tuning; mark nib as daily-ready |
This table also helps you see when to stop. Without a clear record, it's easy to keep fiddling with a nib that already writes well.
If you're tuning more than one pen - maybe a fine, a medium, and a flex nib - add a Pen/Nib column so each setup stays easy to track.
FAQs
How do I know when to stop tuning?
Stop as soon as the nib writes cleanly and stays consistent. After each tiny change, test it on fountain-pen-friendly paper. If you spot sudden shifts in line width, wetness, skipping, or a new scratchy catch, stop right away so you don’t over-tune or open the tines too far.
You should also stop once the tines are aligned and the nib feels smooth with light pressure. If the pen still feels scratchy, or the ink flow keeps acting up after the basic steps, pause there and look into professional help or a nib replacement.
What if the nib feels scratchy only on some strokes?
Scratchiness that shows up only on certain pen strokes usually points to misaligned tines. When one tine sits a bit higher than the other, it can snag paper fibers during specific movements.
Test the pen in six directions. If the scratchiness appears mostly in one direction, inspect the tines with a 10x loupe. If the tines seem aligned but the scratchiness is still directional, the tipping may be off-center.
Check tine alignment before doing any smoothing.
Can ink or paper make a good nib seem bad?
Yes. The wrong paper can make even a good nib feel scratchy, rough, or uneven, especially when the sheet has a lot of texture or loose fibers.
If the nib feels much smoother on reliable, fountain-pen-friendly paper, the paper is probably the issue, not the nib. Test it on good paper first before you assume the nib needs tuning.