

My rule for a first nib grind: make 3–5 light strokes, then inspect and test before removing more tipping. I start with a replaceable steel nib, check alignment and ink flow, and keep my writing angle steady.
Here’s what I focus on:
- Setup: A 10× loupe, good lighting, fine abrasive on a flat backing, and the same ink and paper for each test.
- Symmetry: A centerline mark helps me catch rotation; several viewing angles help me check both tines.
- Shape: I keep fine tips rounded, preserve width for broad tips, and give stubs a flat edge with softened corners. Grinding cannot add tipping.
- Testing: I use lines, circles, and handwriting to check smooth contact, line width, flow, and starts.
- Stopping: I smooth only after shape, alignment, and flow are right. <u>I stop when inspection and writing agree</u> - or seek a nib technician if damage or uncertainty remains.
The goal isn’t a shiny tip. It’s a nib that writes evenly at my normal grip and pressure.
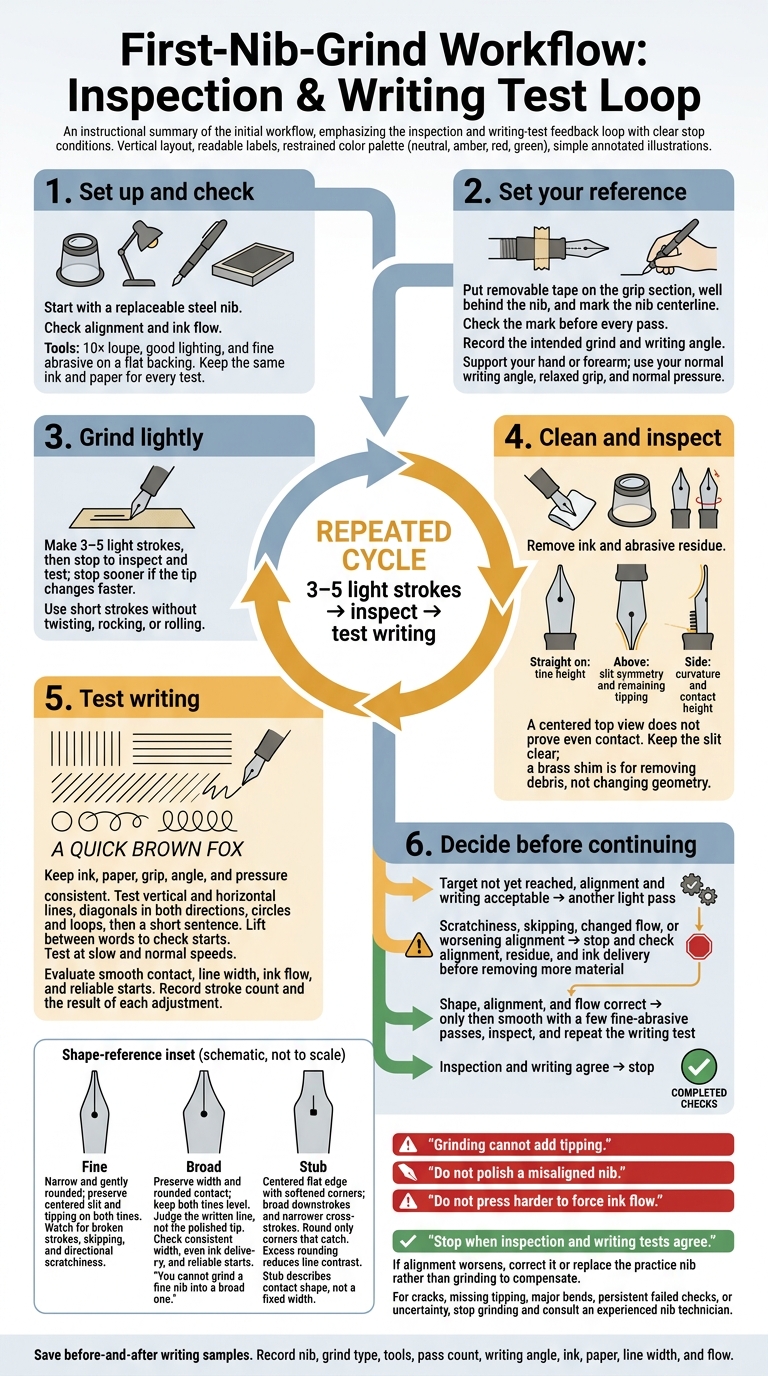
First Nib Grind: Inspect, Test, and Stop
Set Reference Marks and a Steady Hand Position
Mark Nib Rotation and Steady Your Grip
Once the abrasive is ready, set the nib’s orientation before grinding. Put a narrow strip of removable tape on the grip section, well behind the nib, and mark the nib centerline on it. Check this mark before every pass to catch accidental rotation. Take a photo or make a sketch, and note your intended grind and writing angle. Inspect the nib after each short pass.
Rest your writing hand or forearm on the work surface. Use your usual writing angle rather than forcing a target range. Keep your grip relaxed, and use your other hand to steady the abrasive or work surface. Make short strokes without twisting, rocking, or rolling the nib.
Inspect After 3–5 Light Strokes
After each pass, compare the nib with your centerline mark to catch rotation before removing more tipping. Stop after 3–5 light strokes, or sooner if the tip changes faster. Clean off ink and abrasive residue before inspecting - the debris can hide the slit and tipping edges.
Check tine height straight on. From above, check slit symmetry and how much tipping material remains. From the side, check curvature and contact height. A centered top view does not prove that contact is even. Confirm that the slit is clear. Use a brass shim only to remove debris, not to change the slit or nib geometry.
Before the next pass, ink-test with horizontal, vertical, diagonal, and curved strokes, followed by a few words. Record the stroke count so you can link each result to the pass that produced it. A catch or skip in one direction can point to uneven tine height. If alignment worsens, stop and correct it or replace the practice nib. Do not remove more material to compensate. Continue only when both alignment and writing remain acceptable.
sbb-itb-1dd4fe9
Step-by-step DIY Nib Grind
Shape Fine, Broad, and Stub Tips
Keep the tip symmetrical as you change only its contact shape: narrow and rounded for fine, larger and rounded for broad, or gently flattened with rounded corners for stub. Leave enough tipping on both tines and keep the slit centered. Once tipping is gone, smoothing cannot bring it back. Let your target shape guide each pass.
Fine: Narrow the Tip and Keep It Rounded
Remove tiny amounts from each side, keeping the slit centered. Preserve a gently rounded writing surface rather than a flat, sharp point. Test the result with your ink and paper. If narrowing leads to dryness, poor starts, or scratchiness in one direction, stop. Check alignment and ink flow before removing more tipping.
Broad: Keep the Width and Contact Even
Start with enough tipping: you cannot grind a fine nib into a broad one. Avoid removing side material you don't need to remove. Refine the contact surface a little at a time, keeping both tines level.
Tip width isn't line width, so judge the written line - not the polished tip. Stop when you get the width you want, even ink delivery, and reliable starts. A broad, wet line may take longer to dry or feather on absorbent paper.
Stub: Flatten the Edge and Round the Corners
At your normal writing position, flatten the contact surface into a centered edge that keeps downstrokes broad and cross-strokes narrower. Stub describes the contact shape, not a fixed width.
Round only the corners that catch. Too much rounding reduces line contrast, while sharp corners make the nib unforgiving. Once the shape is close, test the written lines before smoothing further.
Test Writing After Each Adjustment
After each pass that changes the nib’s shape, test whether it still tracks evenly. Magnification shows the shape; writing shows whether it behaves evenly in each direction.
Keep the ink, paper, grip, angle, and pressure the same for every test. After each adjustment, wipe away residue, clean and maintain the pen as needed, and test on the same paper. Stick to this cycle: 3–5 light strokes → inspect → test writing.
Test Lines, Circles, and Handwriting
Repeat the same test pattern so small changes are easy to spot. Draw vertical and horizontal lines, diagonals in both directions, and slow circles and loops. Compare resistance, ink coverage, and line width.
Then write a short sentence at your usual speed. Lift the pen between words to check whether each new stroke starts immediately. Continuous writing can hide starting problems.
For a fine tip, watch for broken strokes, skipping, or scratchiness when changing direction. For a broad tip, check that the line stays consistently broad and ink delivery stays even in every direction. For a stub, compare downstrokes with cross-strokes and check whether the nib catches on curves.
Test at both slow and normal speeds. Don’t press harder to force ink through a dry spot or round off a corner that catches.
Check Alignment and Flow Before Smoothing
If the nib scratches in one direction, stop. Under magnification, inspect tine height and the tipping edge for that direction. If ink flow changes, check for abrasive residue and ink-delivery problems at the nib and feed before removing more material. Do not polish a misaligned nib.
Polish only when shape, alignment, and flow are correct. Make just a few fine-abrasive passes, then inspect and repeat the writing test. Too much polishing can reduce stub contrast or cause hard starts.
Record each change so the next pass addresses one problem at a time. If one direction improves while another gets worse, stop grinding and recheck alignment and edge symmetry. Let each writing test guide the next adjustment.
Conclusion: Stop When Contact and Writing Tests Agree
After the last test cycle, stop when inspection and writing tests agree. Balanced tipping, level tines, even contact with the paper, and the intended line during normal handwriting matter more than a polished appearance. Once those checks pass, put the abrasive aside.
Save before-and-after writing samples and record the practice nib, grind type and tools, pass count, writing angle, ink, and paper. Include notes on line width and flow. Use the same ink and paper whenever possible so you have a reliable record for your next attempt.
If the nib still fails those checks because of misalignment or damaged tipping - or you’re unsure what to correct next - stop grinding. Don’t try to grind away cracks, missing tipping, or major bends. Take the nib to an experienced nib technician.
FAQs
What abrasive grit should I use for my first nib grind?
Match the grit to your goal. To shape the tip or square it into a stub, start with 800-grit sandpaper. Once you have the basic shape, switch to 1,500-grit sandpaper to refine it and start polishing. Use 12,000-grit micro-mesh for final smoothing or to address minor scratchiness.
Avoid coarse abrasives. They remove material too fast and can cause permanent damage. Check your progress frequently with a 10x loupe.
How can I tell misalignment from an uneven grind?
Inspect the nib head-on with a 10x to 20x loupe under bright light. If one tine sits higher than the other, the nib is misaligned. This often makes it catch when you write in certain directions.
If the tines are level but the nib still feels scratchy or inconsistent, an uneven grind is likely. Look for off-center tipping, flat spots, or wear that’s heavier on one side.
Always check alignment first. Grinding a misaligned nib won’t fix the underlying problem and may cause permanent damage.
How much tipping should I leave on each tine?
There’s no fixed measurement. Leave enough tipping material for the nib to work smoothly, and keep a clean, continuous curve across the tip.
Tipping material is limited, so check the nib with a 10x to 20x loupe after every 1 to 2 passes. Stop immediately if the tipping becomes barely visible or the line width starts to broaden. Grinding any further will ruin the nib.