
Fountain pen ink and watercolors can create stunning effects when combined. Here are five techniques to try:
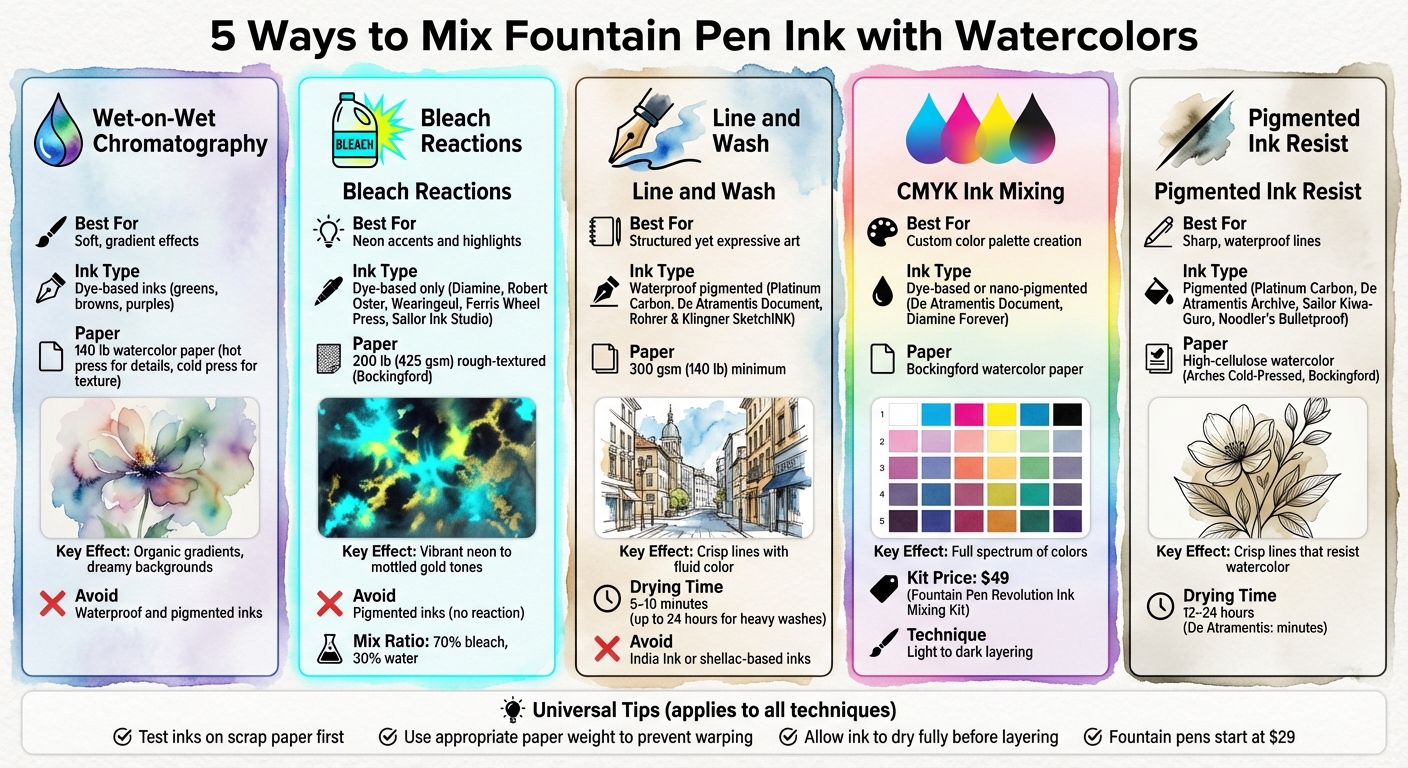
- Wet-on-Wet Chromatography: Apply water to dye-based inks on wet paper to reveal hidden hues as the ink separates into its components. Best for soft, gradient effects.
- Bleach Reactions: Use bleach on dye-based inks to create neon highlights or unexpected color shifts. Works well with brands like Diamine and Robert Oster.
- Line and Wash: Combine waterproof ink with watercolor for defined lines and fluid color. Ideal for structured yet expressive art.
- CMYK Ink Mixing: Blend cyan, magenta, yellow, and black fountain pen inks to create a custom palette, similar to watercolor painting.
- Pigmented Ink Resist: Use pigmented inks for sharp, waterproof lines that stay crisp under watercolor washes.
Key Tips:
- Test inks on scrap paper before starting.
- Use appropriate paper (e.g., 140 lb watercolor paper) to prevent warping.
- Allow ink to dry fully before layering watercolors.
These methods let you experiment with textures, colors, and details, offering endless artistic possibilities.
5 Fountain Pen Ink and Watercolor Mixing Techniques Comparison
Simple Line and Wash for Beginners with a fountain pen!
sbb-itb-1dd4fe9
1. Wet-on-Wet Chromatography
Wet-on-wet chromatography is a fascinating way to break down fountain pen ink into its individual colors. By applying water to dye-based ink on wet paper, the ink's dyes travel at different speeds, revealing surprising hues. For instance, a green ink might separate into yellow and blue bands, while certain blue inks can unveil subtle pink undertones. This technique builds on earlier methods by using the unique interaction between dye-based inks and water.
Ink Compatibility
This method thrives on the unique formulations of dye-based inks, particularly those with complex shades like greens, browns, and purples. These tend to separate dramatically, showcasing their hidden components. On the other hand, primary colors like pure red or blue may not show much separation, as they often contain fewer dye components.
Keep in mind that waterproof and pigmented inks are unsuitable for chromatography. These inks resist water and won’t spread or separate, making them better suited for techniques like line and wash.
Paper Type and Preparation
For the best results, use 140 lb watercolor paper, as it holds up well to water. Hot press watercolor paper is ideal if you want fine details, while cold press paper works better if you prefer a textured look.
To create a radial diffusion effect, try placing a drop of ink on the paper and adding 1–3 drops of water. Alternatively, wet the paper first and apply an ink wash from the edges inward for a different effect.
Effects Achievable
"Fountain pen ink chromatography is when you use liquid and paper to separate out the components of another liquid... as the ink moves through the paper, the different dyes that are in it move at different speeds, which causes them to separate and become visible." - Noel, Fountain Pen Love
This technique produces soft, atmospheric effects with organic gradients of color. The resulting patterns can feel dreamy and unpredictable, making them perfect for backgrounds, skies, or abstract elements in mixed media art. Before diving into your final piece, test the ink on scrap paper to see how it separates and to gauge its color intensity. This small step can help you achieve the desired effect with confidence.
2. Bleach Reactions with Dye-Based Inks
Using bleach on dye-based inks can create eye-catching neon accents, unveiling hidden tones and surprising highlights. Artist Nick Stewart, who tested 2,000 fountain pen inks, observed that the results vary significantly depending on the brand. For those eager to dive into these experimental techniques, Fountain Pen Revolution (https://fprevolutionusa.com) offers a great selection of affordable fountain pen supplies.
Ink Compatibility
Dye-based inks are the only ones that react with bleach to produce neon effects. Each brand behaves differently - Diamine Teal, for example, shifts to a pale salmon pink, while others might transform into mottled gold or bold neon shades. On the other hand, pigmented inks remain unaffected, making them a solid choice for permanent line work. Brands like Diamine, Robert Oster, Wearingeul, Ferris Wheel Press, and Sailor Ink Studio are well-known for their dramatic bleach reactions.
"The reactions can vary from a dull gold over dense ink areas to a vibrant neon effect over less dense areas. But what is of key importance is that it is only with fountain pen inks that this bizarre reaction happens." - Nick Stewart, Artist and Ink Expert
The outcome depends largely on how dense the ink application is. Heavier layers often result in muted gold tones, while lighter washes can create vibrant neon highlights. To avoid surprises, always test the ink on a swatch first - some may not react to bleach at all.
Paper Type and Preparation
For best results, use 200 lb (425 gsm) rough-textured watercolor paper, such as Bockingford. Start by pre-saturating the paper with water, apply an ink wash, and let it dry completely before introducing bleach.
Effects Achievable
In April 2021, Nick Stewart demonstrated this technique using Diamine Winter Miracle ink on 200 lb Bockingford paper. He applied a mixture of 70% bleach and 30% water with a No. 3 rigger brush, creating turquoise spatters and lightened areas. When left incomplete, the process added mottled gold accents to the piece. This approach, along with other hybrid methods, opens up exciting new avenues for blending ink and watercolor in artistic projects.
3. Line and Wash Application
Line and wash is a timeless technique that combines the crisp, defined lines of fountain pen ink with the fluid and expressive qualities of watercolor. The ink provides structure and detail, while the watercolor adds depth and atmosphere. Together, they create a striking contrast that brings artwork to life.
Ink Compatibility
Choosing the right ink is crucial for successful line and wash work. Waterproof ink is a must. Pigmented inks, which contain tiny particles that stay on the paper's surface when dry, are ideal as they resist water and maintain clean lines. On the other hand, dye-based inks can dissolve and bleed when exposed to water. Some excellent waterproof options include Platinum Carbon Ink, De Atramentis Document Ink, and Rohrer & Klingner SketchINK. As K.T. Mehra, Founder of Goldspot Pens, points out:
"It's best to assume that any ink pen contains water-soluble ink and will not be ideal for use with watercolor unless it specifically states that it is waterproof."
Always test your ink before starting. Draw a few lines on scrap paper, let them dry, and brush over with water. If the ink bleeds, it’s not suitable for this technique. And remember, never use India Ink or shellac-based inks in a fountain pen - they can permanently clog the feed.
Paper Type and Preparation
The choice of paper is just as important as the ink. To handle wet washes without warping, use paper with a weight of at least 300 gsm (140 lb). For multiple layers, 100% cotton watercolor paper is the best option.
- Hot Press paper offers a smooth surface for clean, precise lines.
- Cold Press paper adds a bit of texture.
- Rough paper creates a "skipping line" effect for a more dynamic look.
Start by sketching lightly in pencil. Once the ink has dried, erase any remaining graphite before applying watercolor.
Layering and Sequencing Techniques
There are three popular ways to layer ink and watercolor:
- Line First: Draw in ink first, let it dry, and then add watercolor. This approach offers a clear structure but can feel a bit stiff.
- Wash First: Begin with watercolor shapes, then add ink details once the paint dries. This creates a loose, spontaneous feel.
- Sandwich Technique: Start with a pencil sketch, add an initial layer of ink, apply watercolor, and finish with a second layer of ink for added depth. This method strikes a balance between structure and fluidity.
While some inks dry quickly (within 30 seconds), most need 5 to 10 minutes to set. For heavy washes, it’s best to wait 12 to 24 hours for the ink to become fully waterproof. If you’re pressed for time, a hairdryer on low heat can speed up the process.
Effects Achievable
"The ink provides the skeleton - the edges, the details, and the contrast. The watercolor provides the flesh and spirit - the shadow, the light, and the atmosphere." - Olly Farmer, M.Sc, B.Sc, PGCE
To avoid your work looking like a "coloring book", try breaking up lines in lighter areas to create "lost and found" edges. Let the watercolor spill beyond the ink in shadowed areas for a more natural, dynamic feel. Using a fountain pen with a fude nib (a bent nib) can also add natural line variation - thicker strokes for shadows and finer ones for highlights - helping you achieve a perfect balance between structure and flow.
4. CMYK Ink Mixing and Painting
CMYK mixing lets you create a custom palette using four fountain pen inks: Cyan, Magenta, Yellow, and Black. This technique blends the world of fountain pen ink with watercolor painting, offering endless creative possibilities. It’s similar to traditional watercolor methods but uses fountain pen ink as the medium. Artist Nick Stewart captures its charm perfectly:
"There's also something greater and smarter than just using single colours – and it's mixing 4 primary fountain pen ink colours together, allowing the user to create all the colours of the spectrum and to paint pictures just like using watercolours."
Ink Compatibility
For the best results, dye-based inks are your go-to, as they mix predictably and produce vibrant colors. If you need waterproof layers, nano-pigmented inks like De Atramentis Document (around $20–$22 for a 45mL bottle) or Diamine Forever (about $20–$25 for a 50mL bottle) work well. De Atramentis inks are known for their consistent saturation across all four colors, while Diamine Forever’s cyan can dominate, so you’ll need to adjust carefully. For convenience, the Fountain Pen Revolution Ink Mixing Kit ($49.00) includes all four base colors, along with syringes and pipettes for precise mixing.
Once you’ve chosen your inks, it’s time to prepare your paper to bring out their full potential.
Paper Type and Preparation
For practice, Seawhite cartridge paper is a solid choice, while Bockingford watercolor paper is ideal for finished artwork. A smooth surface is essential to protect your fountain pen nib. Begin by lightly sketching your design with a B-grade graphite pencil. Keep a spare sheet of the same paper nearby to test your color mixes before applying them to your piece. To stay focused and avoid fatigue, work in smaller sections, about 3.3 inches × 3.3 inches.
Layering and Sequencing Techniques
Stick to the classic rule: start with light tones and gradually build up to darker shades. To adjust the value of your colors, add water to your ink on a mixing palette instead of reaching for white paint. For smooth gradients, wet the paper first, then apply the ink wash, letting it naturally bleed inward from the edges. Using dropper bottles for your CMYK inks ensures consistent drops, making it easier to record and replicate your color recipes. For fine details, a rigger brush works wonders, while a No. 6 or 7 watercolor brush is great for broader areas.
With these techniques, you’ll be ready to explore a full spectrum of colors.
Effects Achievable
The CMYK method gives you access to an entire rainbow of hues. For example, you can create Painted Desert, a warm earthy red, by mixing 98 parts red with 2 parts blue. Or try Neptune, a deep blue-violet, by combining 75 parts blue with 25 parts pink. For dramatic highlights, a 50:50 bleach-to-water solution applied with a rigger brush can add striking effects after the ink has dried. As Nick Stewart highlights:
"For those fine highlights, tiny amounts of bleach react sensitively with the dyes, elevating the artwork to greater levels of visual sophistication."
5. Pigmented Ink Resist Techniques
Pigmented ink resist techniques are perfect for creating sharp, waterproof lines that stay crisp even under watercolor washes. As K.T. Mehra, Founder of Goldspot Pens, explains:
"Pigments are tiny particles of colored material that do not dissolve in water. In other words, they are rarely water-soluble or water-based, which makes them good for use with watercolor."
Ink Compatibility
When working with resist techniques, pigmented inks like Platinum Carbon Ink, De Atramentis Archive Ink, Sailor Kiwa-Guro, and Noodler's "Bulletproof" inks are excellent choices. Each offers unique qualities:
- Platinum Carbon Ink: Produces a deep black finish that resists water, smudging, and erasing once dry.
- De Atramentis Archive Ink: Known for drying quickly - often within minutes - while maintaining strong waterproof properties.
- Noodler’s "Bulletproof" inks: These bond with the cellulose in cotton paper, becoming fully waterproof after drying.
Proper pen maintenance is crucial, as pigmented inks can build up over time. Pairing the right ink with suitable paper ensures your resist effects remain sharp and durable.
Paper Type and Preparation
Using high-quality watercolor paper is key to achieving the best results. Papers like Arches Cold-Pressed or Bockingford are ideal for handling the wet washes without feathering. For effective ink binding, look for high-cellulose watercolor paper.
Start by lightly sketching your design with a B pencil to guide your work. Before diving into your main piece, test your materials on a scrap piece of paper. Draw a few lines, let them dry completely, and then apply water to confirm the ink’s resistance.
Layering and Sequencing Techniques
The sequence in which you apply ink and watercolor can affect the final look of your artwork. There are two main approaches:
- Ink-first technique: This method allows you to create precise lines on a clean surface. However, watercolor washes applied afterward might slightly lighten the ink’s appearance.
- Ink-after technique: Applying ink after the watercolor has dried results in bold, opaque lines that stand out, perfect for striking silhouettes.
Whichever method you choose, ensure the ink is fully dry before layering watercolor. Standard pigmented inks may need 12 to 24 hours to dry completely, but faster-drying inks like De Atramentis Archive Ink can be ready for layering in just minutes.
Effects Achievable
Pigmented ink resist techniques offer a beautiful balance of structure and fluidity. The permanent inks create crisp, defined lines that contrast with the expressive, flowing watercolor washes. As Moritz Pratt points out:
"The permanent [pigmented ink] will not bleed or blend once dried, even with water brushed over the top. These inks are favored for line work and, by their nature, give a piece longevity."
Experimenting with different nib sizes or a fude nib can add variety to your line work, enhancing the interplay between bold ink details and the softness of watercolor. This technique allows for dynamic compositions that feel both structured and free-flowing.
Conclusion
Combining fountain pen ink with watercolors opens up a world of possibilities for creating mixed media art. Techniques like wet-on-wet chromatography, bleach reactions, line and wash, CMYK mixing, and pigmented ink resist each bring something special to the table. Whether it’s vibrant color effects or sharp, permanent lines, these methods can elevate your artwork in unique ways.
As Erika Lancaster explains, the blend of watercolor and ink achieves a "harmonious balance."
The secret to success with these techniques is experimentation. Testing different combinations of ink, paper, and application methods on scrap paper allows you to find what works best for your style. And don’t forget to let layers dry properly before adding more - this small step can make a big difference.
For example, you might mix custom watercolor washes using CMYK techniques, define fine details with pigmented ink resist, and finish with bleach highlights to add depth and texture.
If you’re ready to dive in, resources like Fountain Pen Revolution offer tools to get started. Their fountain pens start at $29, and their $49 Ink Mixing Kit is perfect for artists exploring new creative avenues.
K.T. Mehra puts it best: "Art is such a personal experience, and we all have different styles, quirks, and processes. Try different pens and inks to find the ones that work best for you."
FAQs
How do I know if my fountain pen ink is waterproof?
Curious if your fountain pen ink can stand up to water? Here's a simple way to find out: write something on a piece of paper and then apply a small amount of water to the inked area.
- If the ink smears or washes away, it’s not waterproof.
- If it stays put, it’s likely waterproof or at least water-resistant.
Some inks are specially formulated with micro-fine particles or iron-gall components, which boost their resistance to water. But the most reliable way to know for sure? Test your specific ink yourself!
What’s the safest way to use bleach with fountain pen ink?
To use bleach safely with fountain pen ink, make sure the ink has completely dried before introducing bleach to avoid any unexpected chemical reactions. Work in a well-ventilated space, and apply the bleach carefully using a brush or dropper. Be cautious to prevent contact with your skin or eyes. This method is intended for creating artistic effects, not for cleaning fountain pens, as bleach can harm the pen's components. Always exercise care when handling bleach, and wear protective gear if necessary.
Can I mix fountain pen inks without clogging my pen?
Yes, you can mix fountain pen inks, but it’s important to be cautious to prevent clogging or damaging your pen. Always use distilled water if you’re diluting the ink, and mix the inks in a separate container - not directly in your pen. Shake the mixture well to ensure it blends evenly, and always test it on paper first to see how it performs. Stick to inks specifically made for fountain pens, and avoid inks that are too thick or heavily pigmented, as they can affect your pen’s functionality.