

When cleaning your fountain pen, drying it properly is just as important as the cleaning itself. If you refill your pen before it's fully dry, leftover water can dilute the ink, cause uneven flow, or even damage the pen over time. To avoid these issues, let your pen air-dry for 12–24 hours. This ensures all moisture evaporates, especially from hard-to-reach areas like the feed and nib channels.
For best results:
- Disassemble the pen: Remove the nib, feed, and converter to expose all surfaces.
- Remove excess water: Blot with a lint-free cloth and shake gently.
- Air-dry: Place the nib section nib-down in a cup lined with paper towel, and lay other parts horizontally.
Avoid using heat or direct sunlight, as this can warp or damage components. Always use a fountain pen cleaning kit to check for remaining moisture before reassembling and refilling your pen to ensure smooth, consistent performance.
How Long Should Fountain Pens Dry?
Recommended Drying Time
To ensure your fountain pen is completely dry, aim for an overnight drying period of 12–24 hours. This gives water enough time to evaporate from the nib and feed, especially from the fine channels and assembly where moisture tends to linger. Proper drying prevents issues like diluted ink or inconsistent ink flow when refilling.
If you rush the process, residual water can mix with fresh ink, altering its performance. Remember, even a small amount of water can impact the standard 0.75 mL ink capacity of most converters. The intricate design of feeds and fine nibs means water often gets trapped in small pockets, making patience key to a thorough dry.
Drying happens through evaporation, and its speed depends on environmental conditions. Factors like airflow and temperature play a big role in how quickly your pen dries.
Factors That Affect Drying Time
- Humidity Levels: Drying is faster in low-humidity spaces, such as air-conditioned rooms. High humidity, on the other hand, slows evaporation, sometimes requiring an extra day for complete drying.
- Temperature and Airflow: Warm air speeds up evaporation and helps push out moist air trapped inside the pen. Changes in temperature encourage air exchange, which helps dry internal components. Pens left in open air dry faster than those stored in cases since constant airflow removes moisture more effectively.
- Deep Soaking: If you’ve soaked the nib and feed in warm water to clean stubborn ink, expect longer drying times. Removing the nib and feed from the pen while drying allows air to reach internal channels directly, speeding up the process compared to leaving the pen assembled.
- Excess Water Removal: Shaking the pen with the nib pointing downward and blotting it with a paper towel can remove most of the water, leaving only a thin film to evaporate. For even drying, lay the parts horizontally to avoid water pooling at the nib’s tip or the back of the pen.
sbb-itb-1dd4fe9
4 Tips for Maintaining Your Fountain Pens
Beyond drying, proper maintenance often involves knowing how to lubricate fountain pen pistons to ensure smooth operation.
Step-by-Step Guide to Drying Your Fountain Pen
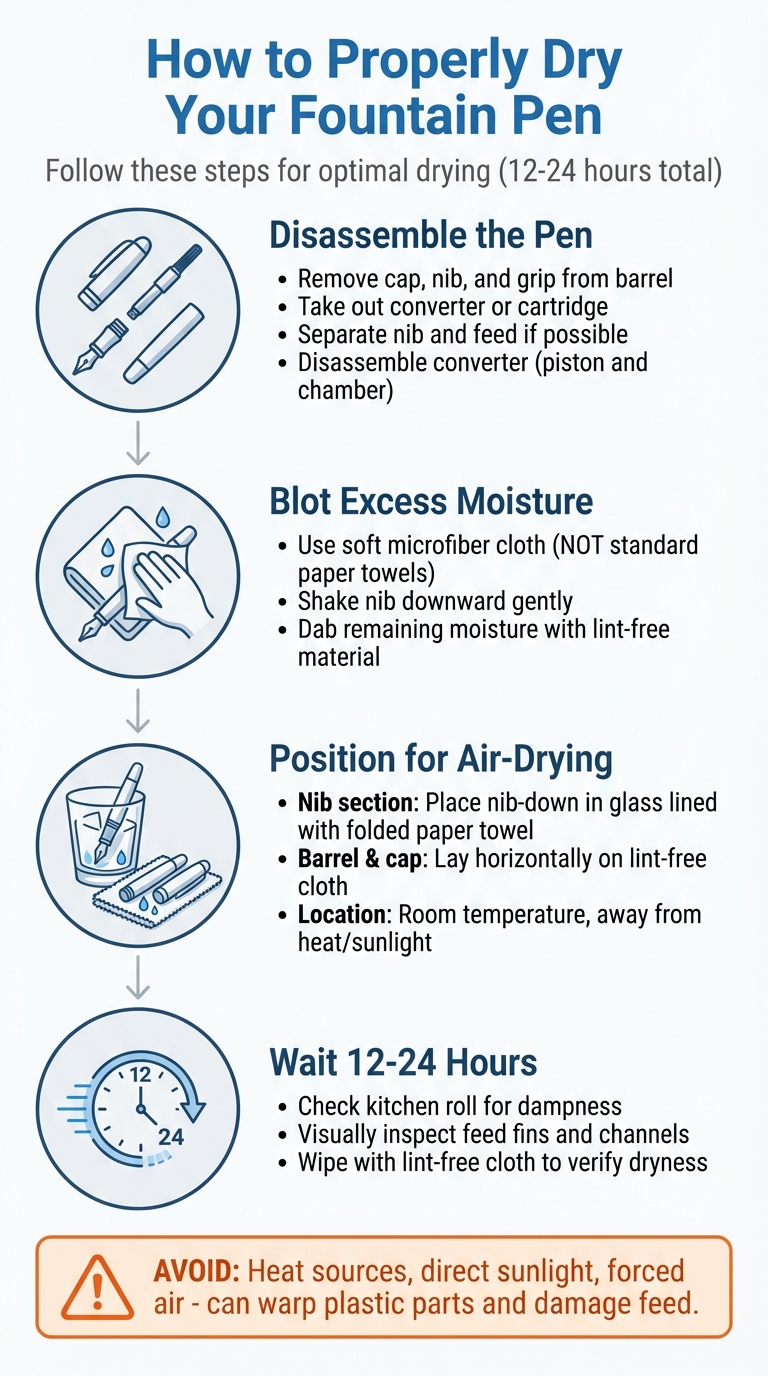
Step-by-Step Guide to Properly Drying Fountain Pens After Cleaning
Disassembling the Pen for Better Drying
Start by taking your fountain pen apart. Remove the cap, unscrew the nib, and separate the grip from the barrel. Take out the converter or cartridge to expose all internal surfaces, allowing any trapped moisture to evaporate. If your pen has a removable inner cap, take that off and dry it separately. For a thorough clean, you can remove the nib and feed from their housing and dry them individually. If your converter can be disassembled, take it apart to dry the piston and chamber separately - this helps avoid diluting your ink when you refill the pen. Once everything is disassembled, you’re ready to remove excess water before letting the parts air-dry.
Using a Paper Towel or Cloth to Remove Excess Water
Gently blot the nib with a soft, microfiber cloth to absorb surface moisture. Avoid standard paper towels, as their fibers can scratch delicate nib finishes. Instead, use a lint-free material. Shake the nib downward to dislodge water, then dab any remaining moisture with your cloth.
"Once you have the pen disassembled, soak the nib and feed section in a warm water bath... Dry the pen and nib with a soft towel." – Pen Chalet
After blotting, move on to air-drying to ensure the pen is completely dry.
Air-Drying Techniques
Position the nib section nib-down in a glass or cup lined with a folded paper towel at the bottom. This setup uses gravity to draw moisture out of the feed channels, while the paper towel absorbs the water. As noted by one expert:
"To dry the pen out I will usually (GENTLY) place the pen nib down in a glass with a folded paper towel or tissue at the bottom for padding, which will wick out any remaining inky water." – The Gentleman Stationer
Lay the barrel and cap horizontally on a lint-free cloth to dry. Keep all parts in a stable, room-temperature location, away from drafts, heaters, or direct sunlight. Excessive heat can warp plastic parts or damage the feed, so a controlled environment is best.
Common Mistakes to Avoid When Drying Fountain Pens
When it comes to drying fountain pens, even small missteps can lead to unnecessary damage or performance issues. Here are two common pitfalls to watch out for.
Using Heat or Direct Sunlight
Resist the urge to use heat or sunlight to speed up the drying process. Placing your pen near heaters, vents, or in direct sunlight might seem like a quick fix, but it can do more harm than good. Heat fluctuations can warp plastic parts or throw off the alignment of the nib, leading to long-term issues.
Stick to air-drying at room temperature. Choose a stable, temperate spot away from windowsills, heat-generating electronics, or any direct heat sources. This method ensures your pen dries thoroughly without risking damage to its materials.
Skipping the Disassembly Step
Drying your pen without disassembling it can trap moisture in the feed, nib, or barrel. Over time, this can lead to hardened ink residue, dust buildup, or even clogs that disrupt ink flow. Regular cleaning and disassembly are essential for maintaining your pen's performance.
"If you don't clean all of the ink off of the nib and inside of the barrel, it can clog up the pen and prevent any new ink from flowing through." - Fountain Pen Guide
However, avoid disassembling pens not meant for user servicing. Some pens aren't designed for easy disassembly, and forcing the process can cause permanent damage. If that's the case, rely on passive air-drying techniques instead. For pens that can be safely disassembled, take the time to clean and dry each component thoroughly to prevent future issues.
How to Tell When Your Fountain Pen Is Fully Dry
After allowing your fountain pen to dry for the suggested 12–24 hours, you can use a couple of simple methods to ensure all moisture has evaporated.
One popular approach is the kitchen roll test. Line a small glass with folded kitchen roll and place the disassembled pen nib-down inside. After the drying period, check the kitchen roll. If it’s still completely dry, your pen is good to go. If you notice any dampness, replace the roll with a fresh piece and give it more time to dry.
Another method is a visual inspection. Carefully examine the nib, feed, and internal parts like the converter or barrel for any remaining water droplets or condensation. Pay close attention to the feed fins - these tiny channels often trap moisture. To double-check, gently wipe the components with a soft, lint-free cloth.
"As you run water through the pen the water will turn from the color of the ink to clear (or use a pen flush for stubborn clogs). Once the water runs clear the nib and feed section will be ready for use." - Pen Chalet
Conclusion
Allow your fountain pen to dry completely for 12–24 hours to avoid issues like diluted ink, uneven flow, or potential damage to the pen’s components.
For faster drying, try the gravity-assisted cup method with a soft kitchen roll to gently wick away moisture from the feed. Avoid using heat, as it can warp parts, cause scratches, or lead to mineral buildup. Taking these steps ensures your pen is ready to perform flawlessly once reassembled.
Experts caution that improper drying can harm your pen and affect its performance. Before re-inking, check for dryness using a kitchen roll or by visually inspecting the pen. This simple habit prevents problems like faded ink, hard starts, and skipping - common when residual moisture mixes with fresh ink - so your pen delivers smooth, consistent results every time.
Drying your fountain pen properly is essential for its upkeep. Spending a day on this process every two to three weeks can help maintain reliable performance and extend your pen’s lifespan for years to come.
FAQs
Can I speed up drying safely?
After cleaning your fountain pen, it’s best to let it dry naturally for 12 to 24 hours. While it might be tempting to speed things up with heat or airflow, these methods can harm the pen or interfere with its performance. Sticking to air drying within this timeframe is the safest way to ensure proper ink flow and avoid any potential damage.
What if I can’t disassemble my pen?
If you can’t disassemble your pen, make sure it dries completely after cleaning to avoid any ink flow problems. It usually takes about 12–24 hours for all the moisture to evaporate. Taking the time to clean and dry your pen properly is key to keeping it in good working order, especially when the parts can’t be separated. This simple step helps prevent issues like skipping or hard starts when you use the pen again.
Will leftover water ruin my ink?
Leftover water in a fountain pen after cleaning can cause problems like inconsistent ink flow or leaks. To prevent this, allow all the pen components to dry completely for 12–24 hours before putting the pen back together and using it. Taking the time to let it dry properly helps maintain smooth performance and avoids unnecessary issues.