

If ink keeps showing up in the same spot, I’d assume a crack or a bad seal - not “just a messy fill.”
Here’s the short version: if ink stays on the nib and feed only, that’s often normal. But if I see ink on the grip, threads, barrel, or inside the cap, I’m looking for two things first: a hairline crack or a failed seal. In many cases, the clue is the pattern. A crack tends to leak from the same body spot after each fill. A seal problem tends to show up around a connection point and may stop after I reseat or replace the part.
What I’d check first:
- Same leak spot every time: likely a crack
- Ink near converter or cartridge fit: likely a seal issue
- Ink inside the cap with a clean barrel: often a fit or seal problem
- Leak after heat or movement: can point to pressure changes, cracks, or a worn piston seal
- Loose converter: often means the seal is worn out
A few simple tests help fast:
- Clean and maintain the pen and watch where ink returns
- Check threads, barrel walls, and section edges under bright light
- Use clean water, not ink, to test for hidden seepage
- Stop if a part does not loosen by hand
- Skip glue, heat, and sanding during inspection
If the problem is a worn part, the fix is often cheap. A converter may cost about $5 to $15 in the U.S. If the pen body is cracked at a stress point, though, repair may not be worth it.
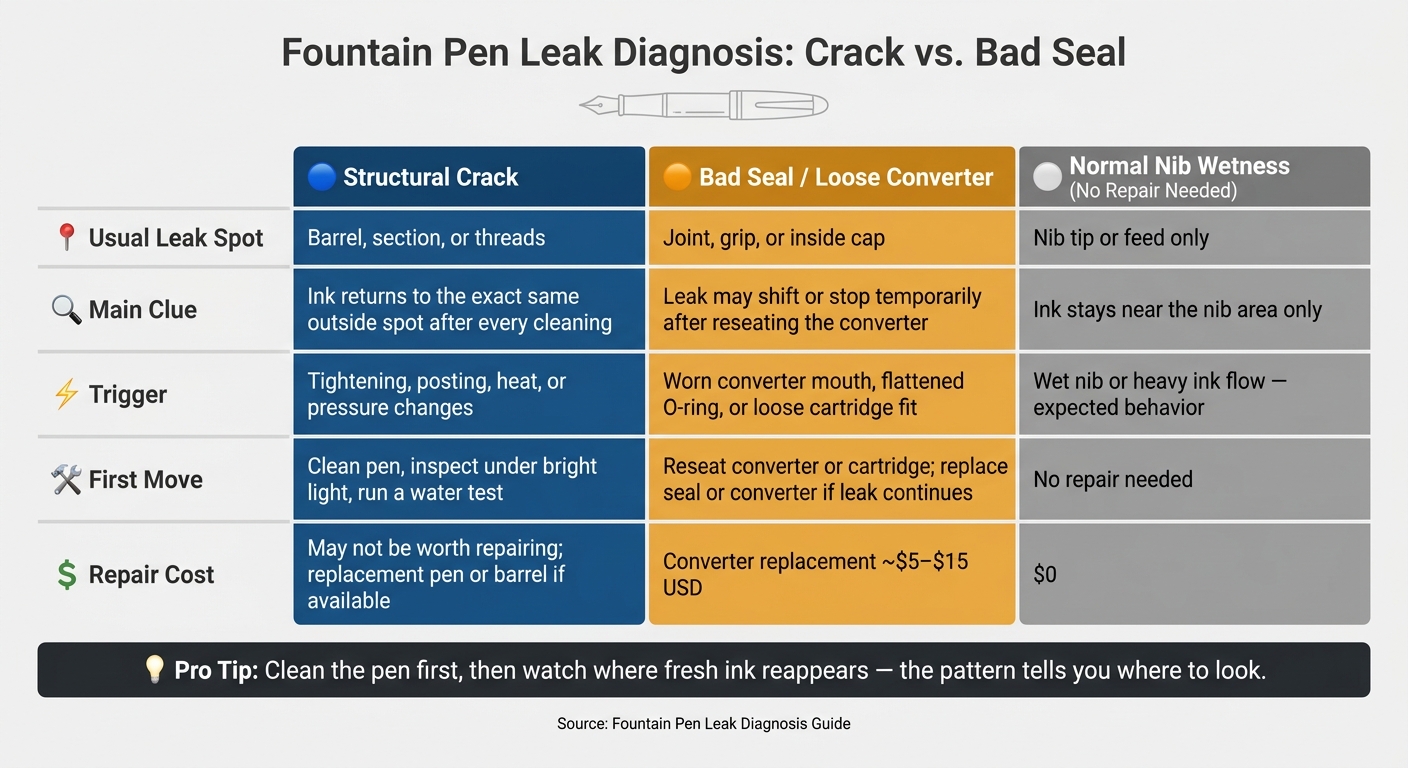
Fountain Pen Leak Diagnosis: Crack vs. Bad Seal
Why Fountain Pens Leak & How To Fix It
Proper maintenance, such as knowing how to lubricate fountain pen pistons, can prevent many seal-related leaks before they start.
sbb-itb-1dd4fe9
Quick Comparison
| Issue | Usual leak spot | Main clue | First move |
|---|---|---|---|
| Crack | Barrel, section, threads | Ink returns to the same outside spot | Inspect under light and do a water test |
| Bad seal / loose converter | Joint, grip, inside cap | Leak may change or stop after reseating | Reseat, then replace seal or converter if needed |
| Normal nib wetness | Nib tip or feed only | Stays near the nib area | No repair needed |
Bottom line: I’d treat repeat leaks as a part failure, not a cleaning problem, and I’d check the leak pattern before trying any fix.
How to Tell if a Leak Points to a Crack or a Bad Seal
Leak location tells you a lot. Clean the pen first, wipe away the ink, then watch where fresh ink shows up again.
| Leak symptom | Likely cause | Inspection focus area |
|---|---|---|
| Ink at the same spot on the barrel or threads after every cleaning | Structural crack | Section–barrel threads, barrel lip, nib collar |
| Ink collecting inside the cap or on the grip | Seal or converter issue | Cartridge/converter mouth, O-ring at section joint |
| Sudden ink blobs during writing after temperature changes | Crack or worn piston gasket | Piston area, barrel walls, section seam |
| Loose converter with ink near the grip | Failed converter seal | Converter mouth, fit on the feed connector |
| Water behind the piston seal during a water test | Worn piston gasket | Piston seal, rear barrel wall |
These patterns give you a good starting point. Instead of checking every part at random, you can go straight to the area most likely causing the mess.
Signs the Barrel, Section, or Threads May Be Cracked
Cracks usually appear where the pen takes the most stress. That often means the section–barrel threaded joint, the nib collar, the area around the piston mechanism, or the barrel lip where the cap posts. Tightening, posting, and pressure shifts all put strain on these spots.
With translucent pens, you may spot a fine hairline in the material. With opaque barrels, the clue is often less direct: ink on the outside of the barrel even though there was no spill and the nib never touched that area. That’s a red flag.
If the pen leaks while stored upright and left alone, ink may be seeping through a damaged wall instead of getting knocked loose during use. In plain terms, if the pen is just sitting there and still making a mess, the body itself deserves a close look. You can also watch our maintenance videos for visual help with disassembly.
Signs the Converter, Cartridge, O-Ring, or Gasket Is Failing
Seal-related leaks usually stay near the connection point, not the barrel body. A converter mouth that looks slightly cracked or warped can cause trouble. So can a flattened O-ring at the section–barrel junction. In both cases, air gets in where it shouldn’t, and ink ends up where you don’t want it.
One common pattern is ink inside the cap or on the grip while the outside of the barrel stays clean. That usually points to a seal issue, not a crack in the pen body.
If reseating the converter or connection helps for only a short time, that’s another clue. At that point, it’s usually better to replace the failing seal part than keep trying to force a temporary fix.
How to Inspect a Fountain Pen Before Trying Any Fix
Start by cleaning and drying the pen with fountain pen cleaning solution. Then work over a white paper towel so any fresh seepage stands out right away. Focus on the joint, seal, or body section that best matches the leak pattern. In plain terms, begin with the spot that seems most likely to be the source.
Only take apart pieces that loosen easily by hand. If a joint resists, stop there. Forcing it can crack the pen or damage a seal that was still doing its job.
Check Threads, Barrel Walls, and Section Edges Under Bright Light
Turn each part slowly under bright light. Watch for hairline cracks, stress marks, or ink that comes back after cleaning. On translucent parts, a crack may show up as a faint line that seems to shift as the angle changes. On opaque parts, the clue is often simpler: ink showing up on the outside where it shouldn’t be.
You can also lightly run a fingernail across the area. A crack may catch slightly on the edge. Just don’t flex the part while checking it.
Use a Water Test to Confirm Hidden Leaks
If you don’t spot the crack under light, move to a water test. Use clean water only. Wet the part you think is leaking, dry the outside, and place it on a paper towel or lint-free cloth. If there’s a leak, you may see a damp spot appear.
When the crack is harder to find, submerge the empty part and watch closely for bubbles. What you’re looking for is bubbles coming from one specific seam or crack, not from a normal opening.
Why to Avoid Glue, Heat, and Sanding During Inspection
Once you’ve narrowed down the suspect area, resist the urge to jump into a fast fix. Don’t use glue, heat, or sanding during inspection. Those can warp parts, cover up the source of the leak, or mess up the thread fit.
For now, stick with visual checks and water tests until you know exactly where the leak starts.
What to Do if the Problem Is a Worn Seal, Loose Fit, or Damaged Converter
If the pen body is dry and the leak shows up at a connection point, the next place to look is the seals and fittings. If you've already ruled out a crack, focus on the seal itself. In most cases, the fix is simple: reseat the part, replace it, or use a tiny bit of silicone grease on intact seals or threads.
Reseat or Replace the Cartridge, Converter, or O-Ring
In cartridge and converter fountain pens, seals usually matter at three spots: where the cartridge or converter plugs into the section, at the threads between the section and barrel, and inside the converter at the piston seal. When one of these stops sealing well, ink can leak out while air slips in.
Start with the easy move: reseat the part. For push-in cartridges and converters, press straight in until it sits firmly. For screw-in converters, turn them all the way until snug. After that, do a quick side-to-side check. If the converter wiggles with obvious play, the seal is probably worn, and reseating it won't last. At that point, replace the part instead of trying to force more life out of it.
A simple test can help narrow it down. If a new cartridge stops the leak, the old cartridge was likely at fault. If the pen still leaks with more than one cartridge, the converter or the section O-ring is the more likely problem.
Use a simple order here: reseat first, replace only if the part still moves or still leaks.
How to Use Silicone Grease Correctly
Only use silicone grease after you've confirmed the part is still intact. It can help threads, O-rings, and piston seals close up more reliably, but it doesn't fix damage. Think of it as a light assist, not a patch job.
Less is better. A pinhead-sized amount on your fingertip or a cotton swab is enough. Spread it around the threads or the seal contact point, then wipe away any extra. Keep it away from the feed and nib, since grease there can block ink flow. If some gets onto the feed by accident, flush the pen with room-temperature water before you ink it up again. If the issue persists, you may need to explore other fountain pen quick fixes to get it writing again.
When a Seal Issue Is Fixable and When It Is Not
| Option | Effectiveness | Risk for Beginners | When Appropriate |
|---|---|---|---|
| Reseating parts | Moderate to high for minor fit issues | Low, if pressure is gentle and straight | First step after cleaning; best for leaks at the cartridge/converter junction |
| Replacing seals or converters | High when wear or damage is visible | Low to moderate; mainly about choosing the right part | When parts show cracks, flattening, or repeated leaks after reseating |
| Using silicone grease | Moderate; helps intact threads and piston seals | Low, if kept away from feed channels | Minor seepage at threads or dry piston movement |
Start with the least invasive fix. Silicone grease is a targeted aid, not a fix for broken parts. If a seal is cracked, flattened, or hardened, replace it.
When Replacement Parts or a New Pen Make More Sense Than a Repair
There’s a point where fixing a leak stops being a repair job and starts becoming a money pit. If the leak comes back after you’ve already replaced the part, the pen body is probably cracked.
That matters because a crack is not the same as a worn seal. Once inspection shows a crack instead of a seal issue, it’s time to stop treating the leak like a minor fit problem.
Cases Where Structural Cracks Mean You Should Stop Repairing
The clearest sign to stop is a crack at a high-stress point: the section threads, the barrel mouth, or the rear piston seal on a piston-filler. These spots take pressure every time you tighten the section or cap, so once a crack starts there, normal use often makes it spread.
If a crack gets larger between uses, the material itself is giving way. And if the leak returns after you replaced the seal part, the body - not the seal - is the problem.
At that stage, glue and heat usually don’t bring the strength back, especially at stress points. More advanced fixes often need special tools and a steady hand. For many modern pens, especially low-cost ones, replacement parts or a new pen often make more sense than trying to chase the same leak over and over.
If your pen uses standard components, check with the manufacturer first. Some brands sell replacement barrels or end caps for a low price. And if the converter is cracked, swapping it out is usually the easiest move, since common converters often cost about $5 to $15.
It also helps to keep a dependable backup pen. That way, you’re not stuck using one that may fail again.
If the pen is still worth keeping, shift your attention to the habits that help stop the same problem from happening again.
How to Prevent Leaks Going Forward
A few small habits can save a lot of trouble:
- Don’t overtighten. Stop when the section or cap feels snug.
- Clean threads and seal areas with water from time to time.
- Store pens nib-up when they’re not in use.
- Keep them away from heat.
FAQs
How can I tell a crack from a bad seal?
Check both the pen’s parts and the way it leaks. A crack is a physical split in the barrel, section, or nib collar. It’s often easier to spot under bright light or with a magnifier. A bad seal usually comes from a loose converter, cartridge, or feed connection.
A suction test can help confirm a bad seal. You can also wrap a paper towel around the section-barrel joint. If the towel gets damp, that usually points to a seal issue. If the pen still leaks but the towel stays dry, a crack is more likely.
Can heat or air travel make a pen leak?
Yes. Heat can make the air inside a fountain pen expand faster than the ink. That pressure can push ink out through the nib.
Air travel can cause the same kind of problem. Changes in cabin pressure can throw off the pen’s internal balance and lead to leaks.
To help prevent this, keep your pen away from hot spots like parked cars or direct sunlight. If you’re flying, either fill the reservoir all the way or empty it completely.
When should I replace the part instead of repairing it?
Replace the part instead of trying to repair it if you spot hairline cracks in the section or barrel, especially on clear barrels. In most cases, a fix only buys you a little time and doesn't bring the part's strength back.
The same goes for converters that still fit poorly or keep leaking after a thorough cleaning, or if ink has gotten inside the piston seal. At $3.00 to $8.00, a new converter is often the better deal. Skip home fixes for deep nib scratches, bent parts, or material rot that shows up across the pen.