

Most dried fountain pen clogs can be cleared with cool water, short soaking, and repeated flushing. In many cases, I’d start with water at 68–100°F (20–38°C), soak only the nib and feed, flush until the water runs clear, and use a pen flush only if water still leaves color behind.
Here’s the short version:
- I use cool to lukewarm water first
- I soak only the nib and feed section
- I flush the pen 5–10 times for light buildup, and 10–20 times for darker or heavier ink
- I use a bulb syringe or converter for light pressure if plain flushing falls short
- I save pen flush for dried ink that water won’t loosen
- I clean converters and cartridges separately
- I let parts dry for 15–20 minutes minimum, and longer if the pen is going into storage
If you want the safest path, it’s this: water first, pressure second, pen flush last. And one rule matters the whole way through: don’t force parts apart and don’t use hot water.
Quick Comparison
| Method | Best for | Time | Risk | What I’d do next |
|---|---|---|---|---|
| Cool water rinse | Light dried ink | 10–30 seconds | Low | Repeat or soak |
| Short soak | Ink stuck in feed channels | 15–30 minutes | Low | Flush again |
| Longer soak | Heavy dried ink | 30 minutes to 2 hours, sometimes longer | Low to medium | Try pressure flush |
| Bulb syringe/converter | Loosened ink still stuck inside | 4–6 flushes | Medium if forced | Move to pen flush |
| Pen flush | Stubborn dried ink | 15–30 minutes | Medium | Rinse 10+ times |
| Separate converter/cartridge cleaning | Ink trapped outside the nib unit | A few cycles or 15–30 minute soak | Low | Air-dry before reuse |
| Drying and reassembly | Stopping weak flow from leftover water | 15–20 minutes or more | Low | Refill and test |
About 80% to 90% of fountain pen cleanup is simple: water, patience, and repeat flushing. The rest is knowing when to stop, rinse again, or use a stronger cleaner for a short time.
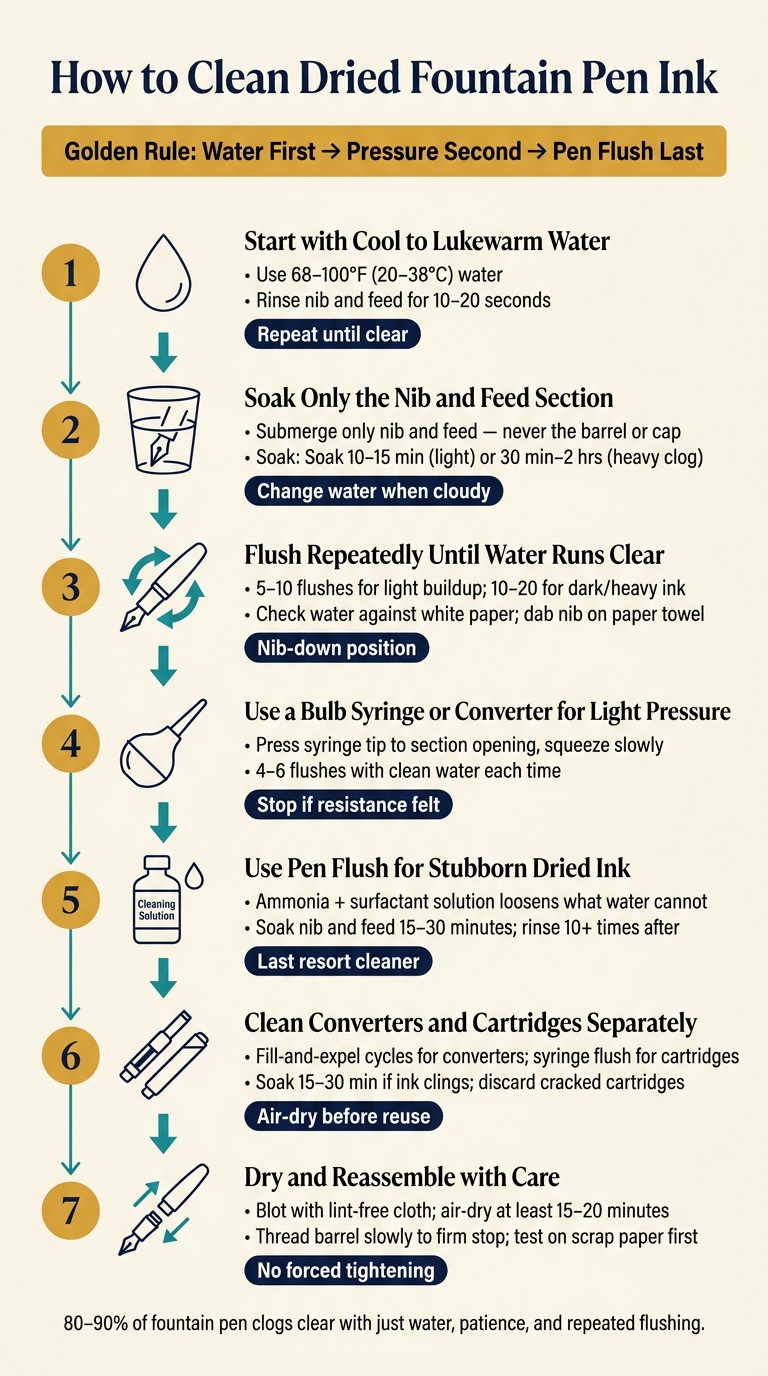
How to Clean Dried Fountain Pen Ink: Step-by-Step Guide
How to clean a fountain pen. Several methods. Also for dried up pens 🖋
sbb-itb-1dd4fe9
1. Start with Cool to Lukewarm Water
Start with cool to lukewarm water. Most fountain pen inks dissolve in water, so a gentle rinse or soak can loosen dried ink and get things moving again. If plain water doesn’t clear the clog, soak the nib and feed only.
Stick to water in the 68–100°F (20–38°C) range. Hotter water can soften plastic feeds, warp the nib unit, or loosen parts held in place with adhesive. If you’re cleaning a vintage pen with an ebonite feed, play it safe and stay closer to the cool end. Ebonite can discolor or swell with warm water.
Take the pen apart first. Unscrew the barrel, remove the cartridge or converter, and set those aside. Only the nib and feed section should go in the water.
For lightly dried ink, rinse the nib and feed under a gentle stream for 10–20 seconds. Repeat until the water runs clear.
For stubborn buildup, soak the nib and feed section in 1–2 inches of cool water for 15–30 minutes. Swap in clean water when it starts looking colored or cloudy.
If you’ve done several soak cycles and the water still runs dark, or ink still streaks out, you’re dealing with a tougher clog. If the ink won’t budge, move on to repeated flushing or a pen flush.
2. Soak Only the Nib and Feed Section
If a quick rinse doesn’t clear the ink, soak only the nib and feed. After removing the cartridge or converter, pull the nib and feed straight out with a gentle, steady motion. Never twist them. Hold each piece at the base, not the tip, and stop right away if you feel resistance. Some pens simply aren’t made to come apart this way.
The reason this helps is pretty simple: the feed has narrow channels that hang onto dried ink. A soak loosens that buildup much faster than a brief rinse.
Keep the rest of the pen out of the water. Don’t soak the barrel, cap, trim, or any moving parts. Those areas can stain, corrode, or lose their finish.
Use a small glass or ceramic cup and add enough cool to lukewarm water to cover the nib and feed. A 10 to 15 minute soak usually works for normal buildup. For a heavier clog, leave them in for 30 minutes to 2 hours. If the water turns colored, change it and keep going. Once the water stays mostly clear, switch to repeated flushing. Next, flush the section to push out the ink that the soak loosened.
3. Flush Repeatedly Until the Water Runs Clear
Once the soak has loosened the ink, flush the pen again and again with clean water. For normal buildup, 5 to 10 gentle flushes are usually enough. Dark or heavily pigmented ink can take 10 to 20 rounds, with short soaks in between. If the water still looks tinted after several cycles, move on to light-pressure flushing.
Fill the pen with clean water using the converter or piston, then slowly push the water out into a cup or sink. Swap in clean water whenever it starts to look cloudy, and keep going until the water runs clear.
Here’s the simplest way to judge it: check the water against white paper, and dab the nib on a paper towel. Stop when the water looks clear and the nib leaves only a faint mark.
As you flush, turn the converter or piston slowly and evenly. Keep the pen nib-down so the water can drain the way it naturally wants to. If the converter starts to bind, don’t force it. Pause, let the nib and feed soak a bit longer, then try again.
A slight tint is fine only if you’re not changing ink colors. If ink still hangs on after all that flushing, the next step uses a cleaner with a bit more help.
4. Use a Bulb Syringe or Converter for Light Pressure
If repeated flushing still leaves ink behind, try a bulb syringe. It pushes clean water through the feed and nib slit, which helps wash out loosened residue.
To use it, remove the cartridge or converter and press the syringe tip firmly against the section opening. Hold the pen nib-down over a sink, then squeeze the bulb slowly and steadily with light pressure. Repeat 4 to 6 flushes, refilling with clean water each time.
No bulb syringe on hand? A converter can do the job as a backup. Reattach it, submerge the nib and feed in clean water, and cycle the piston to draw water in and out. It creates less pressure than a bulb syringe, so a stubborn clog may need a few more rounds. Still, it sends water through the same path the ink uses, which is exactly what you want.
One thing matters here: stop if you feel noticeable resistance. Forcing water through a clog that hasn't softened enough can stress the feed or crack the section. Also, don't block the nib tip with your finger while pressurizing from the back. That can put too much pressure on the feed channels and damage the nib.
If the water still shows color after several cycles, move on to a pen flush.
5. Use a Pen Flush for Stubborn Dried Ink
If plain water and light pressure still leave color behind, it’s time to troubleshoot your fountain pen or try a pen flush. This mild cleaning solution is usually made with water, a small amount of ammonia, and a surfactant. In plain English, it helps loosen dried ink that water alone can’t budge.
Use the flush on the nib and feed section after removing the cartridge or converter. Follow the bottle directions, then soak the section for 15 to 30 minutes. It’s smart to check on it now and then and stick with short soak-and-rinse cycles instead of one long soak.
Be careful with older or fragile pens. If your pen has vintage rubber sacs, delicate plating, or other sensitive parts, check that the solution is safe to use first. Some materials don’t handle ammonia-based cleaners well.
After soaking, rinse with clean, cool to lukewarm water. If you used an ammonia-based solution, 10 or more rinse cycles may be needed. Then do a plain-water soak and a final rinse until the water runs clear and any odor is gone. Rinse well, because any flush left behind can affect ink flow.
Once the pen runs clear, clean converters and cartridges separately.
6. Clean Converters and Cartridges on Their Own
While the nib and feed soak, clean the converter or cartridge on its own.
For a piston or twist converter, pull the converter straight out of the section. Don’t twist it off. Place the open end in a cup of cool to lukewarm water, draw water in by turning the knob, then push it back out. Keep repeating that fill-and-expel cycle until the water comes out almost clear.
If dried ink is stuck inside, let the converter sit in fresh water between cycles. When it’s clean, push out as much water as you can and let it air-dry all the way before refilling.
For cartridges, flush water through the opening with a blunt-tip syringe, then expel it and repeat until the water runs clear. If ink is clinging to the plastic walls, a short soak of 15–30 minutes can help loosen it. After that, let the cartridge drain with the open end facing down, then air-dry it before reuse.
Throw away cartridges with cracks, a misshapen opening, or residue that won’t rinse out.
Set the cleaned parts aside and let them dry fully before reassembly.
7. Dry and Reassemble with Care
Dry every part all the way before you put the pen back together. If any water is left inside, it can thin the ink and lead to weak flow.
Blot the nib and feed with a lint-free cloth, but don't rub the nib tip. Wipe down the barrel and cap too, and check that no moisture is left where the section threads meet the barrel.
After blotting, let the parts air-dry for at least 15–20 minutes. If the feed has deep channels or the pen is going into storage, give it more time. When everything is dry, reassemble the pen slowly so you don't damage anything.
Hold the pen by the section or barrel. Thread the barrel on slowly and stop when you feel a firm stop. Don't force it. Over-tightening can crack acrylic sections or strip plastic threads. Push the converter or cartridge straight in until it stops.
Test the pen on scrap paper first. If the ink looks pale or uneven, let it dry a bit longer. If the pen still has a rough start, compare plain water, pen flush, and longer soaking next. Using a fountain pen cleaning kit can also help resolve persistent flow issues.
Plain Water vs. Pen Flush vs. Longer Soaking
Start with the gentlest fix that has a good shot at clearing the clog. In most cases, that means plain water first.
| Method | Best Use | Strength | Risk | Rinse after? |
|---|---|---|---|---|
| Plain water | Routine cleaning, lightly dried ink | Low | Very low | None beyond normal flushing |
| Pen flush | Stubborn, heavy, or long-dried ink | High | Moderate | Yes - rinse until the water runs clear |
| Extended soaking | Dried ink lodged in the nib and feed | Medium | Low to moderate | Yes - flush again after soaking |
If a pen has been unused for a few days, several flush cycles in cool water will usually do the job. If the water still comes out tinted, soak only the nib and feed section for 2 to 4 hours. When ink has been sitting for weeks or months, extend the soak to up to 24 hours, then flush again.
Pen flush is the strongest option here. Save it for cases where water and soaking don't fix the problem. After using it, rinse with clean water until the water runs clear and there’s no cleaner smell left.
Because ammonia-based pen flush can dull gold plating or affect some plastics if it sits too long, keep the soak to about 30 minutes. Then follow with a plain-water rinse. A short 15-minute soak in clean water after that can help wash out any traces that remain.
Conclusion
Dried fountain pen ink is often a short-term problem. In most cases, cool water, soaking, and repeated flushing will clear a clog without putting the pen at risk.
Once the clog is out, cleaning isn't the whole job. Drying matters just as much. Let every part air-dry all the way before you refill the pen, ideally overnight.
A few small habits can save you trouble later:
- Clean reusable converters on their own.
- Replace cartridges that are cracked or packed with hardened ink.
- Flush with plain water when you switch inks.
- Clean pens in storage every few weeks so ink doesn't build up.
That kind of routine pen care goes a long way in stopping dried ink before it starts.
FAQs
How do I know if my pen is safe to disassemble?
Start with gentle cleaning first. Most piston- and vacuum-fill pens are not made for routine user disassembly, so it’s smart to take the cautious route.
If the nib unit doesn’t loosen with light pressure and a rubber grip, stop there. Pushing harder can damage the threads or seals, and that’s a headache you don’t want.
Skip disassembly with hooded, semi-hooded, or nonstandard nibs. If you do need to go further, identify your pen type first, take a few reference photos, and never use force or pliers. If a part is stuck, soak the section in lukewarm water before trying again.
What should I do if my pen still skips after cleaning?
If your pen still skips after cleaning, soak the nib and feed in lukewarm water for a few hours. That extra time can loosen stubborn residue that a quick rinse leaves behind.
If that doesn’t do the trick, go a bit deeper. Use a mild mix of 1 part clear ammonia to 10 parts water or a dedicated pen flush, then rinse the pen thoroughly with clean water.
It also helps to check the nib tines under 10× magnification for any misalignment. And if ink flow still seems weak, try priming the feed by using the converter or cartridge to push a small amount of ink into the nib.
How often should I clean a fountain pen to prevent dried ink?
Flush your pen with lukewarm water each time you switch ink colors, or about every 2 to 4 weeks during normal use. If you use shimmer, pigment, or iron gall inks, clean it more often - about every 1 to 3 weeks.
If you only use the pen now and then, monthly cleaning is usually enough. Planning to store it for more than 1 to 2 weeks? Empty it and flush it first.
And if the pen starts skipping, railroading, or putting down pale lines, clean it right away.